Accounting
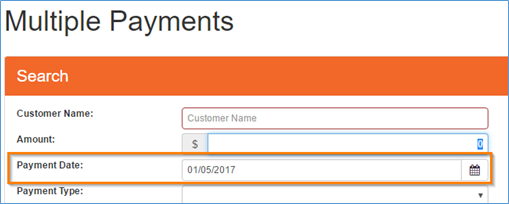
Multiple Payments
- Fixed issue where the multiple payments screen was not always displaying work orders with outstanding balanced for the selected customer.
- Added a ‘Payment Date’ field that will allow you to specify what payment date should be recorded for each of the multiple payments processed
Employee – Job Skills
QuickBooks Transfer
- Added
 (refresh) button to the QuickBooks Transfer panel
 - Changed wording on
 (Choose) drop down to better define what each option represents
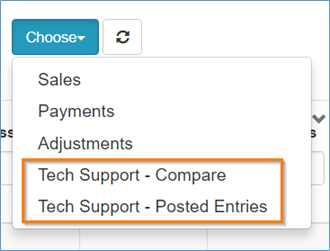
QuickBooks Transfer – Choose (button)
Administrative
Employees
- Removed the following options from
 (Options) menu: Job Skills & Job Skill-Zone
 - Added Job Skills field to the Employee panel. The Job Skills field will allow you to quickly and more easily select multiple job skills to associate with an employee.
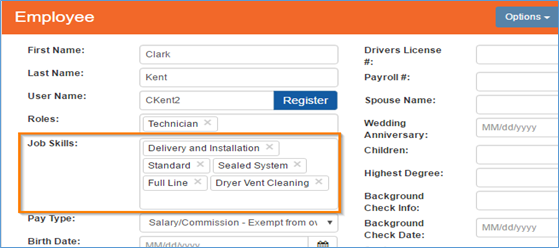
Employee – Job Skills
Customer
General
- Changed ‘Type’ field to be required on the Customer Communication Info panel prior to clicking the
 (Save) button
Address
- Save on new customer panel from the New Order screen will now display an error message if the customer address could not be validated through Google Maps. You will need to verify the address you entered is correct or enter the address through the Customer screen.

New Order - Customer
- You may now enter in latitude and longitude coordinates on the customer record when a new customer address was not locatable. These coordinates will be utilized in place of the customer address in certain areas of SmartWare (e.g. scheduler, travel times, router) and are only available to enter if an approximate match was returned through the Google Map.

Customer Address
- Steps to take if customer address is not located:
- Find Latitude & Longitude coordinates for closes cross streets:
- Open a browser on your computer and navigate to: maps.google.com
- From Google Maps – search for the customer address and verify the address is not found.
- If Address is not found you will need to find the nearest cross streets to where you believe the address is located.
- This can be done by trying one of the following methods:
- Search for the customer’s street name (without street number)
- Search for the customer’s city & state
- This will narrow down the area displayed on Google Maps. From here you will need to move around on the map until you have located the area in which the customer lives.
- Find the nearest cross streets located by the customer’s address.
- Right-click on the place or area of the map
- Select ‘What’s here?’

Google Map
- This can be done by trying one of the following methods:
- Find Latitude & Longitude coordinates for closes cross streets:
- At the bottom of the browser page, you will see a card with coordinate information appear.

Google Map: What’s here?
- Locate the latitude and longitude coordinates. You will need these later to enter into SmartWare on the customer record.
- Latitude: first set of numbers displayed at the bottom of the ‘What’s here?’ popup.

Google Maps: What’s here? - latitude - Longitude: second set of numbers displayed at bottom of ‘What’s here?’ popup.

Google Maps: What’s here? - longitude
- Latitude: first set of numbers displayed at the bottom of the ‘What’s here?’ popup.
- Add Latitude & Longitude to Customer Address record:
- Once you have located the latitude and longitude, you will need to add them to the customer record in SmartWare:
- From SmartWare, navigate to customer record you would like to add latitude and longitude coordinates on.
- From the Customer panel, click (Options) and then select Address.
- The Customer Address panel will load on the right-hand side of the page.

Customer Address
- From the Customer panel, click
- Towards the bottom portion of the Customer Address panel you will notice a section labeled: Google Mapping Address
- You will need to enter in the latitude and longitude coordinates you found from Google Maps
- Lat: enter in the latitude number found using Google Maps as a positive number
- Long: enter in the longitude number found using Google Maps as a negative number
- Click (Save)
- You will need to enter in the latitude and longitude coordinates you found from Google Maps
Dashboard
Owners
- Added Export (button) to the Technician Big Board. (Export is only available from the Owner’s dashboard)
- Export from Technician Big Board will export a list of work orders that compose the Big Board calculations
Technician
- Changed calculation for Job Average column to the following:
- Job Average = (Total Revenue) / (Total Jobs)
- Changed calculation for Closing Rate column to the following:
- Closing Rate = 100 * [(Demand Closed Jobs) / (Demand Closed Jobs + Diagnostic Jobs)]
- Removed Total Hours column from report
- Added the following additional columns to the Technician Big Board:
Field
Explanation / Calculation
Demand Closed Jobs
(Total Completed Jobs) – (Warranty Jobs) – (Diagnostics Jobs)
Warranty Jobs
Includes count of all work orders marked as Job Status = Tech Completed within the report date range and where the Warranty checkbox was selected on the work order.
Dignostic Jobs
Includes count of all work orders marked as Job Status = Tech Completed within the report date range and where the work order is a Diagnostic Only Work Order.
· Diagnostic Only Work Orders: Work orders where only the Diagnostic Task (OO4 or OO5) is marked as an accepted Task.
Total Completed Jobs
(Demand Closed Jobs) + (Warranty Jobs) + (Diagnostic Jobs)
· Total Completed Jobs = count of all jobs that make up the Total Revenue (column)
Dispatch
Dispatch
- Calendar View
- Fixed issue where resizing browser was sometimes causing the calendar view to slide back to viewing midnight.
- Fixed issue where First Call & Last Call jobs with a Status: Ready to Schedule were still showing at midnight if there was a scheduled technician on the work order but the work order was still unscheduled.
- Fixed issue where Time Off entries that were created for less than 1-hour time slot will display correct on the calendar.
- Dispatch View
- Fixed issue refresh was losing page and column sorting values
- Fixed issue where sometimes work orders under the Online view were displaying the incorrect ‘Date Created’
- General
- Additional changes made to help improve speed and performance
Routing Setup
- Job Skills
- Changed Job Skills panel to display one entry per technician which will display all job skills associated with the technician.
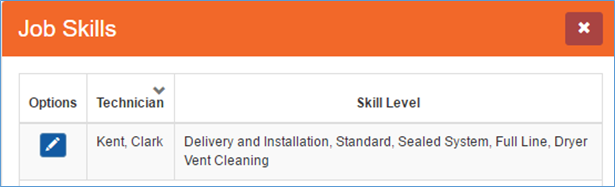
Job Skills – grid view
- Changed Job Skills panel to display one entry per technician which will display all job skills associated with the technician.
- Job Skills edit panel was changed to utilize the multi-select function allowing you to quickly and more easily select multiple job skills to associate with an employee.
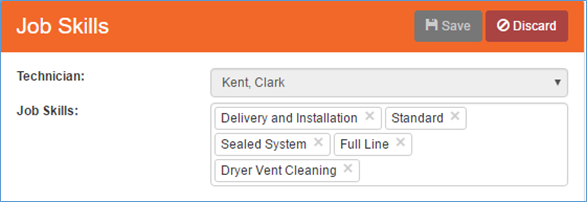
Job Skills – edit/add view
Material
Location
- Following changes were made to the Inventory Detail grid that is visible when editing a Location Part
- Renamed Number column to MFG #
- Added Shelf, Cost and Date Received columns to display on Inventory Detail grid
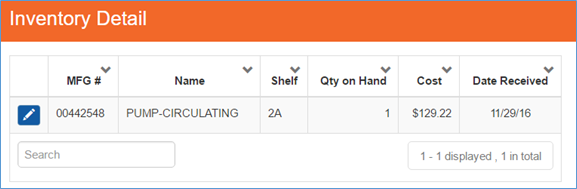
Location – Inventory Detail (grid view)
General
- Added Tech Completed to the work order status combo box if the current status is set to ‘Scheduled’
- Changed default split pay type on a work order from ‘By Time’ to be ‘By Employee’
Parts
- Added ‘Average Cost’ field to Part panel. This will display the average cost of the part from your offices purchase orders for the past 6 months.
- Vendor field has been disabled when editing a part
- Formatted all $ dollar fields to display out to 2 decimal places
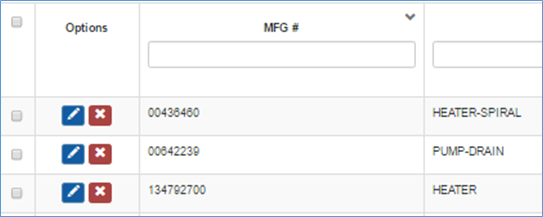
Reorder
- Added
 (Delete Reorder Point) button next to an item on the Reorder grid.
- Clicking the (Delete Reorder Point) button will delete the reorder points from Location > Material panel which in turn will remove the material entry for a specific location from appearing on the reorder panel to order.
Dispatch - Calendar View (bucket details)
- Clicking the
- Fixed issue where under certain conditions the Reorder panel was displaying additional inventory entries on the reorder grid.
Report
Technician Mobile Route Sheet
- Fixed issue where the warranty column was not always showing accurately
- Fixed issue where the report was including all payments on the work order, not just the payments that were made based off report date
Work Order
General
- Fixed bleed through issue where tax authorities were appearing on work orders for another franchise if both franchisees had a tax authority setup with the same zip codes or localities
- Resolved issue when creating a new work order where selecting a customer’s secondary address was defaulting the work order address field to the customer’s primary address instead of the customer address that was selected
- Work Orders received from the Mr. Appliance website will now include ‘Repair Needs’ received from the MRA website in the work order job description note
Adjustments
- Resolved issue where Adjustments (tab) was opening in a pend state. This was causing issues trying to close the Adjustment (tab) before any changes were made.