Accounting
QuickBooks Transfer
- Payments (view):
- Removed column for ‘Batch Status’ since only approved batches will appear in the QB Transfer > Payments grid
- Added column for ‘Type’ to display the payment type that was selected on the payment record
- Authorization Code will now transfer to QuickBooks and will appear in the reference number field
- Sales (view):
- Removed column for ‘Batch Number’ and ‘Batch Status’ since batches do not apply to Sale items
- Added column for ‘Type’ to display wither the line item is Task or Tax
- Made change to the transfer screen to not allow you to send only part of a Sale item (Task or Tax) when filtering the Sales (view) panel and clicking Transfer. If a Sale or Tax item is transferred, then the other corresponding item will transfer as well
- Fixed issue where transfer errors were not displaying if an issue occurred while trying to transfer a Sales item to QuickBooks
- Adjustment (view):
- Removed column for ‘Batch Number’ and ‘Batch Status’ since batches do not apply to Adjustment items
- Added column for ‘Type’ to display wither the line item is Credit Memo or Credit Memo Tax
- General
- Fixed issue where credit memos were appearing in QBs with the Credit Memo ID instead of Invoice Number on the Credit memo NO. line
Administrative
Employee > Options
- Options:
- Options requiring a value of ‘true’ or ‘false’ will automatically change to lowercase once the entire word is typed. Previously this was causing an issue with enabling/disabling options if capital letters were used.
- Change Passwords:
- Fixed issue where ‘Save’ on Change Password screen was not validating the password met the requirements. If the password entered does not meet the requirements, then a message will appear stating “Password not changed….” Along with a message stating what requirements were not met.
Dashboard
General
- Change made to help optimize dashboard performance
- Closing the Dashboard will clear out all search criteria that was previously entered. Reloading of Dashboard will default back to current day only
- Multiple changes made to ensure accuracy of information displayed between Owner Dashboard and Technician Dashboard
Owner Dashboard
- Change made to following calculations:
- Closed Job Statistics = Demand Total Jobs - Diagnostic Only Jobs
- Warranty Revenue (%) = Revenue (Warranty) / Revenue (Combined)
- Added ‘Demand Closed’ column to Owner Export
Technician Dashboard
- Change made to following calculation(s):
- Total Tech Completed = Demand Closed Jobs + Warranty Jobs + Diagnostic Jobs
- Removed ‘Recall Jobs’ filter option since the detail export is now including a column for ‘Recall’
Dispatch
General
- Fixed issue where work orders with no active technician listed and were the work order was skipped during the routing process were not appearing on Dispatch under Dispatch: View or Dispatch: Calendar
Daily History
- Added Daily History panel. The Daily History panel will display a list of all work orders that have been scheduled on the selected date. If a work order was scheduled on more than one day, then the work order will show on each of those days.

Daily History
- To access, navigate to: Dispatch > Daily History:
- Below is an explanation of the different Filter Options available for Daily History:
Filter
Functionality

Date Selection: Will allow you to select a single date to filter Daily History by

Allows you to select a single territory to filter Daily History by
· Territory is used in conjunction with the Date Selection allowing you to select a single day and territory to view
· Note: Territory is only visible if you have more than one territory setup

Will allow you to refresh the information displayed on the grid. Useful when coming back to the Daily History tab from another tab since the Daily History panel will not automatically refresh

Will export the Daily History grid to an excel file

Will close the Daily History panel
- Below is an explanation of the different Filter Options available for Daily History:
New Dispatch View
- We have implemented the initial redesign for the Dispatch screen
- This screen is still in early design stages and not all functions may be fully implemented at this time. However, we wanted to provide users with the chance to view the coming changes ahead of full implementation.
- Until the feature has been fully developed you will still have access to the original dispatch design.
- To view the initial dispatch redesign, from the Dispatch page click the ‘preview’ button found in the top section of the page next to ‘Search WO #’
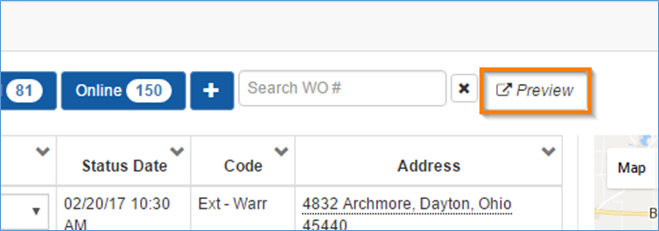
New Dispatch - preview - The new dispatch layout will open as a separate page allowing you to access the new view. The ‘Preview’ button will change to say ‘Original’.
- Click on the ‘Original’ button will toggle you back to the original dispatch view.
- Below is a list of changes that have been implemented on the New Dispatch:
- Dispatch View – Changes:
- Added tool tips for each of the Dispatch Views. In order to view the tool tip associated with a dispatch view, hover your cursor over the (#) displayed to the right of a Dispatch View.

Dispatch View – tool tip
- Added tool tips for each of the Dispatch Views. In order to view the tool tip associated with a dispatch view, hover your cursor over the (#) displayed to the right of a Dispatch View.
- Tech (column) will display an orange circle icon if there are secondary technicians listed on the work order. Hovering your mouse over the icon will display the name(s) of the secondary technicians

Dispatch View – Secondary Techs - Date Scheduled (column) will display the time slot that was selected on the work order

Dispatch View – Time Slot - The following sort order changes were made on the Dispatch views to show what’s ready to schedule with the most current date first:
Dispatch (view):
Sort Order

Sorted by Date Promised column (descending)

Sorted by Date scheduled (descending)
- Below is a list of the definition changes made on the new Dispatch layout:
Dispatch (view):
New Definition:
Original Definition:
Displays a list of WOs with Job Status: ‘Ready to Schedule’ and where the work order meets ALL of the following conditions:
· Date Scheduled is greater than or equal to today
· There are no Open purchase orders associated with the work order
Displays list of WOs with Job Status: ‘Ready to Schedule’ and work order was not previously marked ‘Active’
Displays a list of WOs with Job Status: ‘Ready to Schedule’ and where the work order meets ONE of the following criteria:
· Date Scheduled less than today
· Date Scheduled is greater than or equal to today and WO has open purchase orders associated with it
Displays list of WOs with Job Status: ‘Ready to Schedule’ and work order was previously marked ‘Active’

Displays a list of all work orders that meets all of the following conditions:
· Job Status = ‘Ready to Schedule
Date Scheduled is less than the current date
‘New tab’ - does not exist on original Dispatch
- Dispatch Calendar – Changes:
- Colored line change for certain work order types. Below is an explanation of each new color:
Color
Functionality

Medium Blue: Represents a work order where Warranty box was selected.

Dark Grey: Represents a work order where the Time Slot = First Call

Dark Blue: Represents a work order where the Time Slot = Last Call
- Colored line change for certain work order types. Below is an explanation of each new color:
General
- Fixed issue on the following screens when entering numbers with decimal places where it was not always properly recognizing the decimal number entered:
- Panels with fix implemented: Batches, Multiple Payments, Work Order Adjustments and Work Order Payments
- We have started the initial process of adding a knowledgebase into SmartWare.
- You may access the knowledgebase by clicking the
 (technical support) icon found next to your login name in the top right of the page. Content will be coming soon.
- You may access the knowledgebase by clicking the
- Added capability to migrate over customer and work order file attachments from Zware into SmartWare. Each office will be notified once your file attachments have been successfully uploaded into SmartWare.
- Added a
 (Show All) button to the following panels in SmartWare:
- If more than 250 records exist, the button will say
 (Show 250)
- Accounting: Batches, Multi-Payments, Invoicing and QBO Transfer
- Administrative: Employees
- Customer: Customer Search
- Material: Locations, Parts, Purchase Order Search, Receiving and Reorder
- Work Order: Work Order Search
- Below is a brief explanation of the new feature:
Item
Functionality
Button toggles between ‘Show All’ & ‘Show Only 10’
· If clicked, will display all available grid rows
Button toggles between ‘Show 250 & ‘Show Only 10’
If clicked, will display 250 grid rows per page

Button toggles between ‘Show All’ & ‘Show Only 10’
· If clicked, will only display 10 grid rows per page.
- If more than 250 records exist, the button will say
Login
Reset Password
- Implemented ‘Forgot your Password?’ functionality on the Login Page.
- From the SmartWare Login page, click Forgot your Password? (below the Login button)
- Enter in your SmartWare username
- Press
 (Send Reset Email) button
 - An email will be sent to the email address on file for your user account with instructions on how to reset your password
- If an email address has not been associated with your account or you do not know the email address that was used when setting up your account, you will need to contact your office manager for assistance.
Reports
Jobs for Next 5 Days
- Fix made to ensure that the Jobs for Next 5 Days report is properly filtered by franchise.
Setup Franchise
Options > Options
- Options requiring a value of ‘true’ or ‘false’ will automatically change to lowercase once the entire word is typed. Previously this was causing an issue with enabling/disabling options if capital letters were used.
Work Order
Customer Receipt
- Fixed issue where work orders created on the iPad and then synced back to SmartWare were not displaying job or billing address on the customer receipt
Combined Work Order
- We have implemented the initial redesign for the work order allowing for easier access and viewing of work order related information all from one screen. This screen is still in early design stages and not all functions will be fully implemented at this time. However, we wanted to provide users with the chance to view the coming changes ahead of full implementation. Until the feature has been fully developed you will still have access to the original work order design. Stay tuned for additional changes coming soon!
- To view the initial work order redesign, from any work order click the ‘Open Combined View’ button found in the top-right corner beneath the WO #.

Open Combined View
- To view the initial work order redesign, from any work order click the ‘Open Combined View’ button found in the top-right corner beneath the WO #.
- The new work order layout will open in a separate tab allowing you to access the new view while still being able to toggle back to the original work order view as needed
- The combined work order view has been designed to allow access to more information from a single screen. You will notice several of the work order options that were previous found under Work Order > Options menu are now visible from the combined work order view.

Combined Work Order - Available work order option will appear beneath orange section labels.
- Located to the right of each orange section label you will notice either a closed or opened lock icon. Below is an explanation of each option:
Item
Functionality

Show Unlocked View: Expands section allowing you to view/edit/add information

Show Locked View: Collapses section to take up less real estate on the page
Bucket Scheduler
- Change made to clear out previous routing messages when the work order is rebooked into a new bucket time slot.
General
- Changed Work Order to no longer require receiving purchase orders before marking the work order as Reviewed. Instead if there are opened purchase orders associated with the work order, when you mark the work order as Status = ‘Reviewed’ a message will display notifying you of the opened purchase orders.
Simple Scheduler
- Fixed issue where Simple Scheduler was not accounting for work orders that were currently marked ‘Active’ when returning availability
Split Pay
- Fixed issue where ‘Discard’ button on Work Order > Split Pay panel was sometimes causing an error message
Work Order Receipt
- Fixed issue where work order receipt was only displaying authorization signature and was not including completion signatures. If no signature exists, then neither the signatures nor the remote authorization wording will print on the work order receipt.