Downtime for Release of 1.31 was 11/02/2017 from 9:00 PM - 11:00 PM (EDT). Downtime is to allow for the new version update to be applied to SmartWare.
Action Required
New Site Address for SmartWare
- The SmartWare website address has been changed to a more user-friendly version. The old website address will no longer be available. You will be automatically redirected to the new address below. Please make sure to update any existing bookmarks you have saved to reflect the new website address.
-
- New website name: https://mra.servantia.com
-
Accounting
Invoicing
- Added sort option to 'Balance' column allowing you to sort the Invoicing grid based off the Balance column
- Replaced filter drop down list on 'Balance' column with text filter option. Users may now type in a value to filter the 'Balance' column by.
- To search for 0 dollar invoices you must enter '$0.00' in the filter option
- Added 'Claim Submitted?' column to AR ALL grid on Invoicing panel
- 'Claim Submitted?' column will display checked/unchecked depending on if the claim submitted box was selected on the work order.
- Added 'Warranty' column to Invoicing grid.
- 'Warranty' column will appear checked/unchecked depending on if the Warranty box was selected on the work order.
- Added filter option to Warranty column to display All/Warranty/NonWarranty.
- By default the Warranty column will be defaulted to 'All'
- All: Will display all work orders in the Invoicing grid regardless of if the warranty box is selected or not
- Warranty: Will filter the Invoicing grid to only show work orders where the warranty box was selected on the work order
- NonWarranty: If selected will filter the Invoicing grid to only show work orders where the warranty box was not selected on the work order
- By default the Warranty column will be defaulted to 'All'
- Added
 (Statements) button to bottom of AR All panel. (Statements) button will generate a statement report displaying all amounts owed on past invoices for a specific customer.
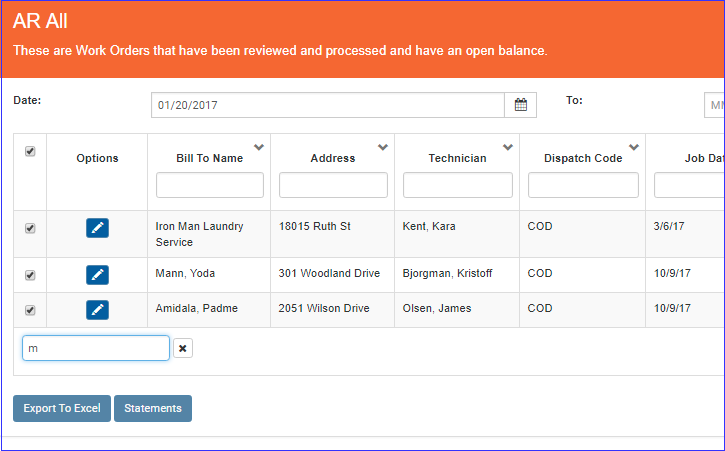
Invoicing - AR ALL
- Statements will be generated for each customer currently displayed in the AR ALL grid. (i.e. if a customer has been unselected from the list or the list has been filtered to exclude certain customers, then those customers will not have a statement generated)
- When printing statements for more than one customer, each customer's statement will start on a new page
- Report header 'Statement as of ....' will populated based off date the Statement was generated
- Changed Mr. Appliance address to appear in the appropriate location so that it will be visible through the 'from' window on an envelope for easier mailing
- Added Accounts receivable aging section to the Statements report. The AR Aging section will be broken down to display a sum of overdue balances based off the length of time the invoice has been outstanding.
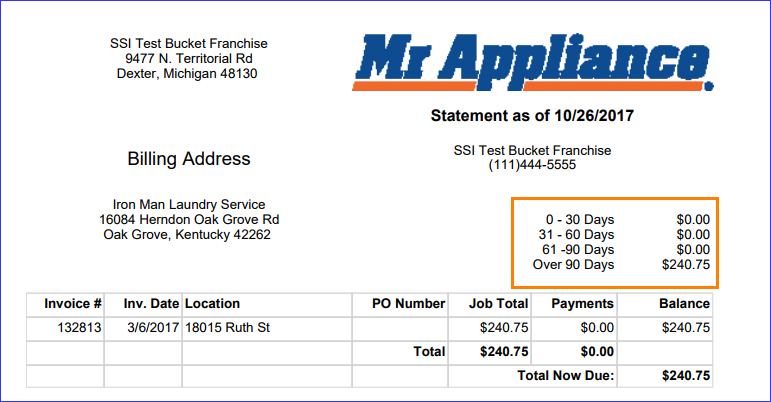
Statements
- Below is a brief explanation of each row of the AR Aging section:
- 0-30: Sum of outstanding balance for all invoices that are 30 days old or less
- 31-60: Sum of outstanding balance for all invoices that are 31 - 60 days old
- 61-90: Sum of outstanding balance for all invoices that are 61 – 90 days old
- Over 90: Sum of outstanding balance for all invoices that are 90 days old or older
- Below is a brief explanation of each row of the AR Aging section:
QuickBooks Transfer
- Resolved issue where left-clicking the (Transfer) button with a mouse and then clicking the 'Enter' key on a keyboard was causing duplicate postings to QuickBooks Online
- Resolved issue where under rare cases some non-warranty work orders were being transferred to QuickBooks and work order task amounts were being applied against the Warranty Parts and/or Warranty Labor QB Accounts instead of the appropriate QB Account associated with the MPG task
Administrative
Employees
- Added 'Meeting' and 'Vacation' as options to select in the 'Reason' drop-down box on the Employee | Time Off panel when adding a new time off record to an employee
- Added capability for employees to set their default preference for how work order blocks are displayed on the Dispatch Calendar. Users will now have the capability to view work order blocks on the calendar by Customer Name, Customer City, or Postal Code. Prior to this change, users could only view work order blocks based on customer postal code.
- Setup
- Dispatch Schedule Item is an employee option
- From SmartWare, navigate to Administrative | Employees and then click the
 (edit) button next to the employee you would like to change the Dispatch Schedule Item Type for
 - From the employee record, navigate to
 (Options) drop-down and select Options
 - The Employee – Employee Options panel will load on the right side of the page
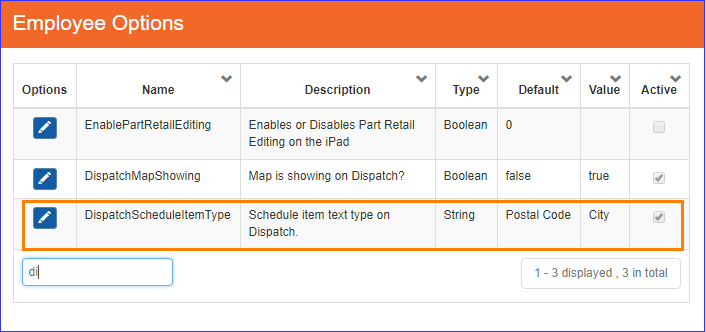
Employee – Employee Options grid - From the Employee Options panel, click the
 (edit) button next to DispatchScheduleItemType
 - From the Employee - Employee Options (edit) panel you will need to enter either Postal Code, Customer Name, or City in the Value field depending on which option below you would like to utilize.
- After editing the Value field, click the
 (Save) button to save your changes
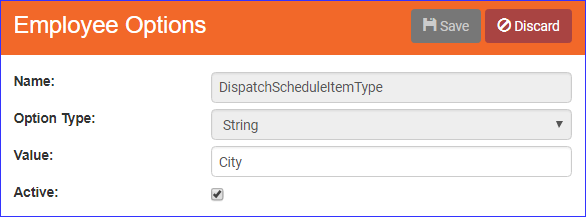
Employee – Employee Options (edit view)- Below is an explanation of the different values for DispatchScheduleItemType
Setup Value
Functionality
Postal Code
(default value) Will display work order blocks on the Dispatch Calendar based on customer postal code
Customer Name
Will display work order blocks on the Dispatch Calendar based on customer name
City
Will display work order blocks on the Dispatch Calendar based on customer city
- Below is an explanation of the different values for DispatchScheduleItemType
- Setup
- Added capability for employees to set their default preference for whether the Dispatch map is visible or hidden. Users will now have the capability to choose whether to show or hide the Dispatch Map
- Setup
- From SmartWare, navigate to Administrative | Employees and then click the (edit) button next to the employee you would like to change the Dispatch Map View option for
- From the employee record, navigate to
 (Options) drop-down and select Options
 - The Employee - Employee Options panel will load on the right side of the page

Employee – Employee Options - From the Employee Options panel, click the
 (edit) button next to DispatchMapShowing
 - From the Employee Options edit panel, you can set the option to true if you would like the map to show or false if you would like the map hidden
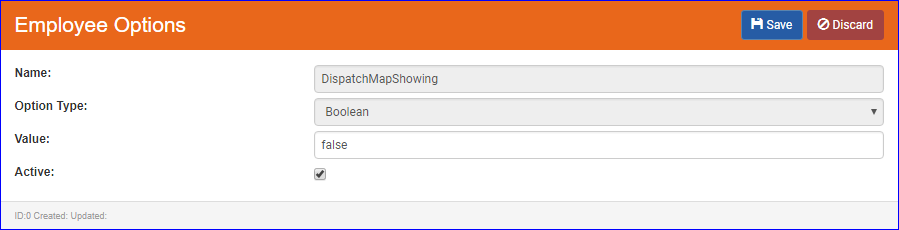
Employee – Employee Options (edit view) - Click the (save) button to save your changes
- This option will be changed automatically to reflect whether the user has the Dispatch Map toggled to show or hide on the Dispatch screen
- From SmartWare, navigate to Administrative | Employees and then click the
- Setup
Menu Pricing Guide
- Added capability to copy an MPG from one territory to another territory within the same Franchise. Please work with your Franchise Consultant or SmartWare Support if you need to have a MPG replaced with one from one of your other territories.
Customer
Customer Search
- Added capability to search by city and email address
- Searching for a customer name using a comma in the name will trigger a 'starts with' search rather than a 'contains' search (i.e. searching for 'mann, yoda' would find 'Mann, Yoda' but not 'Sandmann, Mister')
- Searching by phone number will be a 'starts with' search unless searching with a seven digit phone number
- Searches by Postal Code, City, Address, and Email will all be 'starts with' searches
General
- Removing all information from the Customer Special Info text box will now remove the customer name from appearing highlighted in red
Dispatch
Calendar
- Added grey/white alternating row colors on Dispatch Calendar rows to make each row more pronounced
Dispatch Calendar - Resolved issue where bucket scheduler work order popup list was not always aligned on the Dispatch Calendar next to the appropriate bucket
- Following changes were made to technician rows where the technician's employee record has been marked inactive but the technician is still appearing on the Dispatch Calendar because there are open work orders still assigned to the technician:
- Inactive Technician rows will appear towards the bottom of the Dispatch Calendar
- Change made to prevent dragging a work order to an inactive technician row. You will now receive a Red message indicating 'You can't move an event to disabled tech:...' message and you will be prevented from reassigning the work order to the inactive technician.

Dispatch Calendar - disabled tech message - Right clicking on an inactive employee row will display a list of work orders that the technician is still associated with allowing you to quickly see which work orders need to be reassigned or updated.
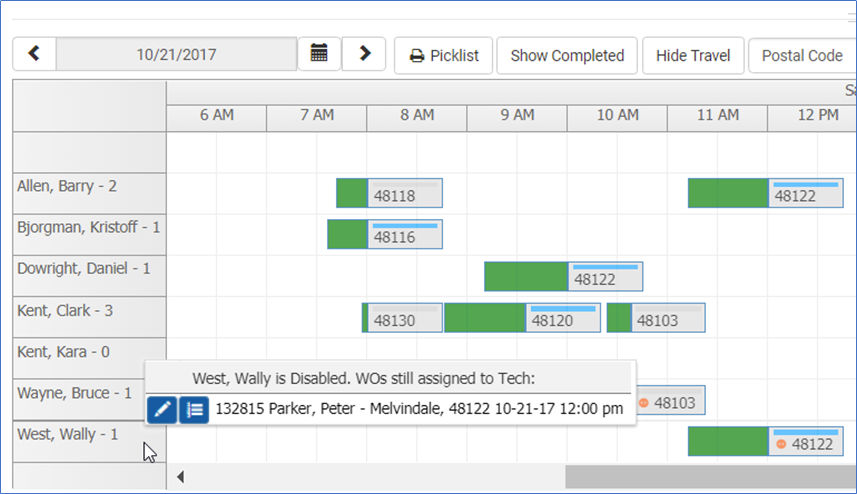
Dispatch Calendar - Inactive Tech - WO List
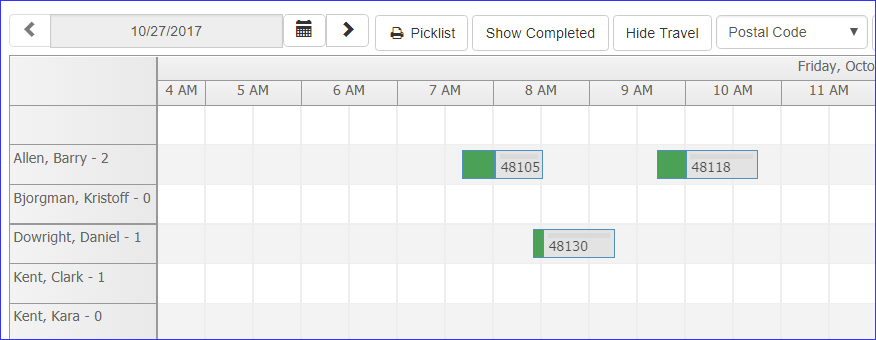
- Added new drop down option to Dispatch Calendar that will allow users the capability to select to view work order blocks on the calendar by Customer Name, Customer City, or Postal Code

Dispatch Calendar- Below is an explanation of the different view work order block options:
Setup Value
Functionality
Postal Code
(default value) Will display work order blocks on the Dispatch Calendar based on customer postal code
Customer Name
Will display work order blocks on the Dispatch Calendar based on customer name
City
Will display work order blocks on the Dispatch Calendar based on customer city
- Selecting a Dispatch Schedule Item Type from the dropdown box will automatically update the DispatchScheduleItemType Employee Option for the logged in user. This will allow SmartWare to remember the last option the user selected to view work order blocks by on the Dispatch Calendar
- Below is an explanation of the different view work order block options:
- Work order block will display Postal Code, Customer Name, or City based off Employee Option setting selected per employee. Please see Administrative | Employee section of release notes for more information over this feature.
- Following changes were made to the scheduled work order tooltip window:
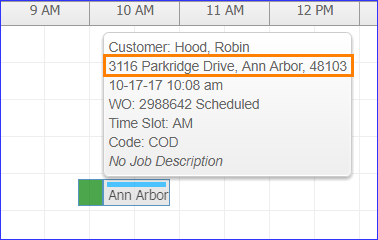
Dispatch Calendar - work order tooltip
- Added Address line on scheduled work order tooltip. Address line will appear below the customer name and will display the customer address, city and postal code.
- Removed Warranty: indicator line from tooltip since this can be determined by looking at the color coding on the scheduled work order block
- Added scroll bar to bucket work order list. Scroll bar will only appear if there are more than 12 work orders in the Dispatch Calendar Bucket you are trying to view the bucket work order list for.
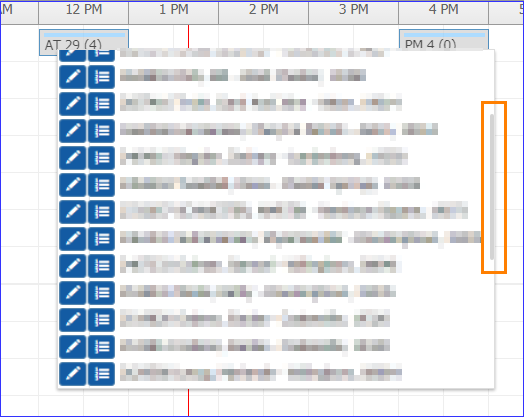
Dispatch Calendar - Bucket Work Order List
Dispatch
- Added grey/white alternating row colors on Dispatch grids to make each row more pronounced
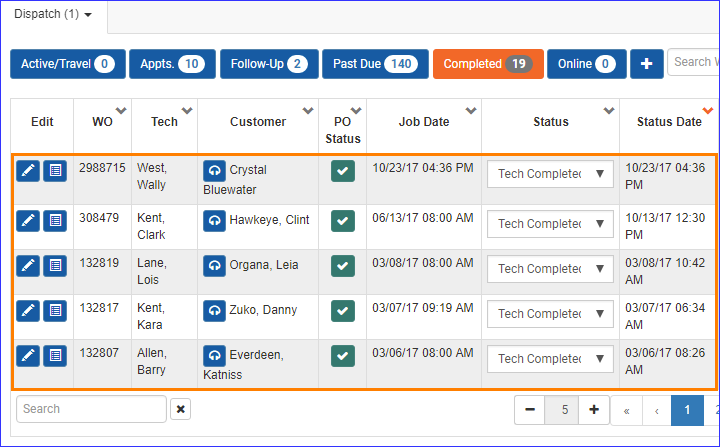
Dispatch View - Improved load time when returning to the Dispatch tab
- Resolved issue where refreshing the browser on the Dispatch tab failed to load the data
Map
- Work order popup on Dispatch | Map will now display the time slot listed on the work order
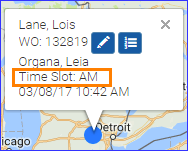
Dispatch Map - Work Order popup - Added a toggle button to hide/show the map.
 will collapse the Map section of the Dispatch screen.
  will expand the Map section to its previous size
 - When the map is resized so that it can barely be seen, it will automatically hide
- If the map is resized from hidden to something smaller than the threshold for automatic hiding, it will expand it to show the map
- The Calendar section of the Dispatch screen will re-center the schedule when the map is toggled
- User preference for hide/show of the Dispatch Map will be automatically saved as an Employee Option and will persist after browser refresh and logout/login. See Administrative | Employees for the explanation of how to manually change the setting
- Technician location updates more frequently
General
Primary Phone/Email
- Following changes apply to any type of communication records in SmartWare (i.e. Customer Communication, Employee Communication, Vendor Communication and Franchise Communication)
- First phone and email added to a communication record will always be set to 'primary'
- Primary phone numbers and emails will be displayed on the Communication Info grids with a blue star indicating that they are the primary phone or email for the communication record
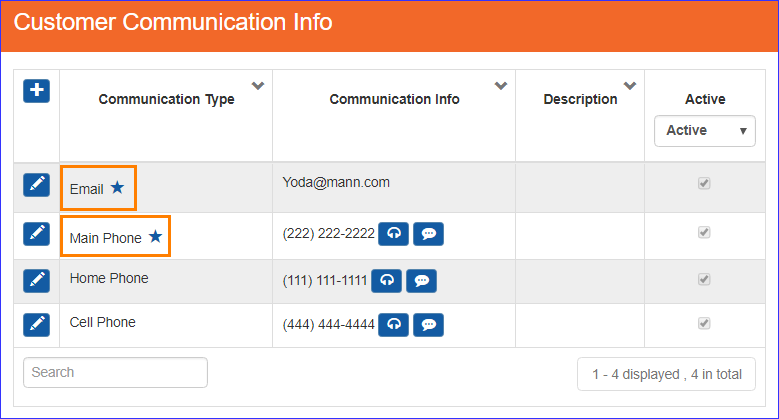
Customer Communication Info - grid - Editing a primary record will display a disabled button labeled 'Is Primary' allowing you to see the communication record you are currently changing is listed as either the primary phone or primary email
- Communication records that are marked as primary cannot be unchecked as 'active'
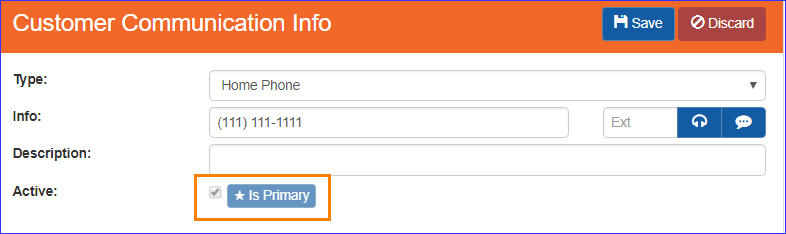
Customer Communication Info (edit)
- Communication records that are marked as primary cannot be unchecked as 'active'
- Added
 (Make Primary) button to Communication Info (edit) panel. Clicking the (Make Primary) button will change the current communication info record you are on to the primary phone or email record
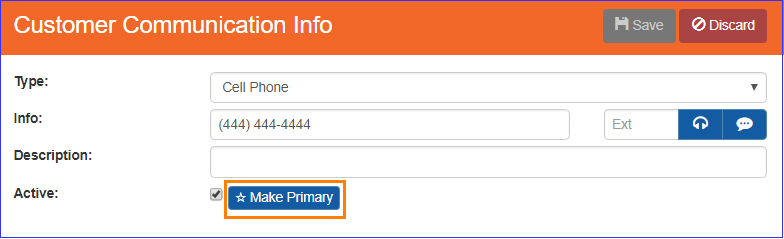
Customer Communication Info (edit)
Material
Parts
- Base Cost calculation will be determined based off your Setup Franchise Option
- If the Option is 'False', base cost will be the Marcone Suggested Cost for Marcone parts, and user specified cost for User Added parts. If there is no Marcone cost or user specified cost, the cost will be $0
- If the Option is 'True', base cost will be the highest value from whichever criteria below is higher:
- Marcone Suggested Cost
- Highest Part Cost from qualified purchase orders:
- A PO 'qualifies' if it has met the following conditions:
- PO was created in SmartWare
- PO belongs to the franchise
- PO was created within the last 120 days
- PO's Part Cost > $0.01
- PO's Part Cost is within 2 standard deviations of the average Part Cost of POs meeting requirements 1-4 above
- A PO 'qualifies' if it has met the following conditions:
Physical Inventory Scan
- 'Expected' column will now show the location count at the time the scan was done
- Added
 (Export) button to the Physical Inventory Scan - Review panel. For each Work Order that hasn't been reviewed but contains parts that were expected on the Inventory Scan, the exported file will list the MFG number, the Name, the Work Order number, the Status of the Work Order, and the Quantity of the Part used on the Work Order. The exported file will be a CSV file.
Online Jobs
MrAppliance.com
- Per Mr. Appliances request: SmartWare has made a change to limit the Appliance Brand selection list that will be available for online websites. In the near future MrAppliance.com will begin picking up these changes and only displaying the following list of brands.
- Brand List: Amana, Asko, Bosch, Dacor, DCS, Electrolux, Elmira, Equator, Faber Range Hoods, Fisher & Paykel, Frigidaire, Gaggenau, GE Monogram, General Electric, Haier, Hotpoint, Jenn-Air, Kenmore, KitchenAid, LG, Marvel, Maytag, Miele, Other, Panasonic, Samsung, Sanyo, Sharp, Sub-Zero, Thermador, Viking, Westinghouse, Whirlpool, Wolf, Zephyr
- All requested changes for the Brand list available online should be submitted to your FC for review and approval since the Brand list is shared between all Mr. Appliance franchises
Reports
General
- Changes made to help with performance when running reports
Statement
- Removed 'Statement' report from Reports section since statements should now be run from the Invoicing panel
Setup Franchise
Options | Options
- Added capability to choose whether Purchase Order costs are considered in calculating the base cost of parts
- To include PO cost in the Part base cost calculations you will need to perform the following steps:
- Navigate to Setup Franchise | Setup and select Options from the (Options) drop-down
- The Franchise Options panel will load on the right side of the page

Franchise Options - grid
- Navigate to Setup Franchise | Setup and select Options from the
- Click the (edit) button next to IncludeFranchisePOCostInPartCostCalc
- From the Franchise Options (edit) panel you will need to enter 'True' in the Value: field and then click the
 (Save) button
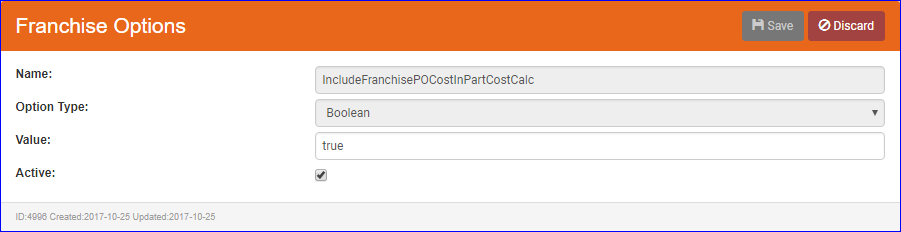
Franchise Options (edit) - Once this option has been set to true, your PO cost will be included in the calculations for the base cost of Parts. See Material | Parts for the explanation of how base cost will be calculated
Options | Zones
- Resolved issue where under certain conditions the (Save) button on the Zone detail screen was not always reassigning the Zone assignment on all open work orders as needed based on the Zone/Postal Code changes that were made
Work Order
New Order
- Added 'Bill To' and 'ACH' as options to select in the Payment Method drop-down box
General
- Resolved issue where changing the dispatch code on a work order was not properly updating the Zone appropriately.
- Resolved issue where selecting a Zone on a work order and clicking (Save) button was not always retaining the selected Zone.
Payments
- Added new payment type of 'ACH' and 'Promotions - Discounts'
- For offices wishing to use the new 'ACH' or 'Promotions - Discounts' payment methods in SmartWare you will need to make sure you have a payment method of 'ACH' and 'Promotions - Discounts' setup in QuickBooks. If these payment methods are not setup in QuickBooks then the QuickBooks Transfer will be unable to transfer payments with these payment types associated with them.
- Payment Methods can be added to QuickBooks by clicking on the 'gear' icon and navigating to All List | Payment Methods. From the Payment Method screen, click the 'New' button to add a new payment record.
- Make sure to spell the payment name exactly as it appears in SmartWare
- Payment Methods can be added to QuickBooks by clicking on the 'gear' icon and navigating to All List | Payment Methods. From the Payment Method screen, click the 'New' button to add a new payment record.
- For offices wishing to use the new 'ACH' or 'Promotions - Discounts' payment methods in SmartWare you will need to make sure you have a payment method of 'ACH' and 'Promotions - Discounts' setup in QuickBooks. If these payment methods are not setup in QuickBooks then the QuickBooks Transfer will be unable to transfer payments with these payment types associated with them.
Print
- Added print option of 'Invoice - Warranty'. Selecting 'Invoice - Warranty' will generate an invoice report for the work order without any dollar amounts displayed.
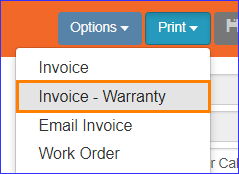
Work Order - Print
Simple Scheduler
- Resolved issue where under certain conditions the Simple Scheduler for current day was displaying a technician start time prior to the current time
Send Confirmation
- Changed how the Job time frame is determined/calculated in the Confirmation message
- Start/End time frame will be rounded to the closet quarter hour
- Start Time:
- AM Jobs with a Start Time of 8:00 AM or before: Confirmation beginning time frame will display 15 minutes before actual work order start time (rounded to earliest quarter hour)
- PM jobs (jobs with a start time of 12:00 PM or later) will not display a confirmation beginning time frame prior to 11:45 AM.
- (i.e. Job Start Time is 12:05 PM. Send Confirmation would see that 30 minutes prior to 12:05 PM would put the Confirmation Start Time at 11:35 AM which is prior to the 11:45 AM allowed start time for PM jobs. Send Confirmation message would display a start time of 11:45 AM)
- All other jobs: Confirmation beginning time frame will display 30 minutes prior to work order start time (rounded to earliest quarter hour)
- End Time:
- Confirmation end time frame will display 30 minutes after the work order end time (rounded to the latest quarter hour)