Accounting
Batches
- Added capability to enable/disable Batches in SmartWare
- Please see Setup Franchise section of this document for detailed instructions
- Added ‘Check’ validation section when marking a batch as closed
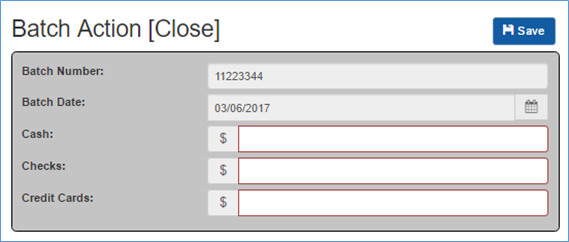
Batches Action [Close]
- See below for an explanation of the amounts that should now be entered in each section when marking a batch as closed:
Field Option
Functionality
Cash
(Currency field) Represents the total dollar amount of all non-credit card and non-check payments that are included in the batch
- (e.g. Cash, Refunds, Warranty EFT, Other, Promotions - Discounts)
Checks
(Currency field) Represents the total dollar amount of check payments that are included in the batch
Credit Cards
(Currency field) Represents the total dollar amount of credit card payments that are included in the batch
- See below for an explanation of the amounts that should now be entered in each section when marking a batch as closed:
QuickBooks Transfer
- Improvements were made to the QuickBooks Transfer to help handle specific situations with negative tax amounts, inactive credit memos and the use of the taxable flag on a part by part basis instead of the whole work order. Most data issues in QuickBooks have already been resolved by support staff. Feel free to contact support with any additional questions you may have regarding these changes.
- Added ‘Exceptions’ choose option on QuickBooks Transfer
- From SmartWare, navigate to Accounting | QuickBooks Transfer and select ‘Exceptions’ from the choose option drop down
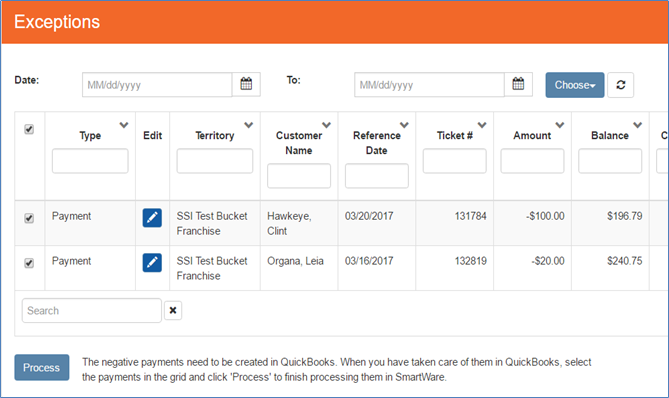
QuickBooks Transfer – Exceptions
- From SmartWare, navigate to Accounting | QuickBooks Transfer and select ‘Exceptions’ from the choose option drop down
- Any items appearing under the Exceptions panel will need to be handled in QuickBooks
- Once you have addressed an exception item in QuickBooks, you will need to perform the following steps in SmartWare:
- Navigate back to Accounting | QuickBooks Transfer and select Choose: Exceptions
- From the Exceptions grid,
 check the negative payment that has been addressed in QuickBooks and click
  (Process) button
 - Once an exception has been marked processed in SmartWare, it indicates you have addressed the item in QuickBooks and removes the item from the Exceptions grid
Administration
Employees
- Fixed issue where Employee (detail) panel was not always loading the security roles that were associated with an employee
- Added capability for technicians to override cost and retail part prices on a work order
- Setup:
- Cost and retail part editing is a per employee option
- From SmartWare, navigate to Administrative | Employees and then click the
 (edit) button next to the employee you would like to allow for part editing
 - From the employee record, navigate to Options | Options
- The Employee – Employee Options panel will load on the right side of the page

Employee – Employee Options
- Setup:
- From the Employee Options panel, click the (edit) button next to EnablePartRetailEditing
- From the Employee - Employee Options (edit) panel you will need to enter 1 or 0 in the Value field depending on which option below you would like to utilize.
- After editing the Value field, click the
 (Save) button to save your changes
Employee – Employee Options (edit view)
- Below is an explanation of the different values for EnablePartRetailEditing
Setup Value
Functionality
0
(default value) Will not allow a technician to override cost and retail part prices on a work order
1
Will allow a technician to override cost and retail part prices on a work order
Menu Pricing Guide
- Renamed ‘Pricing Guide’ headings and titles to ‘Menu Pricing Guide’ to better align with Dwyer Group terminology
- Renamed ‘Price Guide Rate’ field to ‘Menu Pricing Factor’ on Menu Pricing Guide | Task (edit)

Menu Pricing Guide – Task (edit)
Customer
Equipment
- Added memo field to Customer Equipment panel, allowing you to add in additional information regarding the equipment (e.g. Equipment located in basement)
- Change order of fields on Customer Equipment to be ‘Model’, ‘Serial’, then ‘Refrigerant’
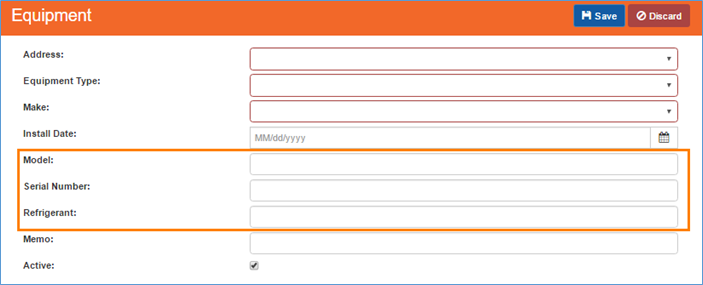
Customer – Equipment (new)
Dashboards
Owner
- Changes made to the following dashboard calculations:
- Closed Job Statistics (Closed Count): Represents the number of work orders that were marked as completed and not a warranty job or diagnostic only job
- Closed: Count of all work orders where Demand Closed (column) is flagged on ‘Export Detail’ report
- Recall Jobs: Represents number of work orders that were marked completed and amount was for $0.00 and work order was not a diagnostic only job
- Recall #: Count of all work orders where Recall (column) is flagged on the ‘Export Detail’ report
- Fixed issue where Turns Analysis export was not always matching the Turns Analysis export details
- Added filter option ‘Include Warranty Jobs in Turns Data’.
- (checked): Will include warranty work orders in the Turns Analysis section of the Owner’s dashboard
 (unchecked): Will exclude warranty work orders in the Turns Analysis section of the Owner’s dashboard
- Change made so that ‘Technician’ filter now also applies to the Turns Analysis section of the Owner’s dashboard. If a technician is selected, then the Turns Analysis section will only display parts where the filter technician was the primary technician listed on the work order.
- Added Technician column to the Turns Analysis export.
- Technician column will only populate when using the ‘Technician’ filter option.
- Technician column will display the primary technician that was listed on the work order where the part was used
- Changes made to the following dashboard % calculations:
Row
New % (percentage) calculation
Total Jobs: Demand %
(Total Jobs: Demand) / (Total Jobs: Combined)
Total Jobs: Warranty %
(Total Jobs: Warranty) / (Total Jobs: Combined)
Existing Customer: Demand %
(Existing Customer: Demand) / (Total Jobs: Demand)
Existing Customer: Warranty %
(Existing Customer: Warranty) / (Total Jobs: Warranty)
Existing Customer: Combined %
(Existing Customer: Combined) / (Total Jobs: Combined)
New Customer: Demand %
(New Customer: Demand) / (Total Jobs: Demand)
New Customer: Warranty %
(New Customer: Warranty) / (Total Jobs: Warranty)
New Customer: Combined %
(New Customer: Combined) / (Total Jobs: Combined)
FCC: Demand %
(FCC: Demand) / (Total Jobs: Demand)
FCC: Warranty %
(FCC: Warranty) / (Total Jobs: Warranty)
FCC: Combined %
(FCC: Combined) / (Total Jobs: Combined)
CRP: Demand %
(CRP: Demand) / (Total Jobs: Demand)
CRP: Warranty %
(CRP: Warranty) / (Total Jobs: Warranty)
CRP: Combined %
(CRP: Combined) / (Total Jobs: Combined)
Part FCC: Demand %
(Part FCC: Demand) / (CRP: Demand)
Part FCC: Warranty %
(Part FCC: Warranty) / (CRP: Warranty)
Part FCC: Combined %
(Part FCC: Combined) / (CRP: Combined)
- Closed Job Statistics (Closed Count): Represents the number of work orders that were marked as completed and not a warranty job or diagnostic only job
Owner - Export Detail
- Change made to help address time out issues when exporting the Owner’s Dashboard for a large timeframe
- Several changes were made to the Owners Dashboard export to help support values appearing on the Owners Dashboard. Below is an explanation of all columns on the Owner’s export.
Value
Functionality
Ticket #
Work Order (ticket) number listed on the work order
Customer Name
Customer name as it appears on the work order
Tech Completed
Date the work order was marked Status: Tech Completed
Employee
Primary Technician listed on the work order
Revenue Total
Sub Total listed on work order
- Labor Total + Part Total
Labor Total
Total Labor amount listed on work order
Part Total
Total Part amount listed on work order
Diagnostic Only
Indicates if the work order was a Diagnostic Only job. Diagnostic jobs are considered work orders where Warranty checkbox = unselected and only accepted task on work order is a Diagnostic Task (Task #: OO4 or OO5)
 (exclamation): Diagnostic Only
- (no exclamation): Non-Diagnostic Only
Recall
Indicates if the work order was a Recall job (Non-diagnostic only job for $0.00)
 (exclamation): Recall
- (no exclamation): Non-Recall
Demand Closed
Indicates a work order that was not a warranty job or diagnostic only job
 (checked): Demand Closed
- (unchecked) Non-Demand Closed
New Customer
Indicates if the customer listed on the work order was a new customer or existing customer
- (checked): New Customer
- (unchecked): Existing Customer
CRP
Stands for Calls Requiring Parts and represents a work order that has parts listed on the work order (regardless of if the parts were used or the task they were on is accepted). This is a representation of a potential call requiring parts.
- (checked): CRP
- (unchecked): Non-CRP
FCC
Stands for First Call Completes and represents a work order that was marked Tech Completed on the same day that the work order was changed to Status = ‘Active’ for the first time and completed on the same day
- (checked): FCC
- (unchecked): Non-FCC
Part FCC
Indicates if the work order was a first call complete (FCC) and requiring parts
- (checked): Part FCC
- (checked): Non-Part FCC
Warranty
Indicates a warranty work order
- (checked): Warranty
- (unchecked): Demand (non-warranty)
Service Days
Represents the number of days it took for a work order to be completed, from start (1st time work order was marked active) to finish (work order marked Job Status: Tech Completed)
Split Pay Type
Split Pay Type that was selected on the work order
Customer Acquired
Date the customer record was created in SmartWare
Technician
- Added ‘Dispatched’ column to the Technician Big Board
- Dispatched (column): Count of any work orders were the work order went active or travel on the selected date
- Dispatched count will be calculated for any employee whose name appears in the ‘Techs:’ field on the work order

Work Order – Techs (field)
- Dispatched count will be calculated for any employee whose name appears in the ‘Techs:’ field on the work order
- Dispatched (column): Count of any work orders were the work order went active or travel on the selected date
- (e.g. Primary technician went travel on the work order on 03/15/17. In this case, the primary technician and any secondary technicians would show Dispatched ‘1’ for 03/15/17)
- Dispatched count is not dependent on if the work order was marked Status: Tech Completed
- (e.g. A work order may appear counted in the Dispatched column but not be included in revenue or any other counts on the dashboard if it was not marked Status: Tech Completed within the same date range the dashboard report was run for)
- Added
 (information) icon to ‘Dispatched’ & ‘Demand Closed Jobs’. Hovering your mouse over the information icon will provide a tool tip explaining of what is included in the column counts
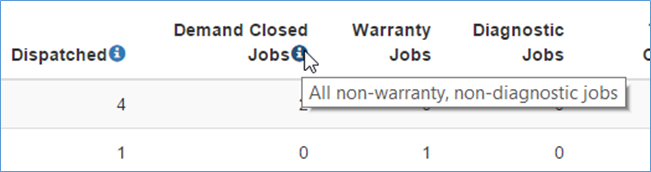
Technician Dashboard
Dispatch
Dispatch View
- Changed icon color in PO Status column for Ordered POs from olive green to yellow

Dispatch view – PO Status
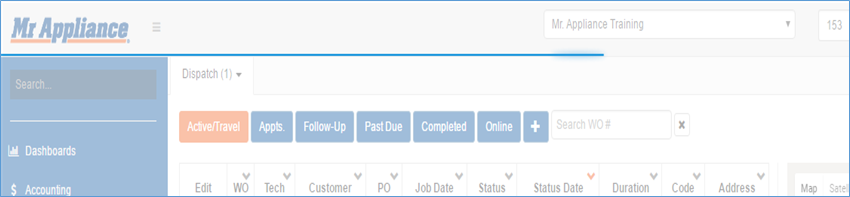
- Changed Dispatch view display name from ‘Scheduled’ to ‘Appts.’
- Combined Dispatch view ‘Unscheduled’ and ‘Past’ together and renamed to ‘Past Due’
- Changed following tool tips:
- Appts: All work orders today & future that have a time or time frame (AM/PM/Anytime) assigned (& no open POs)
- Follow-UP: Work Orders that have Open POs or were received today as ‘Reschedued’, but not WOs Active/Travel/Tech-Completed
- Past Due: All work orders that have not been completed and have a job date prior to today (& no open POs)
Communication
Phone Monitor
- Fixed issue where Date/Time field was appearing in UTC time instead of user’s time
- Fixed issue where connecting/disconnecting a phone monitor extension would affect other users with the same phone extension entered for an office
- New work orders created through the Phone Monitor panel will now populate ‘Lead Source’ and ‘Secondary Lead Source’ fields based on the phone number the customer dialed for your office
- Added refresh button to Phone Monitor panel
- Changed view details icon under Action column to
 (View Details)
 - Added following tool tips:
Icon
Tool Tip
Functionality

New Work Order
Will launch the new work order panel allowing you to create a new work order for the selected phone monitor record
View Details
Will display information for the phone monitor type that was returned
General
Communication Types
- Removed Communication Type: ‘Campaign’ and ‘Click to Call’ from appearing in the following locations:
- Customer | Options | Communication
- Employee | Options | Communication
- Vendor | Options | Communication
Neighborly Launch
- Changed Mr. Appliance logo on invoices to the new Mr. Appliance Neighborly logo

Mr. Appliance Neighborly Logo
- Work Orders received from the GetNeighborly.com website will be populated with a Work Order Source of GetNeighborly.com
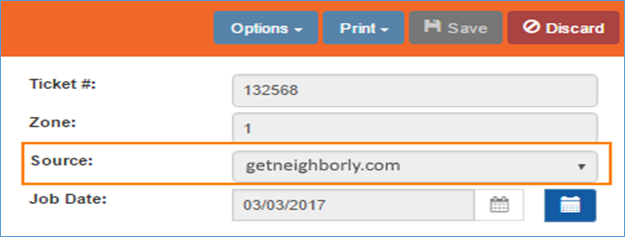
Work Order (edit)
Progress Bar
- Blue progress bar will now appear across the top of SmartWare to help visually display the loading status of panels and information
Dispatch – blue progress bar
Zip/Postal Code
- Removed type ahead for Zip/Postal Code fields. Validation of postal codes will now be performed when tabbed off the Zip/Postal Code field.
Material
Locations
- Added capability to view Location Templates
- Location Templates are new with this release and are templates that allow you to develop a standard stock for any location where you store material. Location Templates can save time by preventing the need to reenter the same part over and over for multiple locations
- See additional sections of release notes for more information on Location Templates:
- See Setup Franchise - Options | Address section of release notes for instructions on how to create a Location Template and copy a location template to an inventory location
- See Material - Physical Inventory Scan section of release notes for details on how Location Templates can be utilized with physical inventory scans
- From Material | Locations you can view Location Templates that have been created and manage material that is listed on a Location Template
- Once you have created your location template, there are a few different ways you can fill your template with material
- Copy template function:
- See Setup Franchise | Options for instructions
- Add parts manually:
- Navigate to Material | Locations and select the Location Template you would like to add parts too from the Location drop down box
- Next, click the (+) button to begin adding each part you would like listed on the template
- Copy template function:
- Once you have created your location template, there are a few different ways you can fill your template with material
- See additional sections of release notes for more information on Location Templates:
- Location Templates are new with this release and are templates that allow you to develop a standard stock for any location where you store material. Location Templates can save time by preventing the need to reenter the same part over and over for multiple locations
Physical Inventory Scanning
- Added capability to view whether scanned inventory items are in a selected template. This functionality was added to make it easier for office to determine which scanned inventory items may need to be removed from an inventory location if they are not considered standard stock items
- From Physical Inventory Scan (edit) you will see a new Location Template drop-down box
- Select the Location Template you would like to use for the inventory scan
- Only locations that were created with Type: Location Template will appear in the Location Template drop down box
- Once a Location Template is selected, a new column called ‘In Template’ will appear on the Inventory Scan Grid
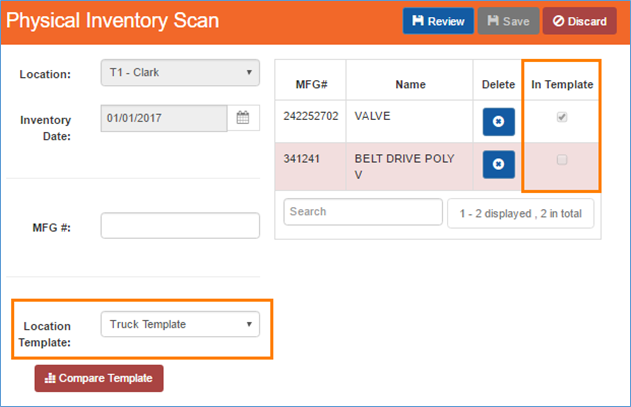
Physical Inventory Scan (edit)
- While scanning inventory, if an item is scanned but not found in the selected template list, then the ‘In Template’ flag will appear unchecked and the entire scanned inventory record row will appear highlighted in red.
- This will allow offices to easily identify which items should potentially not be available on the truck
- Below is a brief explanation of the In Template (column)
- Checked: Scanned inventory item exist in the selected Location Template
- Unchecked: Scanned inventory item does not exist in the selected location template
- Scanned inventory items that do not exist in the selected location template will also appear highlighted in red
- Added
 (Compare Template) button to the Physical Inventory Scan (edit) panel. Compare Template will allow you the capability to compare scanned inventory items to the selected location template
Physical Inventory Scan (edit)
- Compare Template button is only available after a template has been selected form the Location Template drop down box
- Once you have completed scanning all inventory items for a selected location, verify that the correct template is selected in the Location Template drop down box that you would like to compare the scanned inventory too
- Click the (Compare Template) button
- A Location Template Comparison grid will appear displaying information about the Inventory location, scanned inventory and location template

Physical Inventory Scan (edit)
- Below is a brief explanation of each column available from the Location Template Comparison grid:
Column
Functionality
MFG
Displays manufacture three-digit code that is associated with the material item
MFG #
Displays manufacture number that is associated with the material item
Actual Cost
Actual Cost calculation displayed is based on following:
· Display average part cost from location based of remaining part quantities (where part cost is not null)
· Otherwise, if average part cost for location is null, then display maximum part cost from any instances of the part that was ever listed on the location
· Otherwise, display part ‘Base Cost’ from Material | Parts
Expected Qty
Current quantity on hand from selected inventory location for the selected MFG #
Scanned Qty
Quantity scanned for selected MFG #
Difference
(Expected Qty) – (Scanned Qty)
Cost Expected
(Expected Qty) * (Actual Cost)
Cost Scanned
(Scanned Qty) * (Actual Cost)
Template Qty
Quantity listed on selected template location
Templ. Diff
(Scanned Qty) - (Template Qty)
Purchase Order
- Fixed issue where reassigning a purchase order to a new work order was not always reflected under Material | Purchase Order search grid
Reports
General
- Fixed issue where report viewer was running page loads twice. Some users may have noticed a slight delay in the time it took for reports to load prior to this fix.
Technician Mobile Route Sheet:
- Fixed issue where Totals line for employees was not always displaying correct amount
Work Order
Bucket Scheduler
- Fixed issue where Bucket Scheduler was sometimes generating an error when no Zone was associated with the Zip/Postal code listed on the work order
Combined Work Order
- Billing (locked view):
- Added work order totals, payment grid and warranty claim submitted checkbox
- Billing (unlocked view):
- Added Work Order Billing section under Billing panel. Work Order Billing section will display Accounting Class Code, Claim Info, Claim Submitted & Tax Authority
- Customer Information (unlocked view):
- Added Customer Notes, Customer Address and Customer Communication Information sections
- Customer Notes: Displays a list of all customer notes currently entered for the customer
- Customer Address: Displays a list of all addresses currently associated with the customer
- Customer Communication Info: Displays a list of all communication types currently associated with the customer
- Job History:
- Removed lock/unlock feature from Job History panel
- Job History will now always display the Job History grid
- Renamed ‘Status Date’ column to ‘Job Date’
- Removed ‘Description’ column
- Added
 (Notes) icon, allowing you to view all notes for a work order
- Purchase Order (locked view):
- Added following fields: PO Status, Paid Status, Expected Delivery Date, PO Date, Employee, Vendor Inv #
- Added Vendor Inv # column to PO Parts grid
- Purchase Order (unlocked view):
- All Purchase order | Options menu items will now load in the Purchase order panel under the Combined Work Order view instead of opening in a new tab
- Tasks (locked view):
- Added following fields: Task number, Equipment Type, Make, Model, Serial Number, Labor Total, Task Accepted flag
- Added MFG Code in Parts grid
- Added Customer Notes, Customer Address and Customer Communication Information sections
Equipment
- Fixed issue where newly added equipment was not always appearing under the work order equipment drop down box to select until the work order was closed and reloaded
New Work Order
- Fixed issue where Job Source on a New Work Order was defaulting to ‘Existing Customer’ for new customers. Job Source field will now remain blank when adding a new customer to a new work order, requiring users to select a Job Source.
Parts
- Fixed issue where it appeared duplicate results were being returned in the MFG # field when searching for a part to add/edit on a work order
Purchase Order
- Fixed issue where reassigning a purchase order to a new work order was not always reflected on the purchase order list for the work order
Simple Scheduler
- Fixed issue where Simple Scheduler was not always displaying the correct time slot (AM/PM) for a technician
Work Order Source
- Work Orders received from the GetNeighborly.com website will be populated with a Lead Source of Internet and Secondary Lead Source of GetNeighborly.com
Setup Franchise | Options
Location
- Added capability to create Location Templates
- Location Templates allow you to develop a standard stock for any location where you store material and can save time by preventing the need to reenter the same part over and over for multiple locations
- You may create as many location templates as you would like (g. Truck Template, Warehouse Template, Summer Template, Winter Template)
- Location Templates are not available to select as an Employee default location, from the inventory transfer panel, or a physical inventory scan location
- Create Location Template
- To create a Location Template, perform the following steps:
- Navigate to: Setup Franchise | Setup | Options | Location
- The Franchise Address/Location panel will load on the right side of the page
- Click the (+) button to create a new location record
- The Franchise Address/Location (new) panel will load allowing you to create a new inventory location
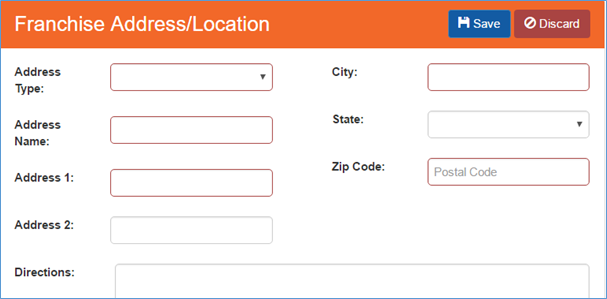
Franchise Address/Location – new record
- Under Address Type select ‘Location Template’
- Fill out all additional address fields and then click (Save) button in the top right of the panel to save the record
- Added Copy Template functionality to Location panel

Franchise Address/Location – edit record
- To fill an Inventory Location from a Location Template, you will need to perform the following steps:
- Navigate to: Setup Franchise | Setup | Options | Location
- The Franchise Address/Location panel will load on the right side of the page
- Click the (edit) button next to the Inventory Location you would like to copy the Location Template material too
- Copy Template will only work if your Copy To Location has no existing material items assigned to it
- The Franchise Address/Location (edit) panel will load allowing you to make changes
- A new ‘Copy items from one location to another (Template):’ section Will appear towards the bottom of the Franchise Address/Location template
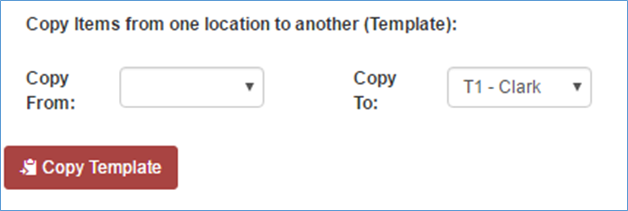
Franchise Address/Location – edit record
- Click the
- In the Copy From: drop down box, select the Location Template you would like to use to fill inventory from
- The Copy To: field will default based on the Franchise Address/Location you are viewing
- Once you have verified the correct Copy From: and Copy To: locations are selected, click the (Copy Template) button
- The Inventory Location selected in the Copy To: field should now appear populated with all material items that were listed on the Copy From (Location Template)
 |
Copy Template will only work for Inventory Locations that currently have no existing material items assigned to them |
Options
- Added UseBatches option to enable/disable the ability to batch payments in SmartWare
- By default, Batches will be enabled
- To enable/disable Batches in SmartWare, you will need to perform the following steps:
- Navigate to: Setup Franchise | Setup | Options | Options
- The Franchise – Franchise Options panel will load on the right side of the page
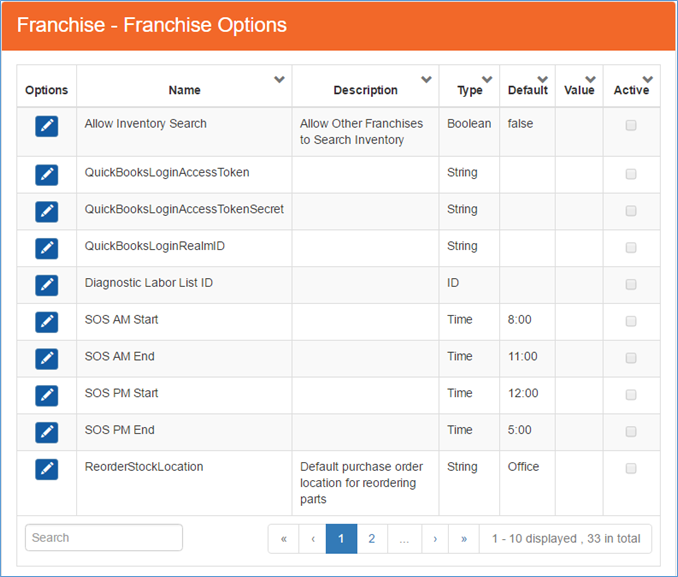
Franchise – Franchise Options
- Click the (edit) button next to UseBatches
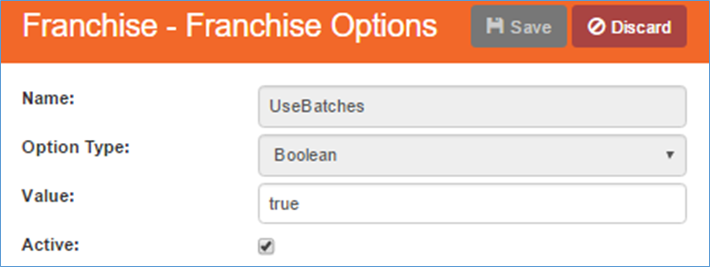
Franchise Options - Use Batches (edit view)
- From the Franchise – Franchise Options (edit) panel you can either enable or disable the batching feature in SmartWare
- Depending on which option you select, you will need to enter either ‘true’ or ‘false’ in the value field.
- Then click the (save) button
- See below for an explanation of each Value option:
Value
Functionality
True
Enables payment batching in SmartWare
· Payments will not appear in the QuickBooks Transfer panel until they have been placed on a batch and the batch has been closed and approved
False
Disables payment batching in SmartWare
· Batches may be disabled at any time regardless of if there are existing batches with payments on them
· Payments will immediately appear on the QuickBooks Transfer panel to send to QuickBooks