Accounting
QuickBooks Transfer
- Resolved issue where error were generated during QuickBooks Transfer if there were more than 100 Products/Services in your QuickBooks Online Account
- Additional improvements were made to the wording on the QuickBooks Transfer verification messages to help users identify transfer issues
Administrative
Employee Time and Revenue
- Made following changes to Employee Time and Revenue export:
- Changed ‘Total Hours’ column name to ‘Total Clocked-In Hours’
- Moved ‘Meal Hours’ column to appear after the ‘Total Clocked-In Hours’ column
- Changed ‘Total Clocked-In Hours’ calculation to the following:
- Total Clocked-In Hours = ‘Active Hours’ + ‘Total Hours’ + ‘StandBy’
- End Date field was changed to be based off end of day time for date that is entered. Prior to this change, some work orders may not have been included in the returned results if they were completed late at night. Most offices would not have noticed an issue since if they use a weekend date for the ‘End Date’ value and do not normally have work orders completed on a weekend.
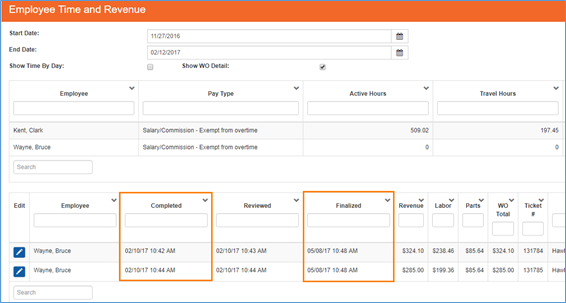
- Added new columns to the Employee Time and Revenue grid:
Employee Time and Revenue
- Completed: Displays the date/time the work order was marked Status: Tech Completed
- Finalized: Displays the date/time the work order was included in a finalized Employee Time and Revenue report. If the work order has not been included in a finalized report yet the field will appear blank.
- Change made to improve displaying of finalized verses unfinalized work orders on the Employee Time and Revenue panel
- Employee Time and Revenue panel will now only show finalized work orders if the date range entered is before the ‘next start date.
- Employee Time and Revenue report will filter out any finalized work orders from appearing in the list so you are only seeing ‘unfinalized’ work orders if the date range entered is after the last finalized Employee Time and Revenue report.
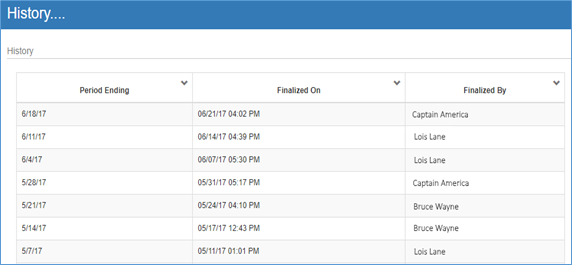
- Added ‘History.…’ panel to bottom of Employee Time and Revenue panel
Employee Time and Revenue - History
- Left-click the History panel header will expand the history section allowing you to view information
- History panel will display a grid allowing you to view which dates have been finalized for the Employee Time and Revenue reports. The History panel has been limited to only display information for the last 180 days and will be displayed with the most recent finalized date appearing first.
- Below is an explanation of the Employee Time and Revenue History Grid:
|
Column |
Functionality |
|
Period Ending |
Displays the last date that was included in a finalized Employee Time and Revenue report |
|
Finalized On |
Displays the date and time the Employee Time and Revenue report was marked as finalized (Date/Time someone clicked the ‘Finalize’ button) |
|
Finalized By |
Displays the employee name who clicked the ‘Finalize’ button on the Employee Time and Revenue panel for the period ending date |
Menu Pricing Guide
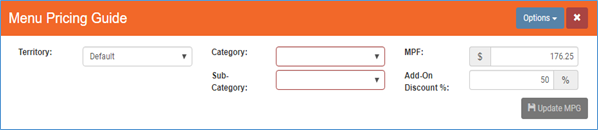
- For Franchise Consultants Only: Added capability to update MPF & Add-On Discount % and recalculate all Menu Pricing Guide tasks. Please work with your Franchise Consultant for any changes needed to your MPF or Add-On Discount % rates.
Menu Pricing Guide
- For single territory offices, the MPF and Add-On Discount % will load automatically
- For multiple territory offices, you will need to first select the territory before the MPF and Add-On Discount % will load
- The Update MPG button will only appear enabled if you modify the MPF or Add-On Discount % values
- The Update MPG button will save the labor rate and add-on discount and it will recalculate all primary and add on task amounts for your menu pricing guide
- Once the update has completed the Update MPG button will be disabled indicating that all tasks have been updated
Communication
General
- Removed Communication Type: Beeper as an option available for selected from Vendor, Customer, Employee and Franchise Communication
Customer
Communication
- Added Type: ‘Work Phone’ to the Customer Communication Info panel. This will allow offices to record a work phone number to associate with a customer record. Work phone numbers will be allowed to receive confirmation and travel work order notifications.

Customer Communication Info
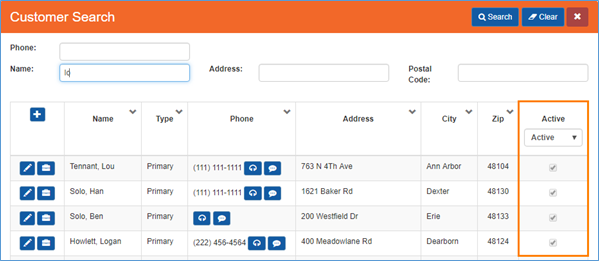
Customer Search
- Added ‘Active’ column to the Customer Search grid. New column allows you to filter customer search results to see Active, Inactive, or All customers returned matching the search criteria entered.
- The default value for this column is ‘Active’
Customer Search
Dispatch
Routing Setup
- Employee Schedule Templates:
- Resolved issue where after adding role of Technician to an employee, the Employee Schedule Template was not displaying an employee’s name in the Technician combo box unless you closed the browser and reloaded it
- Change made to remove employee records from the Employee Schedule Template if their employee record was marked ‘inactive’ in Administrative | Employees
- Change made to hide inactive employee records on the Employee Schedule Template
- Daily Scheduler:
- Added filter option to ‘Active’ column on Daily Scheduler grid. The new filter will allow you to see only active, inactive, or all daily scheduler records for a given day. By default, the column will be filtered to only display active records.
- Change made to remove employee records from the Daily Scheduler if their employee record was marked ‘inactive’ in Administrative | Employees
- Change made to hide inactive employee records on the Daily Schedule. This was causing confusion for offices who were seeing the inactive employee records and were assuming the employee would be assigned jobs.
General
MrAppliance.com
- Resolved issue where SmartWare was not ignoring case sensitivity on customer names and addresses received through the MrAppliance.com website. This was causing SmartWare to not recognize an existing customer if there were differences in capitalization and would result in a new customer record being created.
Reports
Minutes Worked by Postal Code
- Added ‘Minutes Worked by Postal Code’ report. Report will allow you to view employee time clock minutes based off postal code
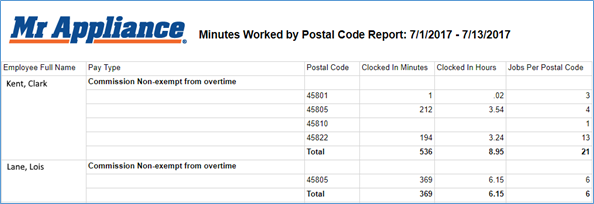
Minutes Worked by Postal Code
- Below is an explanation of each column available on the ‘Minutes Worked by Postal Code’ report:
|
Column |
Functionality |
|
Employee Full Name |
Displays employee name as it appears on their Employee record who has time clock entries entered for the report time frame entered |
|
Pay Type |
Displays pay type that was selected for the employee record on Administrative > Employee |
|
Postal Code |
Displays postal code where employee had active clocked-in time |
|
Clocked In Minutes |
Displays total clocked-in time in minutes where the employee had clocked-in time entered on a work order for the selected postal code |
|
Clocked In Hours |
Displays total clocked-in time in hours where the employee had clocked-in time entered on a work order for the selected postal code |
|
Jobs Per Postal Code |
Displays a total count of work orders for the selected postal code and where the employee had clocked-in time entered on the work order |
Pick List
- Changed Pick List report to include parts for work orders where no technician has been assigned to the job yet. This will allow offices to verify what parts are needed prior to running the router.
Sales by Tech
- Added ‘Dispatch Code’ column to the Sales by Tech report. ‘Dispatch Code’ column will display the dispatch code that was selected for the work order

Sales by Tech
Setup Franchise
Options | Territories
- Added Territory ID to appear at the bottom left of the Territories panel
Work Order
Bucket Scheduler
- Changed Bucket Scheduler to now ignore Daily Scheduler availability for employees with an ‘inactive’ employee record
General
- Added capability to modify Split Pay Type on a work order that has been finalized. ‘Split Pay Type’ field will only be editable if the work order has not been included on a finalized Employee Time and Revenue report yet.
- Added capability to modify Third Party Biller, Claim Info, Claim Submitted and Major Repair fields/options on a work order that has been finalized
- Disabled changing Work Order Job Status from ‘Reviewed’ to ‘Tech Completed’ if the work order has already been sent to QuickBooks or has been included in a finalized Employee Time and Revenue report
- Enabled (edit) buttons on Work Order Tasks panel if a work order has been finalized and is locked. Clicking the (edit) button next to a task will load the task panel in a read only view allowing you to see additional information about the task.
- Enabled (edit) buttons on Work Order Parts panel if a work order has been finalized and is locked. Clicking the (edit) button next to a part will load the part panel in a read only view allowing you to see additional information about the part.
- Following changes were made to better align SmartWare with Mr. Appliance Corporate terminology:
- Changed ‘Source’ field to ‘Job Source’
- Changed ‘Job Source’ field to ‘Lead Source’
- When scheduling a work order for a return visit using the bucket or simple scheduler, the work order job date and time will now update to reflect what was scheduled. Prior to this change, it was confusing looking at the work order screen and seeing both the green scheduled information and the old job date and time.
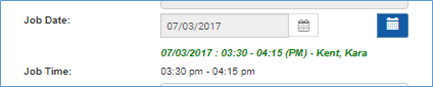
Work Order – Job Date and Job Time
Job Status
- Change made to allow work orders to be changed from Job Status: ‘Ready to Schedule’ to ‘Tech Completed’ without first needing to schedule the job

Work Order – Job Status
New Work Order
- Added ‘Type’ drop-down field to new Customer panel from New Work Order which will allow you to designate if a customer should be classified as Residential or Commercial

New Work Order – New Customer
- Selecting Type: Commercial will hide the First and Last Name fields and instead will display the ‘Company’ field allowing you to associate a Company name with the new commercial customer.
- Work Order Notifications will now appear on the New Order panel allowing users the capability to quickly confirm, edit or add new customer communication information and adjust notification methods if needed without the need to navigate to another area in the software

New Order – Notifications
- Added capability to create a new Third Party Billing customer from the New Order panel

New Order – Third Party Billing
- From the New Order when you select the ‘checkbox’ next to Third Party Billing we have added
 (+) button allowing you to create a new Third Party Billing Customer. Clicking the (+) button next to Bill-To Name will open the Bill-To Customer panel on the right side of the screen allowing you to add a new Bill To Customer.
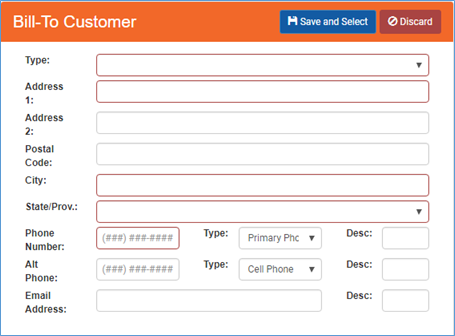
Bill-To Customer
- Change made to allow creation of new work orders for customers without an exact geocode match on address
- Changed label on ‘Search’ panel to ‘Customer Search’ on New Work Order
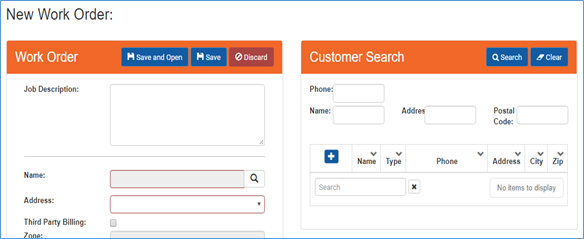
New Work Order
Notifications
- Changes made to help resolve issue where customers with a versizon.net email were not always receiving email notification from SmartWare
- Resolved issue where updating phone and/or email information on the Work Order Notifications panel was not automatically displaying the changes made on the main Work Order panel
- Marking a customer communication record as ‘inactive’ will now remove any notification methods associated with the old customer communication record
- Added
 (+) button to Work Order Notifications panel allowing you to add a new customer communication type

Work Order Notifications
Phone
- Communication Type will now appear after the phone record that is displayed allowing you to identify what type of phone number is displayed (i.e. primary, cell, home)

Work Order – Phone
Techs
- Added
 (Make Primary) button to the work order which will allow you to set the primary technician on the work order without needing to go through the Bucket or Simple Scheduler

Work Order – Make Primary
- To change the Primary Technician listed on the work order you will need to perform the following steps:
- From the work order: In the Techs field, left click on the technician’s name you would like to make the primary technician for the work order. The technician’s name will become highlighted in blue and the (Make Primary) button will be enabled.
- With the technician’s name selected, click the (Make Primary) button
- From the work order: In the Techs field, left click on the technician’s name you would like to make the primary technician for the work order. The technician’s name will become highlighted in blue and the
- Once you have finished making changes to the primary technician click the
 (Save) button to at the top of the Work Order panel to save your changes
WO Search
- Added WO Search option under the Work Order main menu. The WO Search allows you to perform a quick work order search based off ticket number without needing to open the full Search panel.
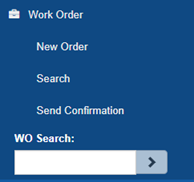
Work Order Search – menu option
- In the WO Search menu option, type in the ticket number you would like to find and click the (>) button.
- If a work order is found matching the ticket number, then the work order will load on the screen
- If no work order is found matching the ticket number, then a yellow message will display informing you that “Work Order not found. Please enter a valid ticket number.”
Summary
- Added ‘QBO Payment Completed’ status to Work Order Summary. Below is a brief explanation of the work order ‘QBO Payment Completed’ status.
|
Column |
Functionality |
|
Status |
QBO Payment Completed: Indicates that a payment on the work order was sent to QuickBooks Online (QBO) |
|
Date |
Indicates date the payment was transferred to QuickBooks |
|
Employee |
Indicates the name of the employee who performed the QuickBooks Transfer |
Zone Assignment
- Save on New Order and Work Order now requires a valid Zone be selected prior to saving
- When creating a new work order or editing an existing work order, if there is no Zone found associated with the customer postal code then the Zone field will be highlighted in red and will display a drop-down box allowing you to select the appropriate Zone to associate with the work order.

New Order – zone assignment
- Zone field will only appear available for selecting if the Zone is not defaulted automatically once a customer and dispatch code are selected on the work order
- This change was made to allow offices the capability to continue scheduling jobs where the customer postal code has not been added to Franchisee’s postal code setup or the postal code has not been associated with a Zone. Offices should still follow proper procedures for adding missing postal codes and zone assignment for postal code through Setup Franchise.