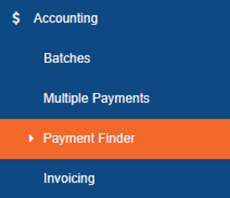
Accounting
Batches
- Changes made to help improve performance issues when in the Batch feature of SmartWare
- Resolved issue where in some cases, payments that had not been placed on a batch were not appearing under the ‘Non-Batched Payments’ section of Batches
Payment Finder
- Added Payment Finder feature to SmartWare. Payment Finder will allow you to search for payments that have been entered in SmartWare
- Below is an overview of the Payment Finder feature
Navigate to Payment Finder
You can access the Payment Finder panel from the following location:
- From the main menu on the left side of the screen, select Accounting and then Payment Finder
SmartWare – Main Menu
Search for payments
The Payment Finder panel will allow you to define the search criteria you would like to use to search for payments
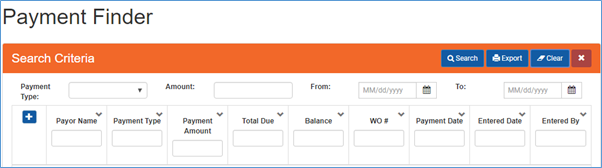
Payment Finder
- In the Payment Finder panel, enter a single item or combination of items
- Below is a brief explanation of each available payment finder search criteria:
|
Search Criteria |
Functionality |
|
Payment Type |
Drop down search option that represents the type of payment you would like to search (i.e. check, visa, cash) |
|
Check # |
(Field only visible if Payment Type: Check is selected) Allows you to search for a specific check number that was entered on a work order payment |
|
Amount |
Currency field that represents the payment amount you would like to search for |
|
From |
Used in conjunction with the ‘To’ (search criteria field) and allows you to define a date range to search for payments based off payment date entered on work order payment panel
|
|
To |
Used in conjunction with the ‘From’ (search criteria field) and allows you to define a date range to search for payments based off payment date entered on work order payment panel
|
| |
Will perform a search based off the search criteria entered |
 |
Will clear out all values entered in the search criteria fields allowing you to start over |
- Once you have finished entering all search criteria, you can either press “Enter” key on your keyboard or click the
 (Search) button
 - A list of payments matching your search criteria will be displayed in the grid below the search fields
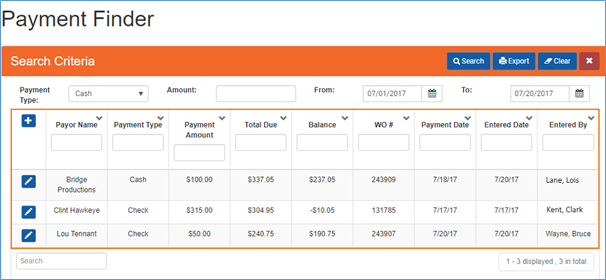
Payment Finder – results grid
Payment - Results grid
Below is a brief explanation of each column available from the payment finder results gird:
|
Column |
Functionality |
|
Options |
|
|
Payor Name |
Displays the Payor Name that was entered on the Work Order Payment panel |
|
Payment Type |
Displays the Payment Type that was selected on the Work Order Payment panel (i.e. check, visa, cash…) |
|
Check # |
Displays the Check # that was entered on the Work Order Payment panel |
|
Payment Amount |
Displays the Amount as entered on the Work Order Payment panel |
|
Total Due |
Displays the Total Due amount from the work order where the payment was entered |
|
Balance |
Displays the Balance amount from the work order where the payment was entered |
|
WO # |
Displays the work order number from the work order that the payment was added too |
|
Payment Date |
Displays the Payment Date as entered on the Work Order Payment |
|
Entered Date |
Displays the date the payment was created in SmartWare |
|
Entered By |
Displays the name of the users who created the payment in SmartWare |
Customers
Address
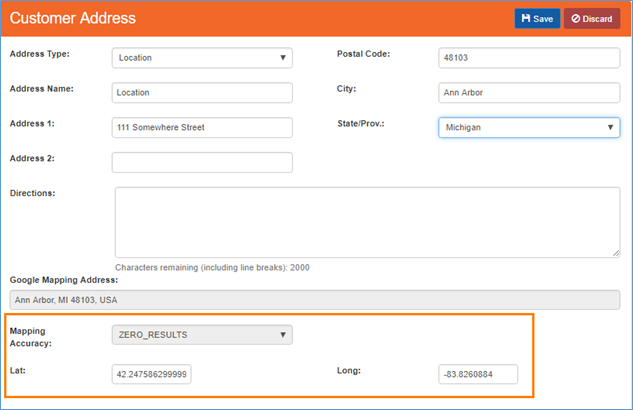
- Changed Lat: & Long: fields to allow editing if ‘Mapping Accuracy’ field shows ‘Approximate’, ‘Zero_Results’ or ‘Geometric_Center’
Customer Address
Equipment
- Resolved issue where the customer equipment address drop-down was not always loading customer address information
Combine Customers
- Added Combine Customers feature to SmartWare. Combine Customer will allow you search and select a duplicate customer to combine
- During the customer combine process, any existing customer notes, customer equipment, customer contacts, and work orders will be moved from the duplicate customer into the customer record you wish to keep
- Below is an overview of the Payment Finder feature
Navigate to Customer Combine
- You can access the Customer Combine feature from the following location:
- From an existing customer, select Options and then Customer Combine
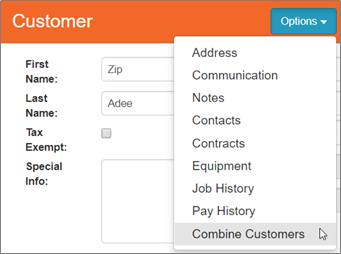
Customer - Options
How to combine customers
- From Customer main menu, search for and then open the customer record you would like to keep
- From the customer record, navigate to Options and select ‘Combine Customers’
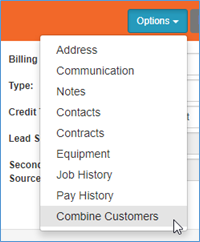
Customer – Options – Combine Customers
- The Combine Customer panel will open on the right side of the screen and the customer you will be keeping will be loaded on the left side of the screen for reference
- From the Combine Customer panel, you will need to search for the duplicate customer you would like to combine into the customer displayed on the left side of the screen

Combine Customers
- In the Combine Customer panel, enter a single item or combination of items to search based on
- Once you have finished entering all search criteria, you can either press ‘Enter’ key on your keyboard or click the (Search) button
- A list of customers matching your search criteria will be displayed in the grid below the search fields
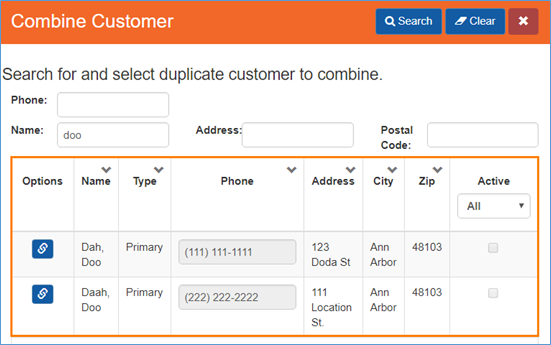
Combine Customers – grid
 |
(Clear) button will clear all information from the search fields allowing you to quickly redefine your search criteria. The Clear button is located in the top right of the Combine Customer panel. |
|
If you are unable to find a duplicate customer you think exist, try entering less criteria in the search section or try searching by different criteria. It may be that some of the information you entered does not match exactly on the duplicate customer record. |
- From the Combine Customer – grid: Click the
 (Combine Customer) button next to a specific customer you would like to combine into the customer displayed on the left side of the screen
 - The Combine Customer panel will load with the selected customer displayed
- Verify the customer displayed is the correct customer you wish to remove from the system and combine into the customer displayed on the left side of the screen

Combine Customer
- Next, click the
 (Combine) button to combine the duplicate customer into the customer you wish to keep
 - Once the combine process has finished, a ‘Combine Complete’ message will appear at the bottom right of the screen

Combine Complete message
What happens during the Combine Customer process
- During the combine process, the system will perform the following activities:
- Mark the duplicate customer as ‘inactive’
- You may still find and view ‘inactive’ customers through the Customer Search panel
- Add a customer note to both the ‘inactive’ duplicate customer and the customer you are keeping stating that the customer was merged with another customer
- Mark the duplicate customer as ‘inactive’

Customer Notes
- Any customer notes, customer equipment, customer contacts, and work orders will be moved from the duplicate customer into the customer record you wish to keep (merge-to customer)
- Any work orders that were copied over from the duplicate customer will be changed to reflect the primary address, customer name and customer notification information of the merge-to customer
- Emailing an invoice for a work order that was merged into the merge-to customer will use the old duplicated customers email address to send the invoice. If you would like to use the new customer communication instead, you will need to print the invoice and save it as a PDF file. Then you can manually email the invoice to the correct customer email address.
- Going forward, any new work orders created will automatically send email messages using the current customer communication information
Dispatch
Dispatch
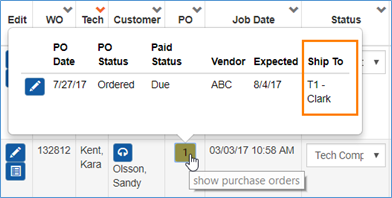
- Added ‘Ship To’ column to the Dispatch PO popup. ‘Ship To’ will display the ‘Ship To’ information that was selected on the Purchase Order
Dispatch
General
Click to Call
- Resolved issue where Click-to-Call capability was not working within SmartWare
Material
Parts
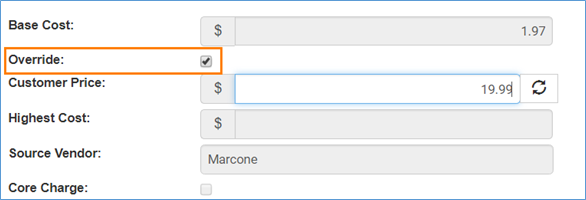
- Added Override checkbox option to Part (edit). Override checkbox will only be available for parts with Source Vendor: Marcone and will allow you to override the ‘Customer Price’
Parts (edit)
 Checked: Checking the Override box will enable the ‘Customer Price’ field and
  (Calc Customer Price) button allowing you to type in your own customer price for the part. (Calc Customer Price) button will recalculate the ‘Customer Price’ by taking the ‘Base Cost’ entered for the part and running it through the Part Margin tool.
 Unchecked: Unchecking the Override box will disable the Customer Price and (Calc Customer Price) button and will redisplay the Marcone Customer Price after saving
- Added (Calc Customer Price) button next to ‘Customer Price’ field on Part detail panel. (Calc Customer Price) button will recalculate the ‘Customer Price’ by taking the ‘Base Cost’ entered for the part and running it through the Part Margin tool

Parts (edit)
Purchase Orders
- Changed default date range on Purchase Order search to two months instead of a year to help with performance issues
- Changed ‘Expected Receive Loc’ field to be a drop-down box displaying all available material locations. Field will still default based off Employee selected on the purchase order. However, you may now change the ‘Expected’ Receive Loc’ field to be for another location if needed.

Purchase Order – Expected Receive Loc:
- Changed PO receive part screen to default ‘Receive Location’ based off the ‘Expected Receive Loc’ that was entered for the part.
- ‘Ship To’ drop-down list will now display location names in bold making it clearer to identify each location
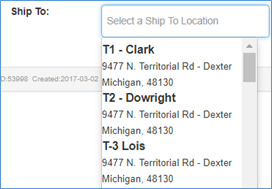
Purchase Order – Ship To:
- Added ‘Ship To Location’ search criteria option which will allow you to search for PO’s based off the ‘Ship To’ selected on the PO
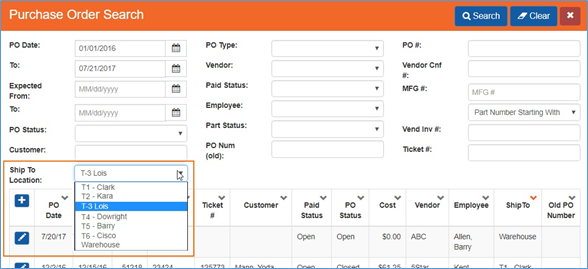
Purchase Order Search
- Added ‘Ship To’ column to the PO Search grid. ‘Ship To’ will display the ‘Ship To’ information that was selected on the Purchase Order
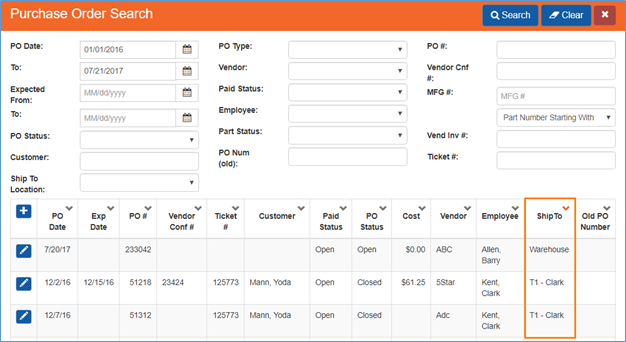
Purchase Order Search - grid
Receive
- Changed ‘Receive Location’ column on grid to default based off the PO Part ‘Expected Receive Loc’ instead of the location associated with the PO Employee
Reports
Sales Tax
- Consolidated ‘Sales Tax Summary’ report and ‘Sales Tax Detail’ report into one report ‘Sales Tax’. This change was made to help eliminate unnecessary reports. Summary information for sales tax can still be found by collapsing all sections of the ‘Sales Tax’ report.
- Changed ‘Total Revenue’ column to exclude tax
- Total Revenue = Labor Total + Part Total
- Changed ‘Total’ row at the bottom of the report to ‘Unduplicated Net:’.
- If a work order/credit memo had multiple tax authorities listed on it, then only one instances of the work order/credit memo ‘revenue’ amounts will be displayed in the ‘Unduplicated Net’ row for the following columns: ‘Total Revenue’, ‘Taxable Sales’, ‘Part Total’ and ‘Labor Total’
Work Orders
Invoices
- Added capability to customize Invoice Headers that will appear at the top right of printed and emailed invoices. Please see ‘Setup Franchise > Territories section of the release notes for detailed explanation of how to customize your invoice header information.
MrAppliance.com
- Warranty work orders received from MrAppliance.com website will now read into SmartWare with a work order status of ‘Request’
- Work Orders with a status of ‘Request’ indicate the customer requested a call from the office and must be scheduled through the simple scheduler or bucket scheduler.
- Warranty work orders received from MrAppliance.com website will appear on the Dispatch screen under the ‘Online’ tab indicating it was received from an online site as well as the ‘Follow-up’ tab indicating that follow-up work must be completed before the work order can be scheduled and routed.
Notifications:
- Additional changes made to help ensure we are successfully sending email notifications to different email providers (i.e. gmail, verizon.net)
Tax Authorities
- Resolved issue where unchecking or checking the ‘Active’ or ‘Exempt’ checkbox next to a Tax Authority listed on a work order was not always recalculating the work order tax for the work order
- Resolved issue where removing a postal code from an ‘active’ Tax Authority record was still automatically assigning the tax authority to new orders for the removed postal code
Setup Franchise
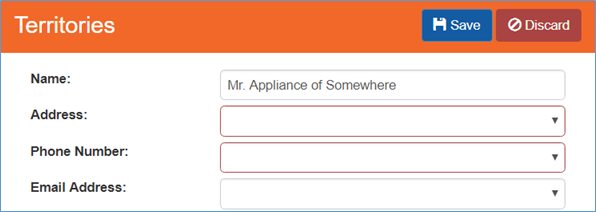
Territories
- Added new fields to Territories screen which will allow you to customize the business information that appears on the Invoice header when printing or emailing an invoice.
- From Setup Franchise > Setup > Options select Territories
- Click the (edit) button next to the territory you would like to customize the Invoice header for
- For offices with multiple territories, you will need to perform these steps for each territory you have listed
- From the Territories panel: Name, Address, Phone Number, and Email Address fields will be used to populate the information displayed on the Invoice header for Invoices that are printed or emailed to customers. By default, Name, Address and Phone Number will be populated for you based off Franchise Name, primary phone number and primary address that have been entered under Setup Franchise for the office.
- Once you have finished entering in all information for the Invoice Header on the Territories panel, click
 (Save) button. Any Invoice printed or emailed after making the changes will contain the new invoice header information
Setup Franchise - Territories
- Below is a brief explanation of the four Invoice Header fields found on the Territories panel:
|
Field |
Functionality |
|
Name: |
(required field)
|
|
Address |
(required field)
|
|
Phone Number |
(required field)
|
|
Email Address |
(Not a required field)
|