Technician Availability
The following document assumes the following:
- You have already gone through the initial franchise setup procedures required in order to use Smartware.
- You have already gone through the initial setup all employees in SmartWare.
- Refer to SmartWare – Employee Setup (User Guide) for additional details on how to create a new employee in SmartWare.
- If you have not preformed the above mentioned items, you will need to do so before proceeding.
Overview
Technician Availability is a way of classifying multiple items related to your technicians and what type of work each technician can perform. SmartWare requires that different features be setup in order for each technician to appear with availability to receive work orders.
- Below is a list of each setup item that will be covered in this document:
- Employee Setup
- Employee Photo
- Job Skills
- Scheduled Template
- Daily Schedule
- Availability
- Mobile Drip Method
Employee Setup
In order to correctly assign jobs to a technician there are a couple of setup options that must first be done in the Administrative > Employee module.
You will need to perform the following steps for each technician in your office.
- From the main menu, navigate to Administrative > Employees to load the Employee List panel.
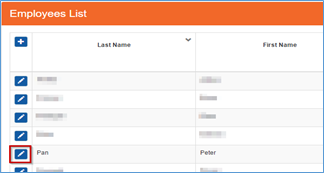
Employee List
From the Employee List panel, you will need to click the  icon next to the technician you would like to begin setting up.
- If the technician’s name does not appear in the list, it means that they do not have an employee record yet in the system and must be added.
On the right-hand side of the screen you will see the Employee panel loaded with the technician you selected. You will need to check that the following items are setup correctly: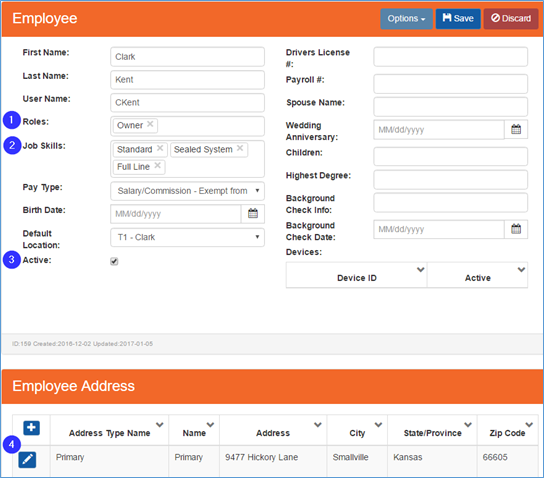
Employee & Employee Address
 Employee shows Role: Technician
- In the Role field, insure that Technician is selected.

- This will tell SmartWare that the employee is a technician and can be assigned work orders.
 Technician is assigned Job Skills
- In the Job Skills field, select each skill type the technician should be allowed to perform.
- Job skills will allow SmartWare to know what type of service calls a technician can perform.
SmartWare allows for flexibility when it comes to setting up the types of job skills a technician is qualified to perform. For this reason, it is important that you specify EACH job skill a technician can perform.
|
 Technician is marked as Active
- In the Active checkbox, insure that Active is checked.
- This will tell SmartWare that the technician is an active employee for your company.
 Technician is assigned to an Address/City/State/Zip Code
- Under the Employee Address panel, you will need to insure that a valid address is setup for the technician.
- The technician’s address will be used by the Router when determining the technician’s first call for the day. Depending on where the technician will start traveling from each day will determine if additional setup is required
- Add Technician’s Primary Address
- Click the
 button to add a new Employee Address
- The Employee Address panel will load allowing you to enter a new address for the technician’s primary residence.
- Under Address Type select Primary
- Fill out all additional address fields and then click
 button in top right of panel to save the record.
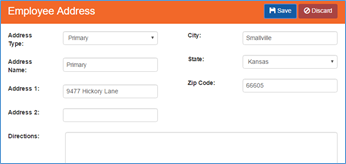
Employee Address
- Click the
- Add Tech Starting Address:
- Only preform the following additional steps if a technician will start work from another location other than their primary address
- Click the
 button to add a second Employee Address
- The Employee Address panel will load allowing you to enter a new address for the technician’s starting location.
- Under Address Type select Tech Starting
- Fill out all additional address fields and then click
 button in top right of panel to save the record.
- This should be the address information for where the technician will begin their work day from.
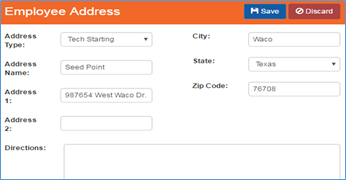
Employee Address
- This should be the address information for where the technician will begin their work day from.
Employee Photo
Employee Photos are used when sending text messages and confirmation emails to customers. We recommend setting up an employee photo for each one of your technicians.
To setup an employee photo, you will need to perform the following steps:
- From the Employee panel for the technician you are trying to setup, select the
 menu and then select Attachments.
- You can access a specific employees record by navigating to Administrative > Employees and clicking the
 icon next to the technician name.
Employee - Options
- You can access a specific employees record by navigating to Administrative > Employees and clicking the
- The Employee Attachments panel will load on the right-hand side of the screen allowing you to add attachments for the selected technician.
- Click the
 button to add a new attachment for the selected employee.
Employee Attachments - Select Type: Employee Record from the dropdown list
- In the Name field, enter in a short description that will be used to identify the attachment.
- Verify the Active checkbox is checked.
- Click
 button
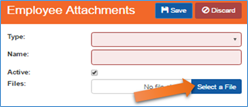
Employee Attachments- A popup window will load allowing you to select a file from your computer to upload into SmartWare for the selected employee.
- Click the
 button at the top of the panel.
 - The employee will now have an Employee Photo associated with their employee record.
- Click the
View Schedule on iPad - Setup
When it comes to visibility of technician’s schedules on their iPad, SmartWare allows for two different methods:
- View All (default setting): Allows technicians to view all work orders for a specific day on their iPad
- Mobile Drip: Limits the number of work orders that can be viewed on the iPad at a given time
Why use View All?
This method is useful for veteran or technology savvy technicians. By default, SmartWare will send all scheduled work orders for the day down to a technician’s iPad.
Why use Mobile Drip?
We realize that some technicians may become overwhelmed with viewing all their jobs for the day at once. In these cases, it may be necessary to limit the number of work orders a technician can view on their iPad at a given time.
The Mobile Drip method will allow technicians to concentrate on the task at hand, and only after finishing that work will the technician receive the next appointment.
How to enable Mobile Drip
To enable Mobile Drip for a technician, you will need to perform the following steps:
- From the Employee panel for the technician you are trying to setup, select the
 menu and then select Options.
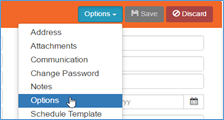
Employee - Options - The Employee – Employee Options panel will load on the right-hand side of the screen allowing you to view additional setup options for an employee.

Employee - Employee Options - Click the
 icon next to Option: MobileDripShowWorkOrdersCount
 - From the Employee – Employee Options: Mobile Drip panel, set the Value field to the number of work orders you would like the technician to view on their iPad at a given time.
- e.g. – If a technician should only see 2 jobs at a time, enter 2 in the value field.

Employee - Employee Options (MobileDripShowWorkOrdersCount)
| MobileDripShowWorkOrdersCount with no Value entered means that a technician will receive all work orders for a given day on their iPad at once. By default, employees will be set to view all work orders on their iPad. |
Service Availability – Setup
You are now ready to begin setting up SmartWare and scheduling the number of calls your office can handle on a daily basis. The first step you will need to perform is to setup your Employee Availability.
Employee Schedule Template:
The Employee Schedule Template will allow you to setup each technician’s standard work hours, standard work days, start time and service area. The Employee Schedule Template will be used to preload technician availability out to your Daily Schedule for the next 35 days.
To setup each technician’s schedule template, you will need to perform the following steps:
- From the Employee panel for the technician you are trying to setup, select the
 menu and then select Schedule Template.
 - The Employee Schedule Template panel will load on the right-hand side of the screen allowing you to setup the technician’s schedule template.
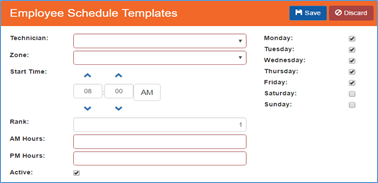
Employee Schedule Template – Add/Edit View
Below is a brief explanation of each field on the Employee Schedule Template:
|
Item |
Functionality |
|---|---|
|
Technician |
Indicates the technician’s name you are setting up availability for on the Employee Schedule Template. The technician dropdown box will be filtered to only display the name of the technician whose employee record you accessed the Schedule Template panel through. |
|
Zone |
Allows you to assign the technician to a particular service area/zone |
|
Start Time |
Enter in the time the technician will being work for each day.
|
|
Days of Week |
Check each week day the technician is available to work in the selected zone |
|
Rank |
Establishes the technician’s priority when routing jobs |
|
AM Hours |
Determines the number of hours a technician can work in the morning for the selected zone and days of the week |
|
PM Hours |
Determines the number of hours a technician can work in the afternoon for the selected zone and days of the week |
|
Active |
If checked, will include the selected technician schedule template and their availability when updating the Daily Schedule |
You will need to create an employee schedule template for each zone a technician is available to work in. You will also need to create a separate employee schedule template Once you have finished entering in each technician’s information on the Employee Schedule Template form, you
Create a separate Employee Schedule Template for any of the following conditions:
|
When setting up more than one Employee Schedule Template per Technician, pay close attention to how many hours you are scheduling your technician for each day as it is easy to overschedule your technician’s availability.
|
Copy Employee Schedule Template:
SmartWare allows you the capability to copy the Employee Schedule Template out 35 days to the Daily Schedule. This helps save valuable time and prevent offices from manually enter in the same technician availability on each individual day in the Daily Schedule.
- Once you have the Employee Schedule Template setup with all technician’s standard availability, you can copy the template out to the Daily Schedule utilizing the
 feature.
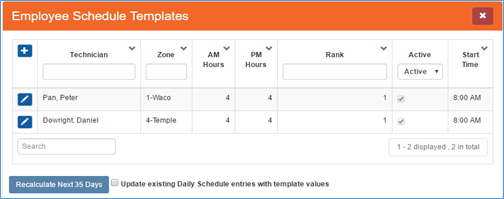
Employee Schedule Template – Grid View
Below is a brief explanation of the Recalculate Next 35 Days feature.
|
Item |
Functionality |
|
|---|---|---|
 |
Will copy the Employee Schedule Template out 35 days to the Daily Schedule. |
|
|
Update existing Daily Schedule entries with template values |
Checked: Copies all Employee Schedule Template entries out 35 days on the Daily Schedule regardless of what entries already exist. This will override any previous Daily Schedule entries for the next 35 days. Unchecked: Will only copy new Employee Schedule Template entries out 35 days on the Daily Schedule. Existing entries already on the Daily Schedule will remain the same. |
|
Daily Schedule
- The Daily Schedule is used by the Scheduler and the Router to determine technician availability for a given day
- You may access the Daily Schedule by navigating to Dispatch > Routing > Options and selecting Daily Schedule
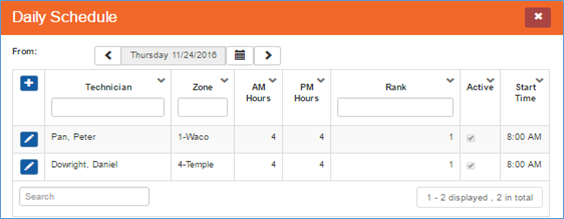
Daily Schedule – Grid View
- In most cases the Daily Schedule will populated based off the
 feature mentioned in the previous section.
- If no availability is displaying, we recommend going to the Employee Schedule Template panel and clicking the
 button to push the template out the Daily Schedule for 35 more days.
- If no availability is displaying, we recommend going to the Employee Schedule Template panel and clicking the
- At any time, you may modify an entry on the Daily Schedule to account for fluctuation in availability or temporary changes to technician schedules.
 Permanent changes to technician availability should not be done on the Daily Schedule. Instead, changes should be made on the Employee Schedule Template. You can then check the ‘Update existing Daily Schedule entries with template values’ and click the button to copy the changes out 35 days. Permanent changes to technician availability should not be done on the Daily Schedule. Instead, changes should be made on the Employee Schedule Template. You can then check the ‘Update existing Daily Schedule entries with template values’ and click the button to copy the changes out 35 days. |
Below is an explanation of each field on the Daily Schedule.
|
Item |
Functionality |
|
|---|---|---|
|
Date: |
Date the Technician Schedule will be utilized for |
|
|
Technician |
The name of the technician who the Daily Schedule entry is for |
|
|
Start Time |
The time each technician will being work for the selected date |
|
|
Zone |
Determines the service area/zone the technician is assigned to work in |
|
|
Rank |
Determines the technician’s priority when routing jobs |
|
|
AM Hours |
Indicates the number of hours a technician can work in the morning for the selected zone and date |
|
|
PM Hours |
Indicates the number of hours a technician can work in the afternoon for the selected zone and date |
|
|
Active |
This informs SmartWare that the technician is available for job assignments
|
|
Availability
The Availability panel allows you to see at a glance your office’s availability for a specific Zone and Date.
From the main menu select Dispatch, and then click Router Setup.
Router - Availability
| If no information appears under the Availability panel it means that no Technician Availability was setup on the Daily Schedule for the selected day. |
Below is a list of each field on the Availability panel:
| Item | Functionality |
|---|---|
 |
Will load the Daily Schedule on the right-hand side of the screen filtered to the appropriate Zone. This allows you to quickly confirm the appropriate availability is setup for the Zone and make any changes if necessary if availability appears incorrect |
 |
Will load the Employee Time Off panel on the right-hand side of the screen filtered. The Employee Time Off panel will be filtered to only display employees with time off entries for the selected date and where the employee also showed availability for the selected date/zone on the Daily Schedule. |
|
Zone |
List each Zone you have availability for on the selected date |
|
First Calls |
Total number of First Calls your office indicated you could handle for the selected Zone and Date- |
|
AM Avail Hours |
Indicates the number of remaining available AM Hours for the selected Zone and Date
|
|
AM Total Hours |
List the total number of AM Hours your office indicated you could handle for the selected Zone and Date |
|
PM Avail Hours |
Indicates the number of remaining available PM Hours for the selected Zone and Date
|
|
PM Total Hours |
List the total number of PM Hours your office indicated you could handle for the selected Zone and Date |
|
Anytime Avail Hours |
Calculated number based off (AM Avail Hours) + (PM Avail Hours) for the selected Zone and Date |
|
Last Calls |
Total number of Last Calls your office indicated you could handle for the selected Zone and Date |
|
Time Off Hours |
Displays the total number of hours based off Employee Time Off entries. The following is taken into consideration when displaying Time Off Hours on the Availability panel:
|
Time Off Hours Scenario:
|

 button in top right of panel to save the record.