Create New Work Order
A new work order can be created from 3 different places:
- Phone Monitor

- Dispatch Screen

- Work Order Menu Option

Add a Customer to the Work Order
Search for an existing customer or add a new customer using the customer panel on the right side of the screen.
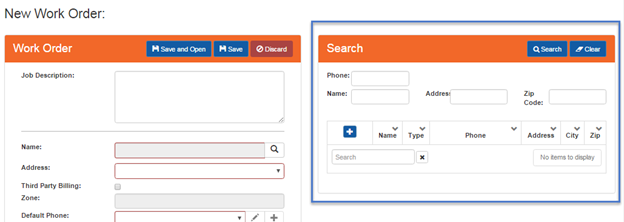
- Search for Existing Customer

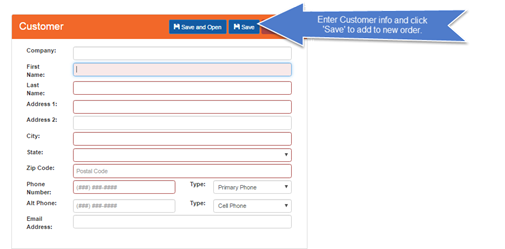
- If the search does not find an existing customer, the New Customer screen opens. The New Customer screen can also be opened by clicking on the + button.
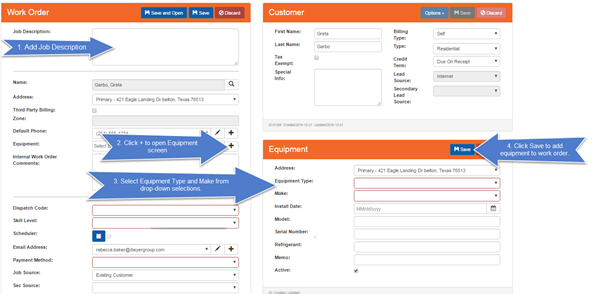
Add Job Description and Equipment to the Work Order
Select Dispatch Code and Skill Level
- Dispatch Codes identify the type of work being done and set the skill level automatically according to what is selected in the Dispatch Code setup screen. Dispatch Codes can be customized per franchisee.
- Selecting a MW dispatch code automatically checks the Warranty checkbox on the work order. This should ONLY be used for true Manufacturer’s Warranty, not Extended Warranty or Home Warranty situations.
- The Skill Level must be selected before the Scheduler can be used.
Schedule the Job
Simple Scheduler
- The Simple Scheduler is used to book Same Day calls or for days when the Router has already been run. It looks for gaps in the schedule and does not limit availability according to zone or the number of hours allotted to the tech. A specific time and technician are selected for the job by using the Simple Scheduler.
- The Simple Scheduler can be set to always show if the Router is not being used.
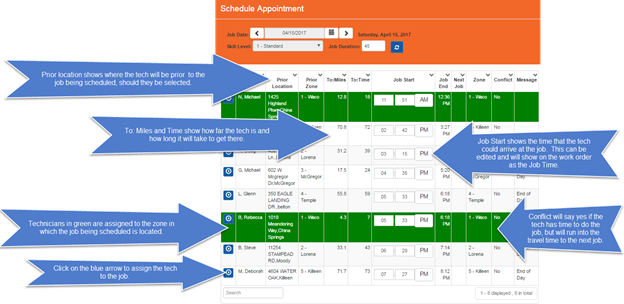
Routing Scheduler
The Routing Scheduler is used to book time frames (AM, PM or Standard) for future appointments. The Routing Scheduler allows you to accumulate the appropriate # of jobs according to the Hours and Skill Levels that are setup in your Availability schedule. Once the hours have been used, the scheduler shows 0 available hours. The Router will then look at all of the jobs that have been given time frames and assign them actual job times and technicians into an efficient route. Assigning First Call, Last Call or specific technicians will limit your flexibility and could result in a less efficient route.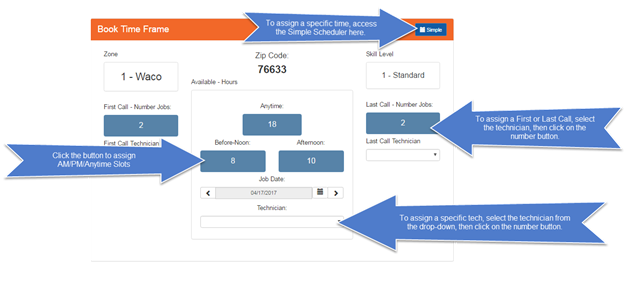
Add Email Address, Payment Type & Job Source
Once you have scheduled a job for a customer they are much more likely to give you an email address to use for the Confirmation Email and invoice.
Add Email Address

Select Payment Method
The Payment method is selected simply as a means of letting the customer know that payment is expected when services are rendered. This could also bring up the possibility of a third party covering the bill.
Select Job Source
- If the work order is created from the Phone Monitor screen, the job source and secondary source will populate automatically according to the Phone Lead Source setup.
- If the customer is an existing customer, ‘Existing Customer’ will be populated automatically.
Save
- To verify or change Work Order Notifications (Confirmation Email, Travel Text, Invoice Email) click Save and Open.


- To add an additional communication method:
- To keep the default notifications, click on Save.
- If only one email address is entered, it is the default for the confirmation email and invoice.
- The Primary phone number is the default for the Travel Text notification.
Route Work Order
- A work order is considered ‘Routed’ when it has been assigned a Technician and a Job Time via the Simple Scheduler or the Router. The job status on the work order will be ‘Scheduled’.
- The Router assigns a Job Time and Technician to work orders that have been promised a Time Slot (AM/PM/Standard). It looks at the available hours, skill levels and zones in order to produce an efficient route. This process is detailed in a separate document.
- The Router should be run mid-afternoon so that the confirmation emails can be sent to customers.
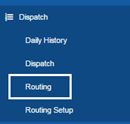
- Open ‘Routing’ under the Dispatch menu option.
- Select the Date for which the Route needs to be run.

- Ensure that all parts are in and received electronically before running the route. Work orders with PO’s that are Open or Ordered have the PO status highlighted in yellow.

- Calculate and Accept the Route

Dispatch to Tech
Work Orders are sent to the Tech automatically when the Work Order Sync button is used on the iPad if:
- The Job Status is ‘Scheduled’
AND - The Job Date is ‘Today’ OR the Job Date is ‘Tomorrow’ and it is after7:00PM local time.
If using Drip Dispatching, only the # of jobs selected in the Employee Options screen will show on the iPad.
Receive from Tech
Work Orders come back from the iPad in 3 different ways: Reschedule, Promised, or Completed.
iPad training is detailed in a separate document.
Reschedule
- ‘Reschedule’ should only be used by the tech in the rare instance that a follow-up appointment cannot be made in the home, i.e. the part is on back-order and there is no way to know when the return appointment will be.
- When a work order is sent back as ‘Reschedule’, it will initially show in the Follow-Up tab on the dispatch screen with a Job Status of Ready to Schedule.

- If there is an open PO on the work order, it will stay in the Follow Up tab.
- If there are no open PO’s on the work order, it will move to the Past Due tab on the dispatch screen the next day, since the Job Date would then be in the past.
- To move the work order to the Appts tab, schedule the work order with either the Simple or Routing Scheduler.
Promised
- “Promised” is used to set the return appointment in the customer’s home in the event that a part needs to be ordered to complete the job.
- The “Promised” feature is connected to the schedule in SmartWare and allows the technician to select AM/PM/Standard time slots. Availability will be removed in SW when the work order is sent back.
- A PO is automatically generated from the iPad. A setting is available to define if the PO should include only a part that is not in the technician’s inventory, or if it should include all parts on the work order if any part needs to be ordered.

- When a work order is sent back as “Promised” and has an open PO attached, it will come into the Follow-Up tab on the dispatch screen showing the return date, time slot and status of “Promised”.

Review PO and Order Part
- Open and review the PO.

- Verify receive location, vendor and parts then enter part cost. It is VERY IMPORTANT to enter the true cost here. The Service Analysis pulls the materials cost information from the PO’s.
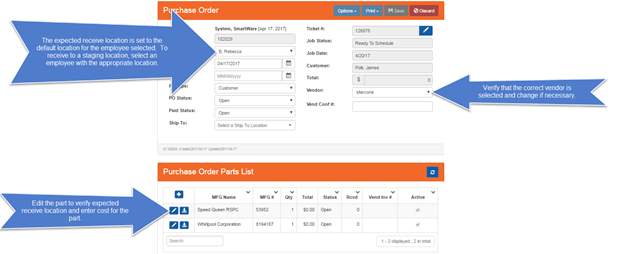
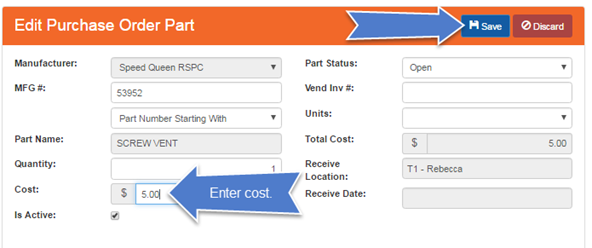
- Cost and Expected Receive Date are verified from the supplier’s website as the part is being ordered.
Completed
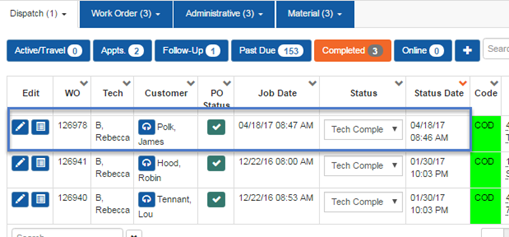
- Jobs sent back as ‘Completed’ come into the Completed tab on the dispatch screen.
Review and Finalize the Work Order
Review the Work Order
Open the work order from the Dispatch screen or from Invoicing
Dispatch screen
From the Completed tab, click on the Edit button for the work order. 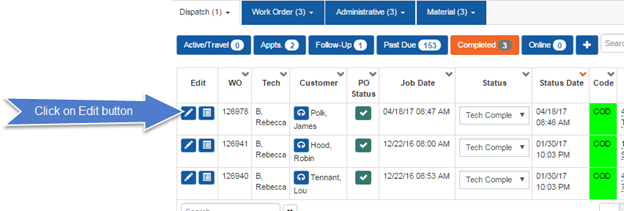
Invoicing
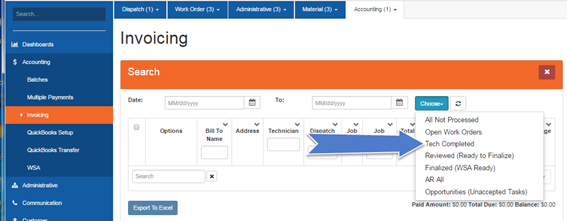
- Open the Tech Completed screen in the Invoicing module.
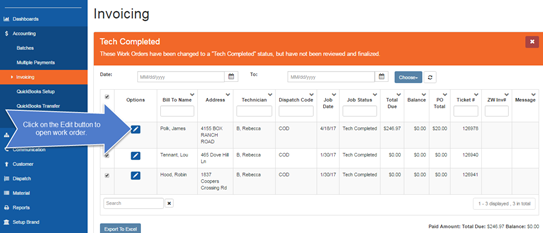
- Open the work order by clicking on the edit button.
Verify
- Verify that Notes, Tasks, Parts, PO, Payments, Tax Authority, Warranty Claim and Split Pay Type are all correct on the work order. Any required changes should be made now. Once the work order has been Finalized, tasks and parts can no longer be changed.
Change Status to ‘Reviewed’ then click ‘Save’.
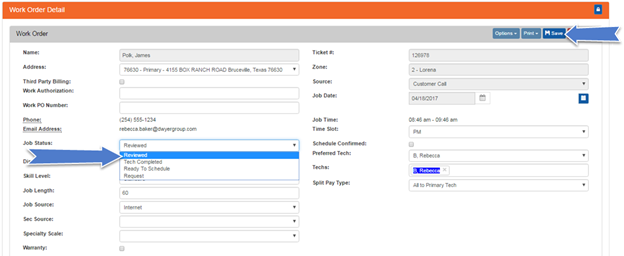
- If all of the parts have not been received to the Primary Tech’s location, you will be prompted to transfer the inventory.
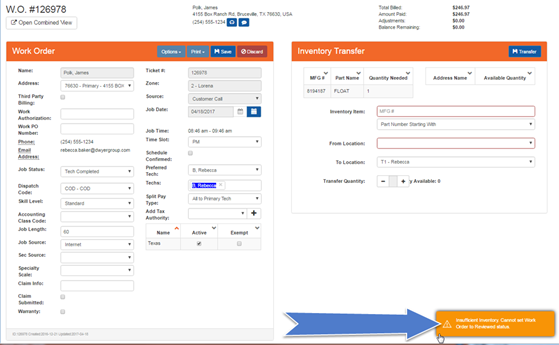
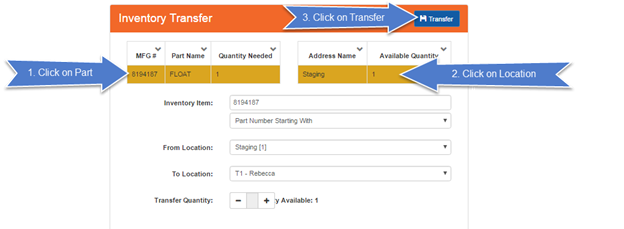
- Click on Part, click on Location, click on Transfer.
- Once the inventory has been transferred, change the status to Reviewed and click Save.
- Changing the status to Reviewed
- Removes the parts from inventory
- Allows the work order to be included in the Time & Revenue report
- Moves the work order to the ‘Reviewed’ Invoicing screen
Finalize the Work Order
- Work Orders should be Reviewed and Finalized on a daily basis.
- Open the ‘Reviewed’ Invoicing screen.

- Click on the Finalize button at the bottom of the screen.
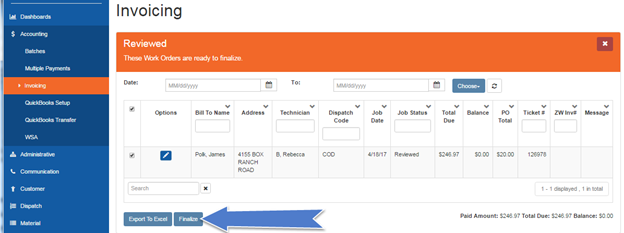
- Finalizing the work order:
- Allows Invoices to be transferred to QB.
- Locks the work order so that changes cannot be made to tasks, parts or amount charged.
- Changes the status to WSA Ready
- Only work orders that have a balance of $0.00 go on a WSA
- All work orders should be finalized regardless of whether or not there is a balance.
- Moves work orders to AR and the WSA Ready Invoicing screen.