Overview
This document will show you how to deal with certain financial situations that may come up in the course of managing Customer payments.
1 - Adjustments
(1.0) In SmartWare Adjustment is a generic term that covers credits, refunds, bounced checks and movement of payments. It refers to an amount added to the Work Order that changes the Balance Due without changing the Amount Billed.
1a - Credits
(1.1) Credits are used to reduce the amount that a Customer is expected to pay AFTER a Work Order has been Finalized. Once a Work Order has been Finalized the Amount Billed can no longer be changed. The original amount has been sent to QB and accounted for on a WSA.
(1.2) If a Work Order has not been Finalized the Amount Billed can be changed in the Tasks panel of the Work Order, or in the case of using an incorrect tax, by changing the tax authority on the Work Order.
(1.3) Occasionally there is also a need to accept a payment that is less than what was originally quoted on a Work Order.
When to Issue a Credit
(1.4) 1. If the Customer is dissatisfied with the work that has been completed and:
a) No payment was made, leaving a balance.
b) Partial payment was made, leaving a balance.
c) Refund was given, leaving a balance.
2. If the Warranty company sends a payment for an amount that is less than what was submitted.
3. If you request a payment from the Customer several times and there is no reasonable expectation that the payment will be made.
4. If the Tax applied to a Work Order was wrong.
How to Issue a Credit:
(1.5) On a Work Order that has been Finalized click the Options button (1) and then select Adjustments (2).
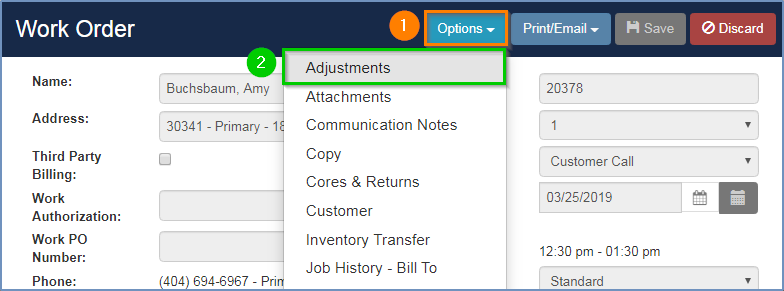
Figure 1.0
(1.6) Select the Adjustment Type Credit or Credit-Tax Only from the drop-down.
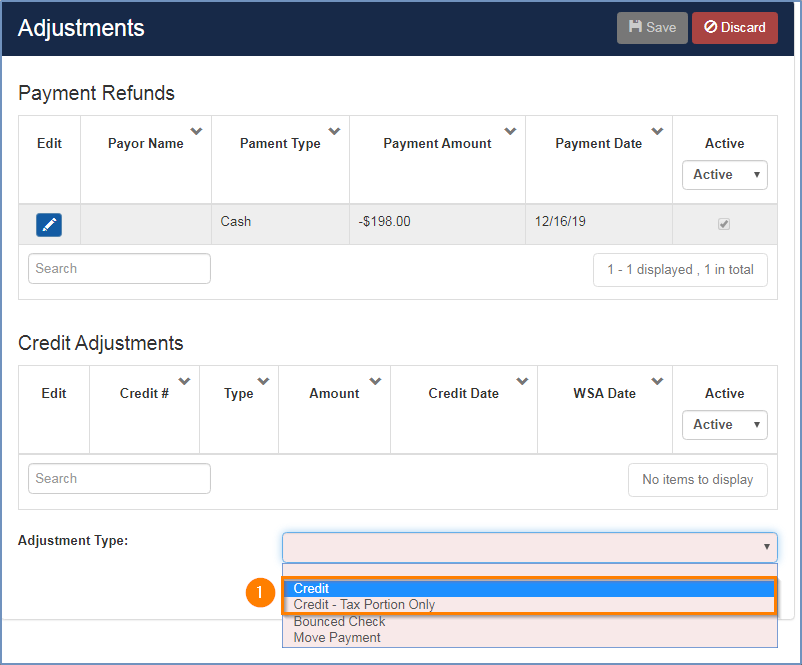
Figure 1.1
|
NOTE: Credit and Credit - Tax Portion Only options will not appear if the Work Order Balance Remaining is negative (1).
|
(1.7) If you've chosen the 'Credit' Adjustment Type you will see:
- An area listing taxes and showing your Balance Remaining (1).
- What date (2) you are applying this credit (the date will by default be today's date).
- The Credit Amount (3) you are applying (the maximum that can be applied is whatever your Balance Remaining is).
- The Task (4) you are applying the credit to
- An area for any Memo (5) information.
- A Save (6) button to apply your Adjustment Type to the Work Order.
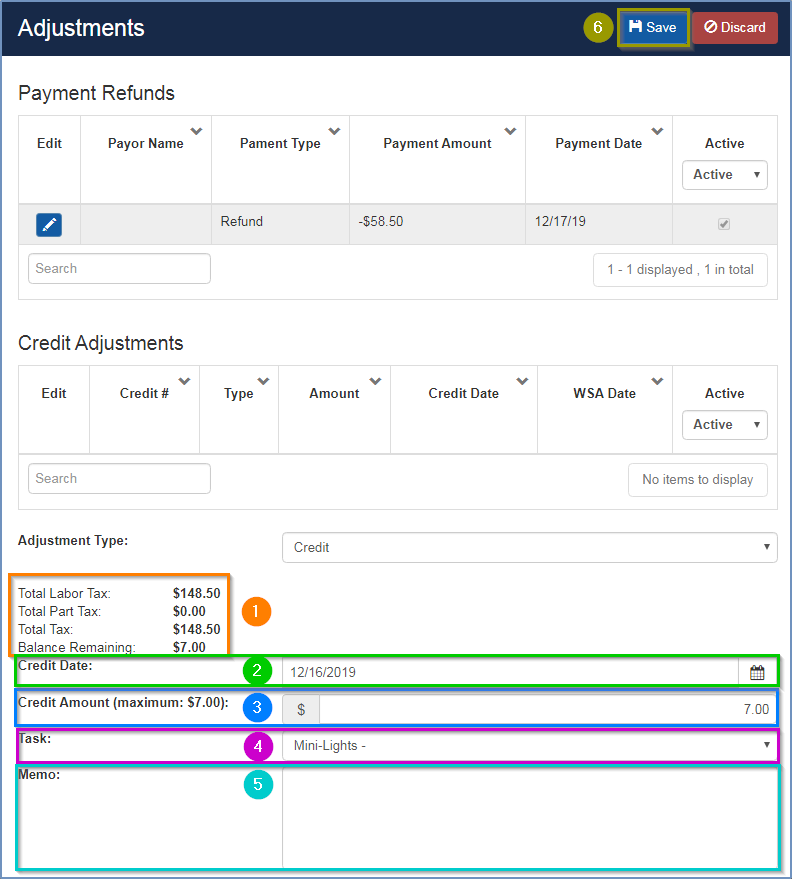
Figure 1.2
(1.8) If you've chosen the 'Credit - Tax Portion Only' Adjustment Type you will see:
- An area listing taxes and showing your Balance Remaining (1).
- What date (2) you are applying this credit (the date will by default be today's date).
- The Credit Amount (3) you are applying (the maximum that can be applied is whatever your Total Tax is).
- The Tax (4) you are applying the credit to
- An area for any Memo (5) information.
- A Save (6) button to apply your Adjustment Type to the Work Order.
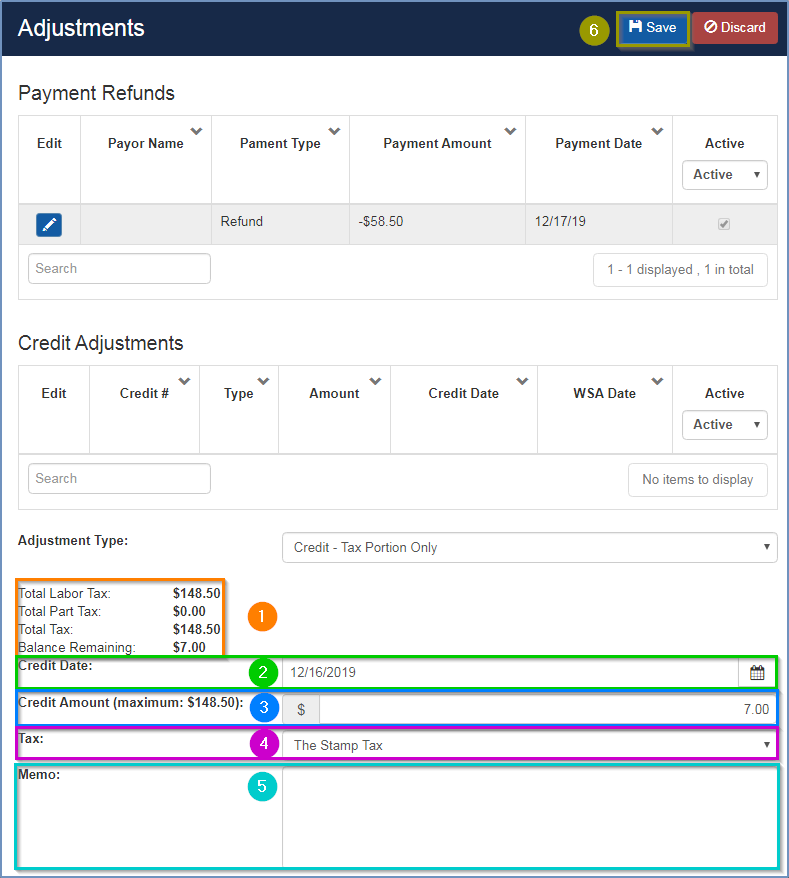
Figure 1.3
(1.9) After you have saved your Credit Adjustment it is added to the Work Order, changing the Balance Due while leaving the Amount Billed the same.
(1.10) Your Credit Adjustments can be seen in the Credit Adjustments table (1) and in the Adjustments section of the Work Order's payment information (2).
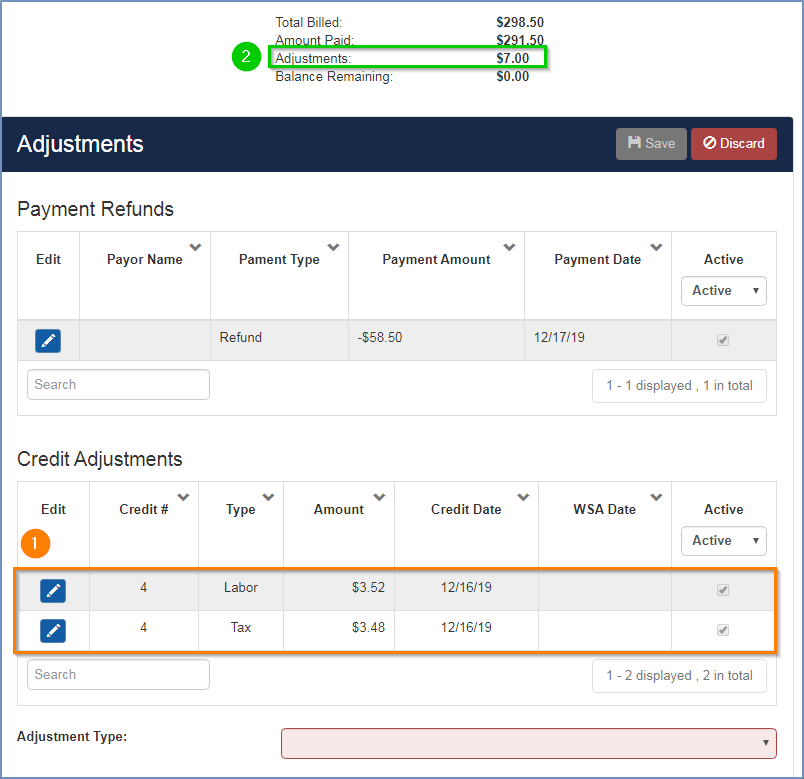
Figure 1.4
How a Credit is Split
(1.11) When a credit is issued, the credit is automatically split between labor, parts and tax in the following ways:
- Labor Only, No Tax – the total amount of the Credit is applied to the labor.
- Labor Only, With Tax – Credit is split between Labor and Tax.
Labor = $65.00
Tax = $5.36
Amount Billed = $70.36
Balance Due = $70.36
Partial Credit of $20.00 is issued: Labor Credit = $18.48, Tax Credit = $1.52
65-18.48 = 46.52
46.52 * 0.0825(tax) = 3.84
5.36 – 3.84 = 1.52
Labor = $65.00
Tax = $5.36
Amount Billed = $70.36
Adjustment = $20.00
Balance Due = $50.36
Full Credit of $70.36 is issued: Tax Credit = $5.36, Labor Credit = $65.00
- Labor & Parts, Labor & Part Tax – Credit is Split between Labor, Labor Tax, Part & Part Tax.
Labor = $237.80
Part = $28.26
Labor Tax = $19.62
Part Tax = $2.33
Amount Billed = $288.01
Balance Due = $288.01
Partial Credit of $100.00 is issued: Tax Credit = $7.62, Labor Credit = $ 82.57, Part Credit = $ 9.81
- To apply the credit to only labor, issue the credit memo, then make the part credit inactive and apply the desired credit amount to the labor.
| NOTE: The tax rate of the tax authority applied to the Work Order will affect what percentage of credit is split between the labor, parts and taxes. |
How Credits Affect WSA's and QBO
(1.12) Credit Memos are applied to WSA’s on the week they were created. The credit effectively reduces the week's revenue by the credit amount. The revenue remains the same but the credit is calculated on a separate line item to reduce the amount on which royalties are based.
(1.13) Credit Memos are transferred to QBO when the ‘Adjustments’ (2) are transferred on the QB Transfer screen (found from the Choose button (1)).
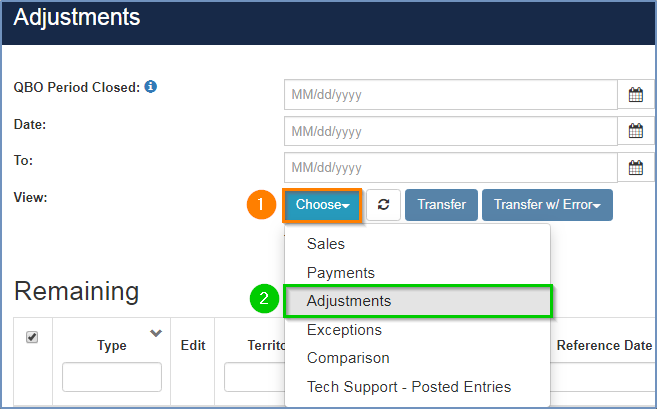
Figure 1.5 - To get to the QuickBooks Transfer screen, click Accounting in the main menu and then select QuickBooks Transfer from the drop down list.
How to Enter a Refund - Overpayment for a Negative Balance
(1.24) A negative balance will occur if a Customer pays more than the amount quoted on a Work Order. Here are a few examples of how this could happen:
- The Customer rounds the amount paid to an even number on a check
- A Customer transposes numbers when writing a check.
- A Customer pays $100 cash on a bill for $99.95.
(1.25) The Refund - Overpayment (1) option will only show as an Adjustment Type if there is a negative balance on the Work Order that was caused initially by the Customer overpaying and not because of any refunds or other adjustments you made after that.
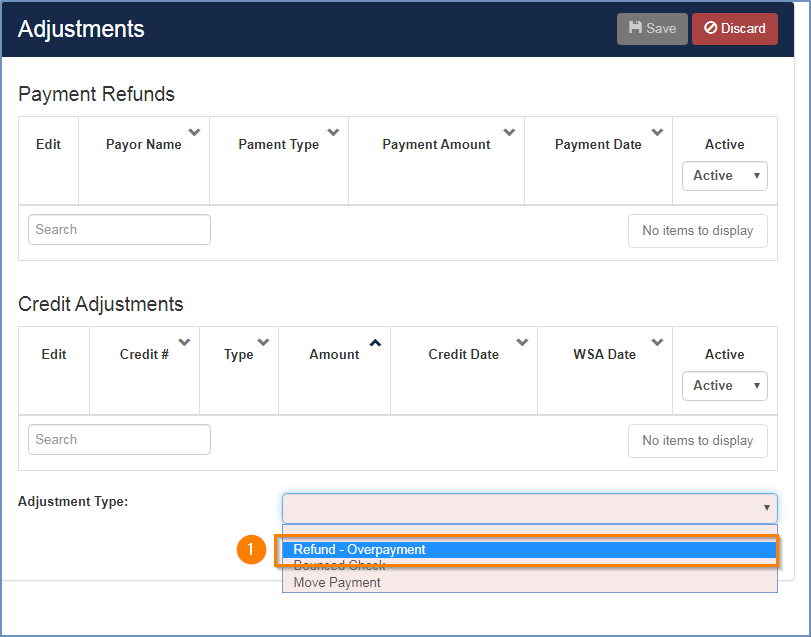
Figure 1.12
(1.26) 1. Select the Adjustment Type as Refund - Overpayment (1).
2. Enter the amount of the negative Balance Remaining (3) as a positive number (2).
3. Save (4).
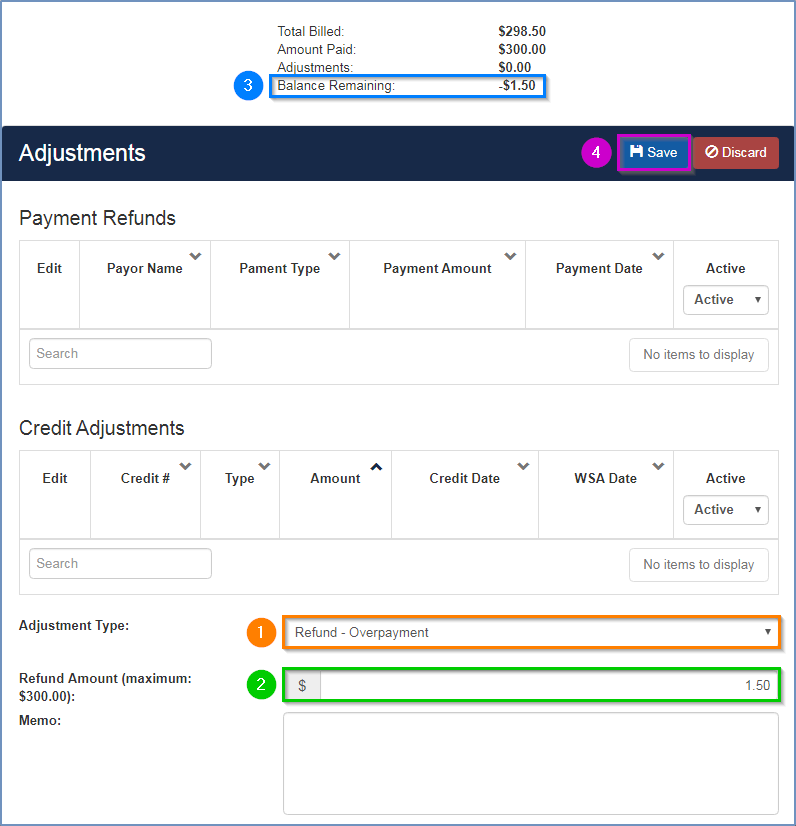
Figure 1.13
(1.27) The Refund - Overpayment will appear in the Payment Refunds table (1) and bring the Work Order to a $0.00 Balance Remaining (2).
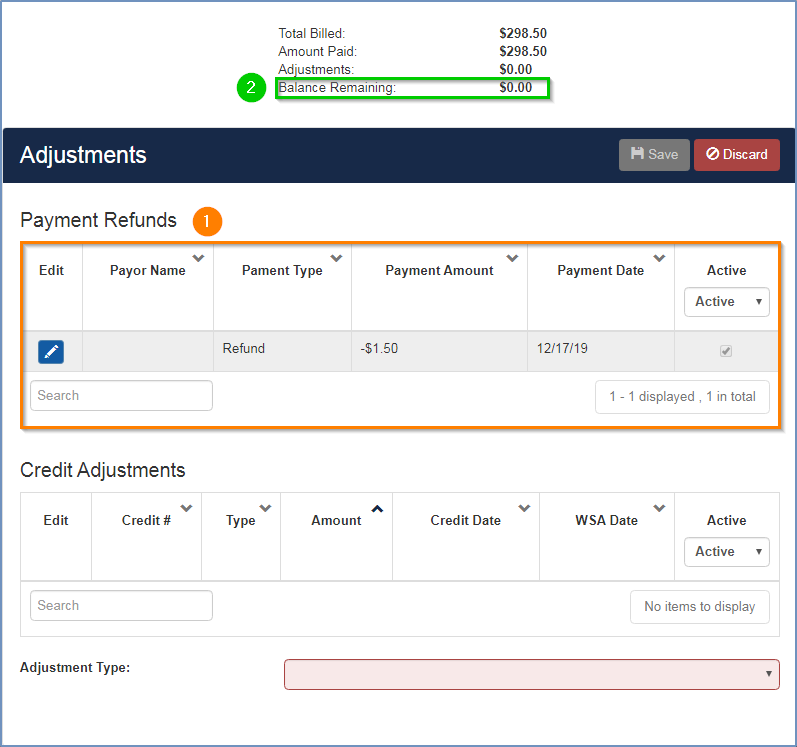
Figure 1.14
How Refunds Affect WSA's and QBO
(1.28) Refunds have no bearing on WSA’s. The Work Order will show in AR All if a corresponding credit was not issued and there is a balance on the Work Order, but once a Work Order has been sent on a WSA it will never be on another one.
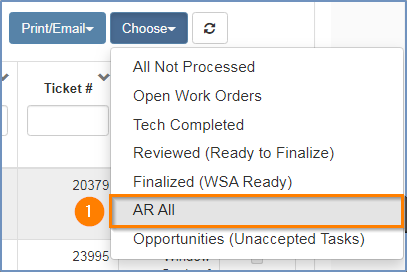
Figure 1.15 - Main Menu - Accounting - Invoicing - Choose - AR All
(1.29) Refunds do NOT transfer to QBO. Instead they will show under ‘Exceptions’ on the QB Transfer screen.

Figure 1.16 - Main Menu - Accounting - QuickBooks Transfer - Choose
(1.30) ‘Exceptions’ contain any amount that does not get transferred to QBO and must be entered into QBO manually. The Exceptions screen is simply a list (1) to help the user keep up with what needs to be manually entered.
(1.31) Once an amount has been manually entered, check-mark the box next to the amount (2) and click on the ‘Process’ button (3) to remove it from the list.
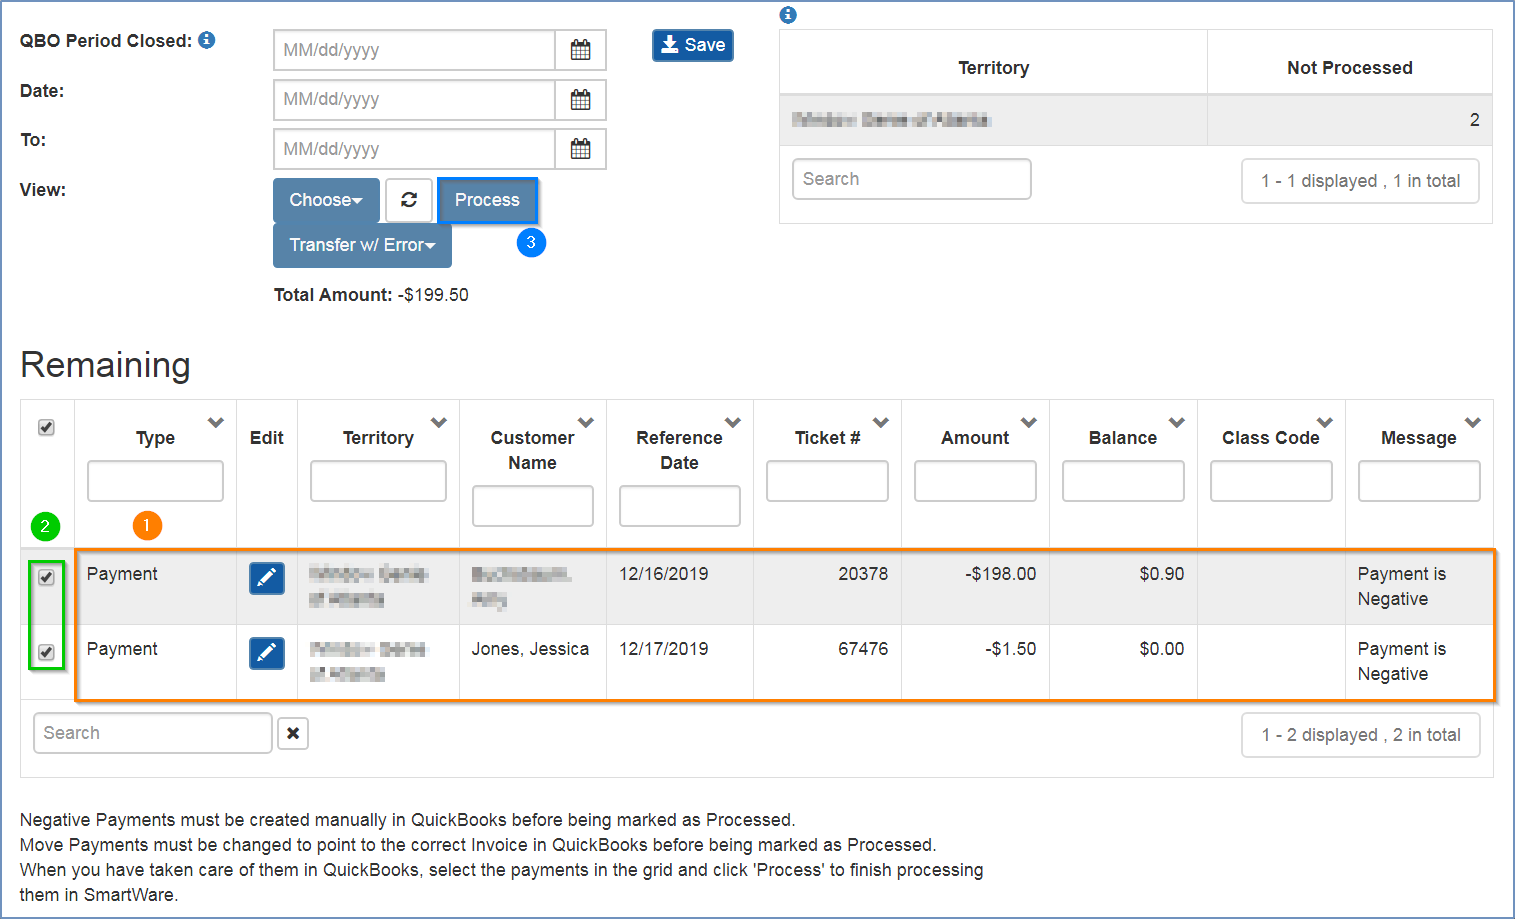
Figure 1.17
1c - Bounced Checks
(1.32) Using the 'Bounced Check' Adjustment Type allows the user to add an NSF fee to the Work Order after it has been Finalized.
(1.33) Go to Options (1) > Adjustments (2).
(1.34) Select Bounced Check (3) from Adjustment Type (4).
(1.35) Enter NSF fee (4)
(1.36) Select the Original Payment for the bounced check amount (5).
(1.37) Save.
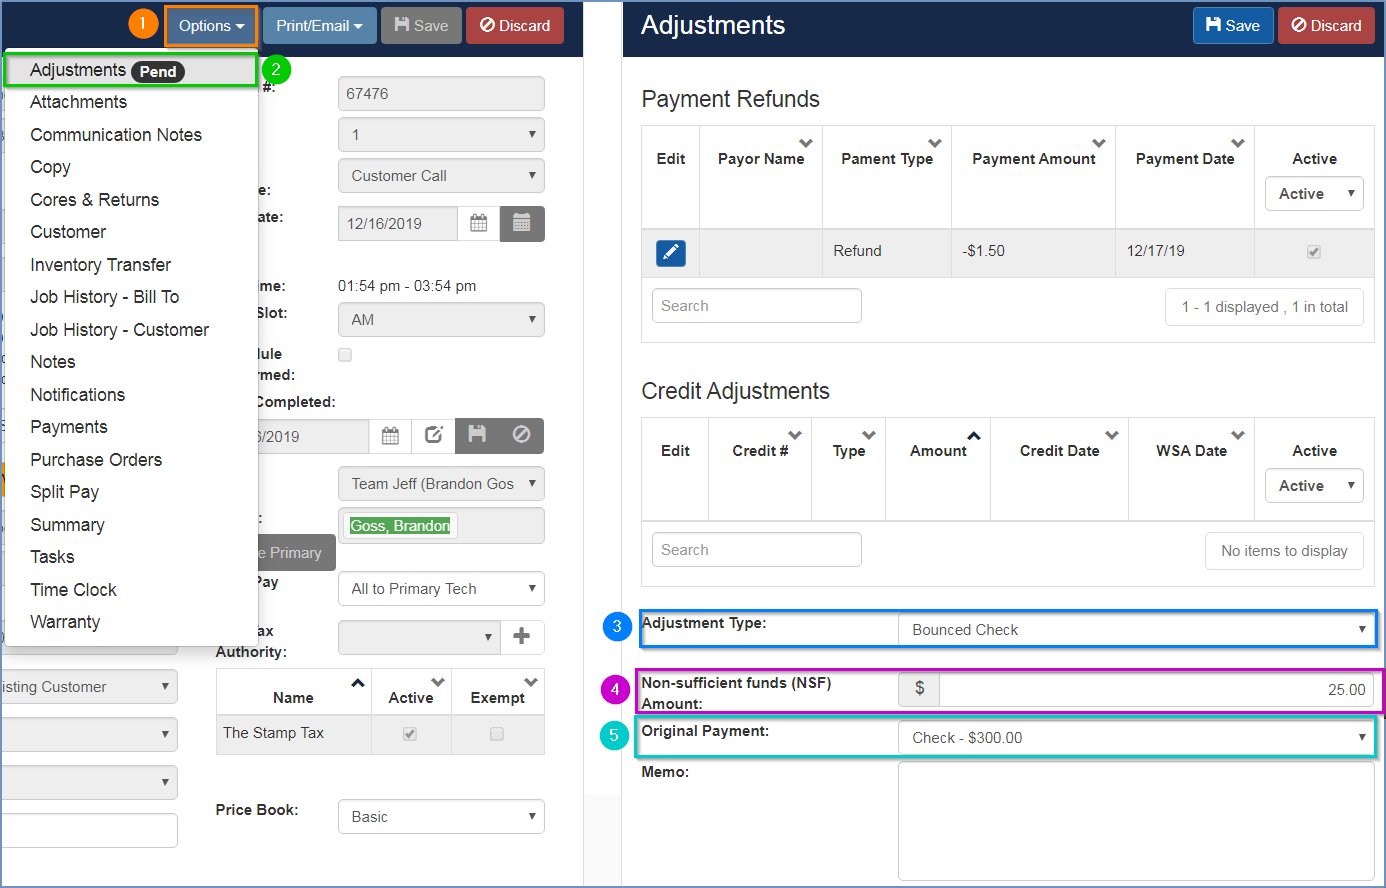
Figure 1.18
(1.38) Your new information will appear in the Payment Refunds table (1) and affect the payment information at the top (2). This will change the Balance Due, including the NSF fee, without changing the Amount Billed.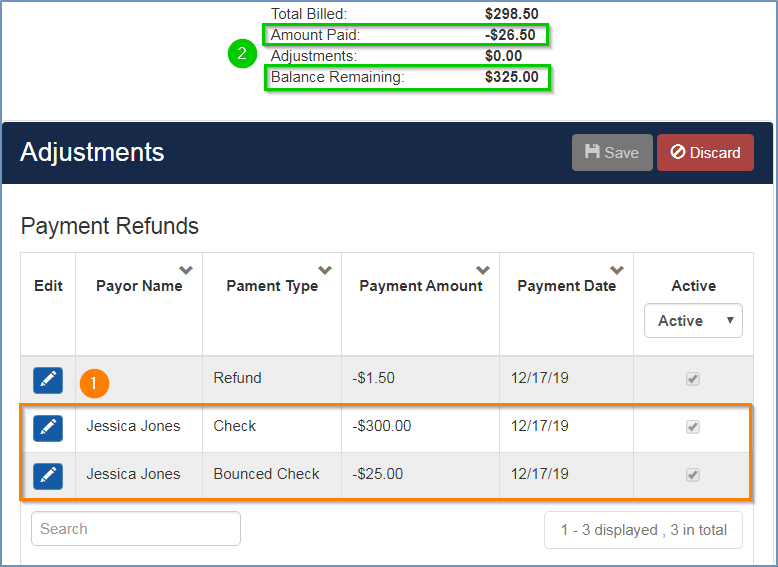
Figure 1.19
(1.39) Because these are now negative payment amounts they will show under ‘Exceptions’ on the QB Transfer screen and will need to be added manually to QBO.
1d - Move Payment
(1.40) If a payment is added to the wrong Work Order it can be moved to the correct Work Order using the ‘Move Payment’ Adjustment Type.
- Go to Options > Adjustments and select Move Payment (1) as your Adjustment Type.
- Select the Original Payment that you wish to move (2).
- Enter the Ticket number (Work Order ID) of the correct Work Order (3).
- Save (4).
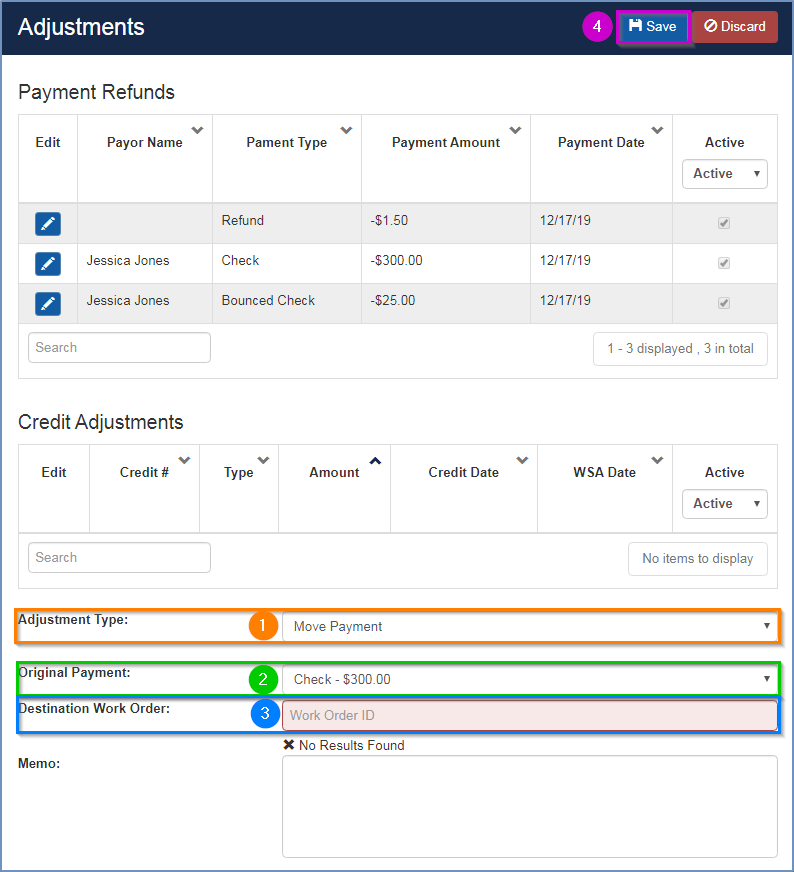
Figure 1.20
-
If the payment has already been sent to QB associated with another Work Order, it will show under ‘Exceptions’ on the QB Transfer screen so that it can be manually adjusted in QBO.
