New Work Order
Navigate to New Work Order
You can access the New Work Order feature by navigating to one of the following locations:
- Communication | Phone Monitor: Click the
 (plus) button
 - Dispatch | Dispatch: Click the
 (plus) button
 - Work Order | New Order
- Work Order | Search: Click the
 (plus) button
New Work Order – Features:
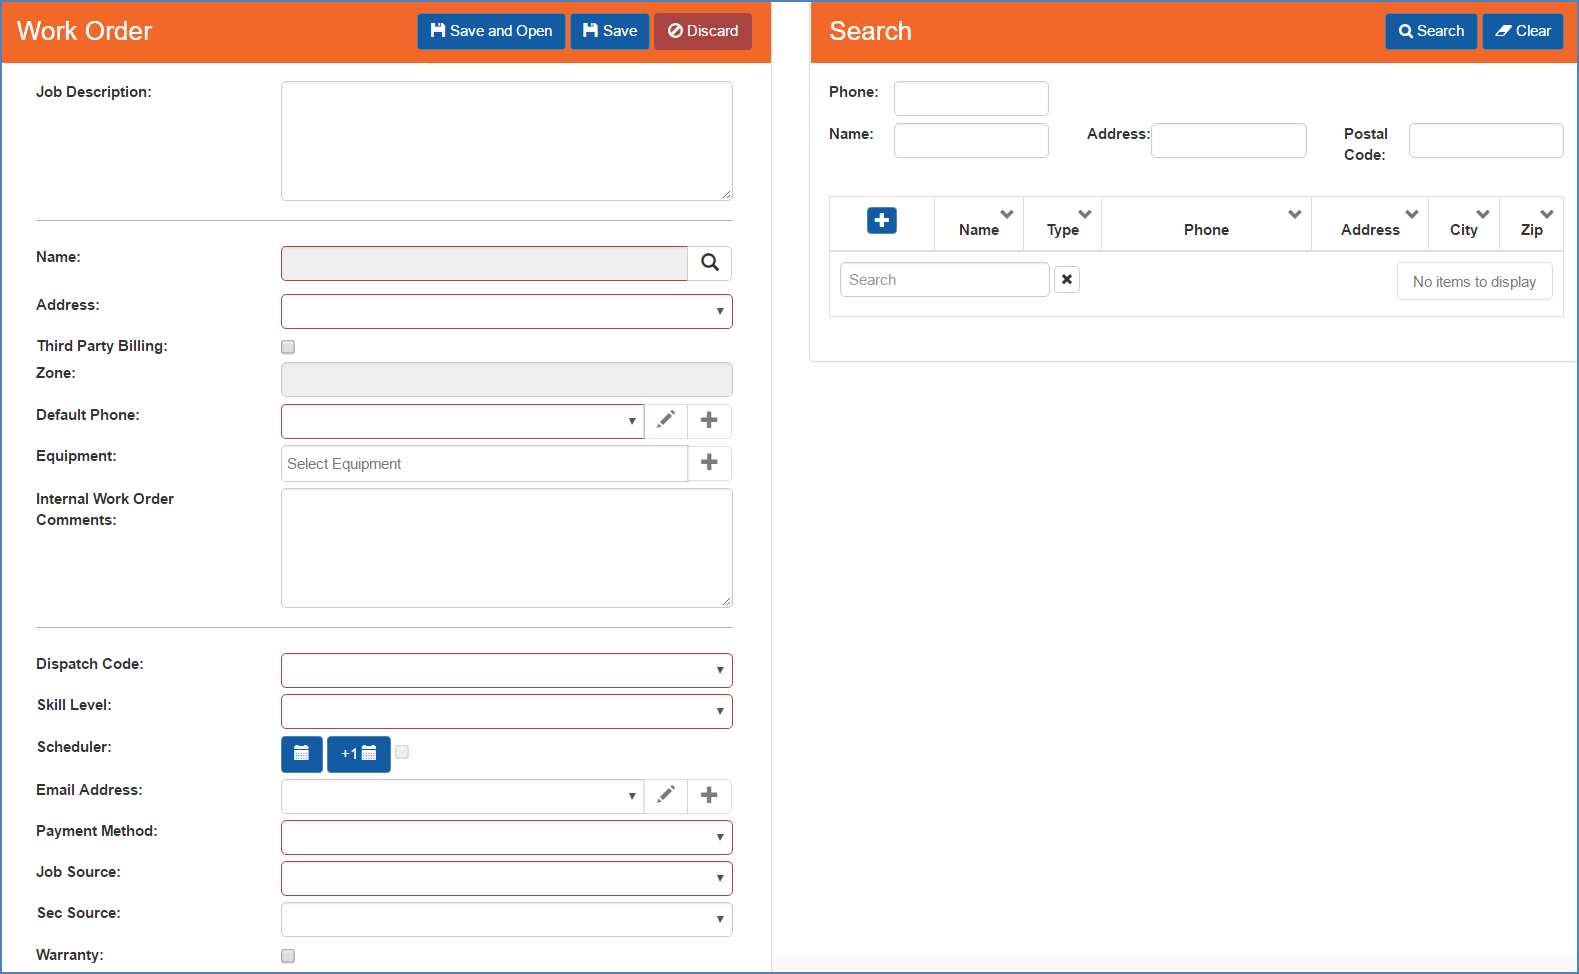
The New Work Order has been divided into two panels to make navigation easier: Work Order & Search
Work Order and Search
- Work Order: Allows you to enter in limited information about the new work order
- Search: Allows you to search for customers to create a new work order for
How to add an Existing Customer to New Order
To add an existing customer to a new work order you will need to perform the following steps:
Search for a Customer
The Search panel allows you to define the search criteria you would like to use to search for customers. Search results list is restricted to active users only. Attempting to create a work order with an inactive user will display error message
Search
- In the Search activity, enter a single item or combination of items
- Once you have finished entering all search criteria, you can either press “Enter” key on your keyboard or click the
 (Search) button
| Did you know: Pressing the “Tab” key on your keyboard will move the cursor between fields, such as from the ‘Phone” box to the “Name” box. Press “Shift” + “Tab” to move the cursor to the previous field |
- A list of customers matching your search criteria will be displayed

Search - results grid
Verify Correct Customer Name and Address
Verify that you find the correct customer name and correct address the job is for in the Search results grid
Next, click  (Select Customer) button next to a specific line item in the Search results grid to move the customer and address to the new work order
Add New Contact to Existing Customer
If you are able to find the correct customer but cannot find the correct Contact, you will need to perform the following steps:
- Click the
 (Add new address and/or contact) button next to the correct customer name
 - The Customer (new contact) panel will load, allowing you to add the Contact

Add New Contact - From the Customer (new contact) panel, make sure you fill out all required fields and then click the
 (Save and Select) button to add the contact to the customer and apply it to the new work order
 - Click the
 (Discard) button to close the Customer (new contact) panel and return to the New Work Order Customer Search screen
Add New Address to Existing Customer
If you are able to find the correct customer in the Search results grid but are unable to find the correct address the job is for, you will need to perform the following additional steps:
- Click the
 (Add new address and/or contact) button next to the correct customer name
 - The Customer (new contact) panel will load; check the "Address Only" box
- The Customer (new address) panel will load, allowing you to add the new address

Add New Address - Make sure you fill out all the required fields on the Customer (new address) panel and then click the
 (Save and Select) button to save that address for the existing customer and add the customer and the new address to the new work order form
 - Click the
 (Discard) button to close the Customer (new address) panel and return to the New Work Order Customer Search screen
| When searching by a customer’s full name make sure to enter Last Name, First Name to ensure fewer extraneous results are returned |
| If you are unable to find an existing customer, enter less criteria in the search criteria or try searching by different criteria. It may be that some of the information you entered does not match exactly on the Customer Record. (e.g., Customer’s phone number has changed, or customer married and has a new last name.) |
How to Create a New Customer from the New Order
To create a new customer from the Work Order panel you will need to perform the following steps:
- Click
 (located below the Search Criteria) to open a New Customer
- Enter as much information as you can about the customer
- Make sure to fill in any required customer fields that are outlined in red
- Once you have finished entering information for the new customer, click
 (Save) or
  (Save and Open) button
How to Create and Save a New Work Order
After you have searched for and added a customer to the new Work Order panel, it is time to fill out the new Work Order fields
- Enter a Job Description
- Make sure to fill in any required fields (those outlined in red)
- Verify and update the following fields where necessary:
- Appropriate customer and customer address is selected
- Default Phone is set to the appropriate call back number indicated by customer for this work order
- Third Party Billing is checked and an approved Third Party Customer has been selected
- Correct Equipment(s) has been selected
- Enter Internal Work Order Comments
- Warranty checkbox is checked for warranty jobs
- Once you have finished entering information for the New Work Order, click
 (Save) or
  (Save and Open) button
See Work Order Options section of this document for additional information on options available from the Work Order panel |
Where to find additional Work Order Options
Additional work order features can be found by clicking ![]() (Save and Open) from the Work Order panel and then selecting
(Save and Open) from the Work Order panel and then selecting ![]() (Options)
(Options)
Work Order – Options menu
Under the ![]() menu the following work order features will be available
menu the following work order features will be available
|
Menu Option |
Functionality |
|
|---|---|---|
|
Attachments |
Opens the Work Order Attachments panel allowing you to view/add/edit any files or images that have been associated with the work order
|
|
|
Communication Notes |
Opens the Work Order Communication Notes panel allowing you to view any communication messages that have been sent out to the customer through text message or email |
|
|
Copy |
Opens a Copy Work Order popup screen allowing you to make a copy of the work order |
|
|
Customer |
Opens the Customer panel based off the customer selected on the work order and allows you to view, edit or add information for the customer |
|
|
Inventory Transfer |
Opens the Inventory Transfer panel allowing you to view a list of MFG part #s and quantities needed to complete the work order where the technician does not have enough parts available. You can then transfer inventory from another inventory location to the technician’s location to cover the part quantity needed. |
|
|
Job History |
Opens the Job Histories panel allowing you to see a list of all work orders that have been associated with the customer |
|
|
Notes |
Opens the Work Order Notes panel allowing you to view any type of note that has been entered for the work order and the date/time the note was created. (i.e. Note Types: Job Description, Recommended Repairs, Analysis & Work Performed, Travel SMS, etc) |
|
|
Notifications |
Opens the Work Order Notification panel allowing you to view or edit customer notification methods for the selected work order | |
|
Payments |
Opens the Work Order Payments panel allowing you to view, edit or add payment information for the work order |
|
|
Purchase Orders |
Opens the Purchase Order List panel allowing you to view, edit or add purchase order information for the work order |
|
|
Split Pay |
Opens the Split Pay panel allowing you to select how to split pay for the work order between technicians |
|
|
Summary |
Opens the Work Order Summary panel allowing you to see an overview of work order totals (e.g. subtotal, tax, payments, adjustments, balance) as well as a summary of the different work order statuses/events that have taken place, the employee who made the status change and the date/time the status change was made. |
|
|
Tasks |
Opens the Work Order Task panel allowing you to view/add/edit Task associated with the work order |
|
|
Time Clock |
Opens the Time Clock Activity panel allowing you to view any time clock entries for employees that has been associated with the work order |
|
|
Warranty |
Opens the Work Order warranty panel allowing you to view a ready-only overview of the work order to help assist offices when submitting warranty claims |
|
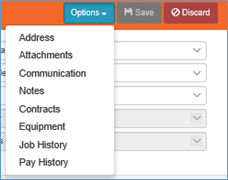
Where to find additional Customer Options
Additional customer features can be found by accessing the Customer panel and then selecting ![]() (Options)
(Options)
Customer – Options menu
Under the ![]() (Options) menu the following customer features will be available
(Options) menu the following customer features will be available
|
Menu Option |
Functionality |
|
|---|---|---|
|
Address |
Opens the Customer Address panel allowing you to view, edit or add addresses that are associated with the customer |
|
|
Communication |
Opens the Customer Communication Info panel allowing you to view, edit or add communication devices to a customer record (i.e. phone, cell, pager, email address) |
|
|
Notes |
Opens the Customer Notes panel allowing you to view or add additional notes that should be specific to a customer and not a work order |
|
|
Contacts |
Opens the Contacts panel allowing you to view, edit or add contacts for the customer |
|
|
Contracts |
Opens the Contracts panel allowing you to view, edit or add contracts for the customer |
|
|
Equipment |
Opens the Equipment panel allowing you to view, edit or add equipment that is associated with the customer |
|
|
Job History |
Opens the Job History panel allowing you to view, edit or add work order information that has been associated with the selected customer |
|
|
Pay History |
Opens the Pay History panel allowing you to view or edit payments that have been placed on a work order for the customer |
|