Overview
The QuickBooks Transfer panel allows you to transfer your accounting transactions from SmartWare to QuickBooks, as well as review what you have already sent over
Navigate to QuickBooks Transfer
You can access the QuickBooks Transfer panel by navigating to the following location:
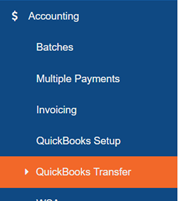
- From the main menu on the left side of the screen, select Accounting and then QuickBooks Transfer

Main Menu - QuickBooks Transfer
QuickBooks Transfer
The QuickBooks Transfer panel allows you to view and transfer items to QuickBooks and is divided into two sections: Search and Remaining Grid
- Search: Allows you to specify what information you would like to view on the QuickBooks Transfer panel
- Results Grid: Will display a list of all transactions matching the search criteria and allow you to transfer them to QuickBooks

QuickBooks Transfer
Below is an explanation of each QuickBooks Transfer feature:
The Search section allows you to define the search criteria you would like to use to search for items

QuickBooks Transfer - Search
- From the QuickBooks Transfer panel: If you would like to only view information for a specific date range, in the Date: & To: fields enter in the date range you would like to use
- Leave date fields blank to view all items for the selected QuickBooks Transfer view
- From the (Choose) dropdown, select the view type you would like to view information for
- The QuickBooks Transfer panel will update to display results matching the view you selected
Below is a brief explanation of the different search options available:
| Item | Functionality |
|---|---|
| Territory: |
Used to select which territory to transfer items from
|
| QBO Period Closed: |
(Optional field) QBO Period Closed (date) field will allow you to specify the date that was set in QuickBooks for the QuickBooks Closed Date (date you have locked your QuickBooks file for)
|
| Date: |
Used in conjunction with the To: search field. Allows you to specify a starting date to search for items
|
| To: |
Used in conjunction with the To: search field. Allows you to specify an end date to search for items
|
| Choose |
Determines the type of information that will be returned
|
 |
Will refresh the information displayed on the QuickBooks Transfer panel based off the search criteria selected |
The 'Choose' option selected will display information available to transfer to QuickBooks or information about the QuickBooks Transfers that have taken place
QuickBooks Transfer - Results Grid
Below is a brief explanation of the different columns available from the QuickBooks Transfer panel Based on the 'Choose' option selected during the search, will determine which columns are available
| Item | Functionality |
|---|---|
| Checkbox |
Indicates if an item is selected or unselected
|
| Type |
Displays the type of item being displayed:
|
| Edit |  (edit WO): Will open the work order allowing you to view information about the work order and make changes if needed (edit WO): Will open the work order allowing you to view information about the work order and make changes if needed |
| Territory | Displays Territory based off Zone selected on work order |
| Customer Name | Displays customer name as it appears on the work order. For Payments, if there is a Payor Name, displays that instead |
| Reference Date | The date of the transaction (e.g. Sales - Job Date; Payments - Payment Date; Credit Memos - Credit Date) |
| Ticket # | Displays ticket # from work order |
| Amount | Displays the total amount of the item that will be transferred to QuickBooks |
| Balance | Displays remaining balance owed on work order |
| Class Code |
Accounting Class Code from the work order
|
| Message | After the transfer process, the 'Message' column will display information about the status of the transaction. If transfer was successful, it will display “OK”. If there was a problem, it will have a red background and some information about why it failed to send |
Why do items appear with a message?
Information only appears in the Message column after a transfer has taken place and can indicate whether an item transferred successfully or not
Below is a brief explanation of the types of information you may see in the Message column:
| Message: | Functionality |
|---|---|
| OK | Indicates that a transfer from SmartWare to QuickBooks recently took place and the item was successfully transferred to QuickBooks |
| Red background with message |
Indicates an item that was not successfully transferred from SmartWare to QuickBooks
|
- From the QuickBooks Transfer panel, select an option (Sales, Payments or Credit Memos) you would like to send to QuickBooks
- Multiple Territory offices will need to make sure they have the correct territory selected in the Search section
- Next, click the (Transfer) button located on the bottom left of the QuickBooks Transfer panel
- The transfer from SmartWare to QuickBooks can be performed with or without QuickBooks opened
- Once all the above steps have taken place, a message will appear informing you that the transfer to QuickBooks is now complete
- Transactions that were completed successfully will appear with 'OK' in the Message column. Any transaction items that were not successfully transferred will appear with a message indicating why they were not transferred.
- Once the QuickBooks Transfer grid is reloaded or refreshed, transaction items that were successfully transferred to QuickBooks will disappear from the QuickBooks Transfer panel in SmartWare
- As new items become available to transfer to QuickBooks, they will begin to appear in the QuickBooks Transfer panel under the appropriate transfer view
- You will need to perform the above-mentioned steps for each QuickBooks Transfer view (Sales, Payments and Credit Memos)
Refunds
To create a refund payment in SmartWare, you will need to perform the following steps:
- From SmartWare, find the invoice you would like to create a refund for and navigate to Options | Adjustment
- The Adjustment panel will load allowing you to create a refund

QuickBooks Transfer - Adjustments
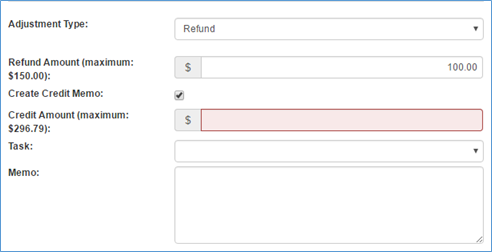
- From the Adjustment Type drop down box, select 'Refund'

QuickBooks Transfer - Create a Refund
- Under 'Refund Amount', enter in the amount you would like to create a refund for
- If a credit memo should also be created check the 'Create Credit Memo' checkbox

- A 'Credit Amount' and 'Task' field will become available
- Credit Amount: Enter in the amount the credit memo should be for
- Task: Select the task that the credit memo should be applied against
- In the Memo field, enter in any notes about why the refund and credit memo were created
- Once you have finished entering in the necessary information for your refund, click the
 (Save) button at the top right of the Adjustment panel
- Refunds will NOT transfer over to QuickBooks and instead will sit in SmartWare on the QuickBooks Transfer panel under Choose | Exceptions until you have handled the refund in QuickBooks
- See Exceptions section of document for instructions on how to process refunds in SmartWare
- A 'Credit Amount' and 'Task' field will become available
Exceptions
Exceptions are negative payments (e.g. refunds) that SmartWare is unable to Transfer to QuickBooks
- You can view exception items by navigating to Accounting | QuickBooks Transfer and selecting 'Exceptions' from the Choose option drop down

QuickBooks Transfer - Exceptions
- Any items appearing under the Exceptions panel will need to be handled in QuickBooks
- Once you have addressed an exception item in QuickBooks, you will need to perform the following steps in SmartWare:
- Navigate back to Accounting | QuickBooks Transfer and select Choose: Exceptions
- From the Exceptions grid,
 check the negative payment that has been addressed in QuickBooks and click
  (Process) button
 - Once an exception has been marked processed in SmartWare, it indicates you have addressed the item in QuickBooks and removes the item from the Exceptions grid
Additional Items:
What Transfers to QuickBooks?
The following items will transfer to QuickBooks:
- Sales: Represents active Task and active Sales Tax information listed on a work order
- Payments: Any payments that have been created and not yet sent to QuickBooks
- If using batches, then the payment must be on an approved batch before it will be available to transfer to QuickBooks
- Credit Memos: Any credit memos that have been created and not yet sent to QuickBooks
The following items currently will not transfer to QuickBooks:
- Refunds: Payments of type 'Refunds'. These should be manually entered in QuickBooks, then marked as processed in SmartWare
When are items available to transfer?
Below is a brief explanation of when items are available to transfer and what date is used when posting transactions in QuickBooks:
| Item | Functionality | Available for Transfer | Reference Date |
|---|---|---|---|
| Sales | Represents any active Task and active Sales Tax information listed on a work order |
Available to transfer once a work order has been processed and finalized in Invoicing panel
|
Appear in QuickBooks based on date the work order was marked as Status: Tech Completed in SmartWare |
| Payments | Any payments that have been created |
Depending on if you are using batches or not in SmartWare determines when a payment is available to transfer to QuickBooks:
|
Appear in QuickBooks based on Payment Date that was entered in SmartWare |
| Credit Memos | Any credit memos that have been created | Available to transfer as soon as credit memo is created in SmartWare | Appear in QuickBooks based on Credit Memo Date that was entered in SmartWare |
What happens during a QuickBooks Transfer?
SmartWare will perform the following steps during the transfer:
• SmartWare will connect to QuickBooks
• Based off transfer (choose) option selected the following will happen:
| Choose View Option | Functionality |
|---|---|
| Sales |
Verify Task descriptions and transfer selected Sale items (Sales & Sales Tax) to QuickBooks
|
| Payments |
Transfer selected payments to QuickBooks
|
| Credit Memos |
Transfer selected credit memo items (Credit Memos & Credit Memo Tax) to QuickBooks
|
• Once SmartWare has finished transferring all items to QuickBooks and associating those items with QuickBooks Invoices (if applicable), SmartWare will then close the connection to QuickBooks
How do I determine if an item went to QuickBooks?
You can check to see if an item was sent to QuickBooks by performing the following steps:
- In SmartWare, open the work order in edit mode. The Work Order Summary should appear loaded on the right side of the page (If not, navigate to Options | Summary)
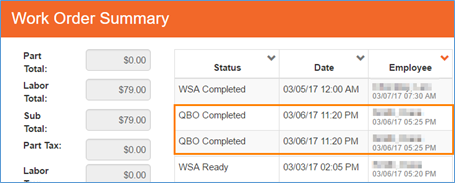
- From the Work Order Summary page, you will see a status of 'QBO Completed' if the sale has been transferred to QuickBooks
- If tax was charged on the work order, you will see two QBO Completed statuses listed One for Sales and one for Sales Tax that was transferred to QuickBooks

Work Order Summary
- If tax was charged on the work order, you will see two QBO Completed statuses listed One for Sales and one for Sales Tax that was transferred to QuickBooks
Below is a brief explanation of the work order QBO Completed Status
| Item | Functionality |
|---|---|
| Status | QBO Completed: Indicates the work order was sent to QuickBooks Online (QBO) |
| Date | Indicates date the invoice/sale was transferred to QuickBooks |
| Employee | Indicates the name of the employee who performed the QuickBooks Transfer |
- Open the work order in edit mode that the payment was listed on
- From the work order, navigate to Options | Payments
- Click the
 (edit) button next to the payment you would like to view information for
 - From the Work Order Payment panel, you will see a field labeled Posted Date

Work Order Payments
- The Posted Date represents the date the payment was transferred and posted to QuickBooks
- If the field is blank, it means the payment has not transferred to QuickBooks yet
 (Save) button to save the QBO Period Closed date in SmartWare
 (unchecked): Will not be included in QuickBooks transfer