Overview:
Inventory is required at different locations within a business in order to function smoothly and without hindrance. For this reason, inventory locations are used to consolidate and manage all goods and material that a business holds for the purpose of resale or repair. Inventory locations allow you to specify availability and status of a product. An inventory location can be a truck for field services, a warehouse, or anywhere material may be stored
This document will cover the following areas of locations:
- Location Setup
- Location Parts
- Reorder Points
- Inventory Movement
- Change Technician’s Default Location
This document is intended as an explanation of the Location feature in SmartWare and assumes you possess a general knowledge of inventory and inventory locations
Location Setup
In order to properly utilize inventory locations with technicians in SmartWare there are a couple of setup options that must first be completed
- Create location
- Assign location to an employee
- Add inventory to new location:
You will need to perform the following steps for each inventory location you would like to create:
Create location:
Navigate to Franchise Address:
Inventory locations are considered franchise addresses and therefore are maintained under the Franchise Address section of SmartWare
You can access the Franchise Address panel by navigating to the following location:
- From the main menu on the left side of the screen, select Setup Franchise and then Setup
- From the Franchise panel select
 (Options) menu and then select Address
Franchise – Options - The Franchise Address panel will appear loaded on the right side of the screen
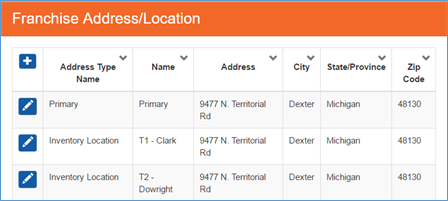
Franchise Address/Location - The Franchise Address/Locations panel is used to record the following items:
- Physical address of office/shop location(s)
- Physical address of warehouse(s)
- Virtual address of all vehicles that will be used to store inventory
From the Franchise Address/Location panel, click the  (+) button
The Franchise Address/Location (new) panel will load allowing you to create a new inventory location 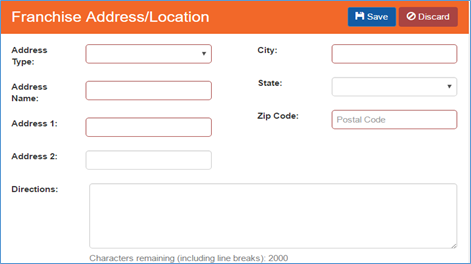
Franchise Address/Location – new record
Under Address Type select ‘Inventory Location’
Once all required information is filled out in the form, the Google Mapping Address will automatically be filled in 
Franchise Address/Location - Google Mapping

Fill out all additional address fields and then click  (Save) button in the top right of the panel to save the record
Below is a brief explanation of each available field:
|
Field |
Functionality |
|---|---|
|
Address Type |
Determines the type of address you are creating:
|
|
Address Name: |
Name you would like to associate with the address. Address name is used to display in other areas of SmartWare |
|
Address 1 |
Street Address in which the inventory location address resides:
|
|
Address 2 |
Additional street address line provided to account for addresses requiring additional information (e.g. apartments or buildings with multiple office spaces). In most cases the Address 2 line is not needed |
|
City |
City in which the inventory location address resides
|
|
State/Prov |
State in which the address resides.
|
|
Postal Code |
Zip Code in which the address resides
|
|
Directions |
Text field allowing you to enter in directions on how to find the address. (e.g. cross streets, turn right at the old bridge) |
Assign Location to an Employee
Once an inventory location is created, if it should be associated with an employee you will need to perform the following steps:
- From the main menu on the left side of the screen, select Administrative and then select Employees

- From the Employees List click the
 (edit) button next to the employee you would like to associate the location with
 - The Employee panel will load on the right side of the screen
- Under Default Location, use the drop down box and select the location that should be associated with the employee

| Employees may only be assigned to one location. However, a location may be assigned to multiple employees allowing for more flexibility. (e.g. Technicians who work different shifts but share the same vehicle would both need to be setup with the same default location). |
Add Inventory to New Location:
Once a location has been created we recommend using the Physical Inventory Scan process to add a large number of parts to the location. Please refer to the Physical Inventory Scan document for detailed information on how the scanning process works
Location Parts
View parts associated with location
- From the main menu, navigate to Material and select Locations
- The Locations Inventory panel will load
- From the Locations drop down box select the location you would like to add parts to
- A list of all parts currently assigned to the location will appear

Material Location – Location Inventory
To edit information about a part on a location you will need to perform the following steps:
- From the main menu, navigate to Material and select Locations
- The Locations Inventory panel will load
- From the Locations drop down box select the location you would like to add parts to
- A list of all parts currently assigned to the location will appear
- Click the
 (edit inventory quantity) button next to the part you would like to view/edit information for
- The Inventory Detail panel will load on the left side of the screen allowing you to view/edit information about the part

Material Location –Inventory Detail - The Inventory Detail panel will display a list of all variations of the part you currently have available on the location. This allows for identifying different quantities of the part you have available, when the part was received to the location and what the cost of the part was at the time it was received
- Once a part line item reaches a quantity on hand of 0, the line item will no longer appear listed in the Inventory Detail panel
- The Inventory Detail panel will load on the left side of the screen allowing you to view/edit information about the part
To edit information related to a part, click the  (edit) button next to the part line item under the Inventory Detail panel you would like to edit
- Editing of part information should only be done if you are needing to adjust information related to the part because it was not originally entered or was entered incorrectly
The Inventory Detail (edit) panel will load allowing you to make changes to the part information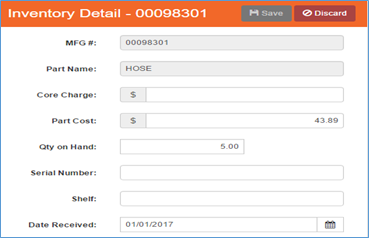
Inventory Detail – edit view
See Part inventory detail (fields) section of this document for an explanation of each available field from the Inventory Detail edit panel
If you need to add a new record of the part for the location complete the following steps:
- From the main menu, navigate to Material and select Locations
- The Locations Inventory panel will load
- From the Locations drop down box select the location you would like to add parts to
- A list of all parts currently assigned to the location will appear
- Click the
 (+) button located at the top of the Inventory Detail screen
- This should be done if you purchased additional quantities of the part at a different cost and date
The Inventory Detail (add) panel will load allowing you to create a new record for the location part
- Fill out all appropriate parts for the new part record and then click
 (Save) button to add the new record to the part location
See Part inventory detail (fields) section of this document for an explanation of each available field from the Inventory Detail new record panel
Part Inventory Detail (fields):
Below is a brief explanation of each available field from the Add/Edit Part Inventory Detail panel:
|
Field |
Functionality |
|---|---|
|
MFG # |
Represents the manufacture number that is associated with the selected part.
|
|
Part Name |
Name that is associated with the inventory item |
|
Core Charge |
Represents the core charge amount that should be charged for the selected inventory item
|
|
Part Cost |
Represents the amount you paid the vendor for the inventory item |
|
Qty on Hand |
Represents the current quantity available for the selected inventory on the location |
|
Serial Number |
Free text field that allows you to type in any serial numbers that should be associated with the inventory item |
|
Shelf |
Represents the physical location (e.g. shelf, bin) where the inventory item resides in the location |
|
Date Received |
Represents the date the inventory item was added to the stock quantity of the location |
Add a Part to a Location
There are a few different ways you can add parts to a location: from Material: Locations, Physical Inventory Scan or Purchase Orders
- Material: Locations: Useful when adding a small number of parts to a location. Slow process for adding entire location inventory stock.
- Physical Inventory Scan: Preferred method for adding a large number of parts to a location or verifying inventory accuracy from a location
- Purchase Orders: Useful when adding a small number of parts to a location that you are ordering/receiving from a vendor
For the purpose of this document we will only discuss how to add parts through Material: Locations. For information on how to add inventory to locations utilizing the other methods please reference the Purchase Order and Physical Inventory Scan
Add Part Through Material: Locations
To add parts to a location through Material: Locations you will need to perform the following steps:
- From the main menu, navigate to Material and select Locations
- The Locations Inventory panel will load
- From the Locations drop down box select the location you would like to add parts to
- A list of all parts currently assigned to the location will appear
- Verify the part you are trying to add is not already assigned to the location
- For newly created locations the part grid should appear blank
- Click the
 (+) button to add a new part to the location
 - The Inventory Detail panel will load on the right side of the screen allowing you to add a new part to the location
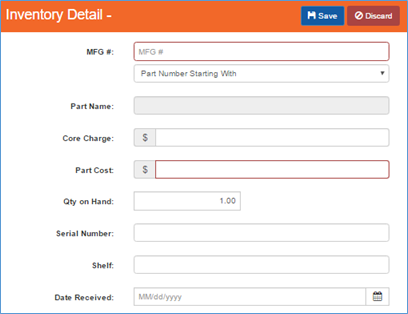
Location - Inventory Detail
- In the MFG # field, enter the part # or part description you would like to search by.
- Below MFG # field select the method you would like to use when looking up a part.
- A list of parts matching your search criteria will appear. Select the part you would like to add to the inventory location.
- Next, fill out all required fields and then click the (save) button to save the inventory item and quantity to the location.
- See Reorder Parts section of this document if you would like to add reorder points for the newly added part.
Below is a brief explanation of each available field from the Add/Edit Part Inventory Detail panel:
|
Field |
Functionality |
|---|---|
|
MFG # |
Represents the manufacture number or description associated with the selected part.
|
|
MFG # (search criteria) |
Method by which you would like to search for the Inventory Item:
|
|
Part Name |
Name that is associated with the inventory item |
|
Core Charge |
Represents the core charge amount that should be charged for the selected inventory item
|
|
Part Cost |
Represents the amount you paid the vendor for the inventory item |
|
Qty on Hand |
Represents the current quantity available for the selected inventory on the location |
|
Serial Number |
Free text field that allows you to type in any serial numbers that should be associated with the inventory item |
|
Shelf |
Represents the physical location (e.g. shelf, bin) where the inventory item resides in the location |
|
Date Received |
Represents the date the inventory item was added to the stock quantity of the location |
Remove Part From a Location
In order for a part to no longer appear on a location the following steps must be performed: ‘Set Part Quantity = 0 and ‘Remove Reorder Points’
There are two ways you can set the location part quantity on hand to 0:
- Inventory Transfer: (preferred method) Inventory Transfer will move the location part quantities to another location ensuring inventory quantities are kept accurate.
- Refer to Inventory Transfer document for information on how to transfer inventory from one location to another.
- Location Inventory Details: Will remove part quantity from location, with no accountability for remaining inventory moved to another location
- You will need to set the part quantity on hand to 0 for all part line items appearing on the Inventory Detail panel for the selected Location Part. Once a part line item reaches a quantity on hand of 0, the line item will no longer appear listed in the Inventory Detail panel
- Refer to View/Edit part information section of this document for information on how to edit part information
From the main menu, navigate to Material and select Locations
The Locations Inventory panel will load
From the Locations drop down box select the location you would like to remove a part from
A list of all parts currently assigned to the location will appear
Click the  (edit) button next to the part you would like to remove reorder point information from
- The Inventory Detail panel and Reorder Point panel will load on the screen allowing you to edit reorder information for the part
- On the Reorder Point panel change the target quantity to 0.00

- Then click the
 (edit) button on the Inventory Detail panel
 - Change the Qty On Hand to 0.00 and click the
 (save) button to update the part and remove the reorder point
Reorder Points:
The reorder point is the level of inventory which signals the need to replenish a particular inventory stock. It is a minimum amount of an item which a location should have available in stock. When the stock falls to the reorder points, it will indicate that the item must be reordered.
View/Edit Reorder Points for a Part
To edit reorder points for a location part you will need to perform the following steps:
- From the main menu, navigate to Material and select Locations
- The Locations Inventory panel will load
- From the Locations drop down box select the location you would like to add parts to
- A list of all parts currently assigned to the location will appear
- Click the
 (edit) button next to the part you would like to view/edit reorder point information for
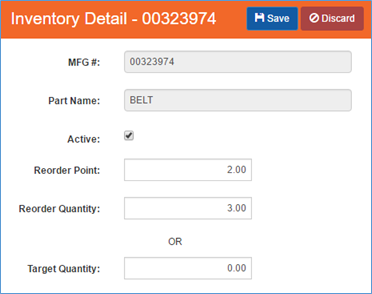
- The Inventory Detail panel will load on the right side of the screen allowing you to view/edit reorder information for the part
Employee – default location
- The Inventory Detail panel will load on the right side of the screen allowing you to view/edit reorder information for the part
Below is a brief explanation of the fields available from the Reorder Points panel:
|
Field |
Functionality |
|---|---|
|
MFG # |
Represents the manufacture number that is associated with the selected part.
|
|
Part Name |
Name that is associated with the inventory item |
|
Reorder Point |
Used in conjunction with Reorder Quantity. Reorder point represents the level of inventory which will trigger an action to replenish a particular inventory item. It is the minimum amount an item can reach before the item must be ordered based off reorder quantity. |
|
Target Quantity |
Represents the quantity you always want to have on hand.
|
To ensure accurate reorder information, you should select one of the following reorder process to follow:
|
Inventory Movement:
To view inventory movement for a part on a location you will need to perform the following steps:
- From the main menu, navigate to Material and select Locations
- The Locations Inventory panel will load
- From the Locations drop down box select the location you would like to add parts to
- A list of all parts currently assigned to the location will appear
- Click the
 (edit inventory quantity)
 - The Inventory Detail panel will load on the left side of the screen allowing you to view information about the part
- On the bottom right side of the screen you will see the Inventory Movement panel

Location - Inventory Movement - From the Inventory Movement section, you can view all inventory movement information related to the location part
Below is a brief explanation of the Inventory Movement (grid)
|
Field |
Functionality |
|---|---|
|
Action |
If the inventory movement involved a WO or a PO, |
|
Date |
Displays date the inventory transfer took place |
|
Employee |
Displays employee who transferred the inventory |
|
Type |
Displays what type of inventory movement took place
|
|
To |
Displays location the inventory item was transferred too |
|
From |
Displays location the inventory item was taken from |
|
Qty |
Displays quantity of inventory item that was moved/changed during inventory movement |
|
Part Name |
Displays part name that is associated with the part |
|
Ticket # |
Displays ticket number from the work order that the part was used on |
|
PO # |
Identifies the PO involved if there was one |
Inventory Transfer Types:
Below is a brief explanation of each type that can be associated with an inventory transfer action
|
Inventory Transfer Type |
Functionality |
|---|---|
|
Location to Location |
Inventory transferred from one location to another location using the Inventory transfer feature |
|
Move to Work Order |
Inventory used on a work order once the work order status is set to ‘Reviewed’ |
|
Physical Inventory Add Inventory |
The part was added through an inventory scan to the location |
|
Physical Inventory Remove Inventory |
Inventory removed from a location through inventory scanning |
|
Physical Inventory Reorder |
Inventory added to location through inventory scanning |
|
Physical Inventory Quantity Adjustment |
The inventory quantity was adjusted through an inventory scan |
|
Receive |
Inventory received to a location from a purchase order |
|
Remove From Work Order |
Inventory removed from work order and placed back on location. This action is performed if a work order status is changed from ‘Reviewed’ back to ‘Tech Completed’ |
|
Manual Qty Adjustment |
Manual change in inventory detail |
|
Copied from Location |
Inventory copied from one location with the same prices and quantity |
|
Import Adjust Qty |
Edited by inventory import |
Change Technician’s Default Location:
In rare cases, it is necessary to change the inventory location that has been associated with a technician. In these cases, you will need to perform the following steps to change a technician’s default location:
- From Administrative > Employees click the
 (edit) button next to the employee whose location assignment you would like to change
 - From the Employee panel, use the drop-down box next to Default Location and select a new location to associate with the employee
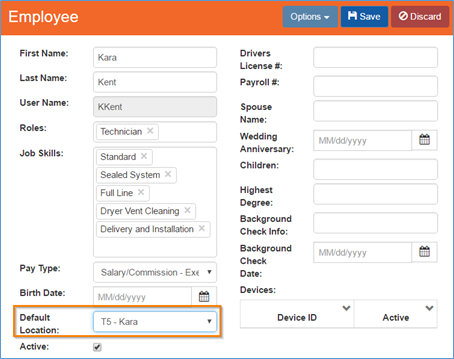
Employee – default location - Once changes have been made to the Default Location, select
 (save) button to update the employee's information
 (Options) menu and then select Address
 (edit WO) and/or
  (edit PO) buttons will be added that will open the associated WO or PO