Overview:
The Physical Inventory Scan allows for scanning and managing your inventory from one area and relies upon the existence of inventory locations in SmartWare
- If you have not created inventory locations in SmartWare you will need to do so before proceeding
- Please reference the Material – Locations document for instructions on how to create and setup inventory locations
This document is intended as an explanation of the Material: Physical Inventory Scan feature in SmartWare and assumes you possess a general knowledge of inventory, locations and inventory processes.
Navigate to Physical Inventory Scan
You can access the Physical Inventory Scan panel by navigating to the following location:
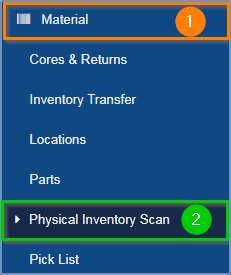
- From the main menu on the left side of the screen, select Material (1) and then Physical Inventory Scan (2)

Main Menu – Physical Inventory Scan
View Physical Inventory Scan List
From the main menu on the left side of the screen, select Material and then Physical Inventory Scan
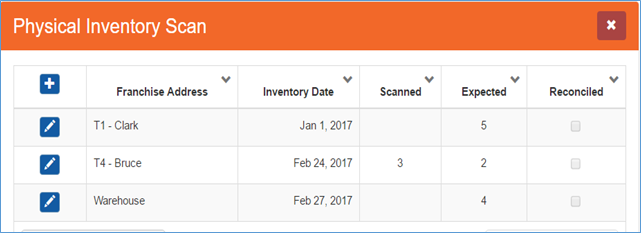
The Physical Inventory Scan panel will load, displaying a list of all existing inventory scans
Physical Inventory Scan – grid
Below is a brief explanation of the available columns from the Physical Inventory Scan (grid):
|
Item |
Functionality |
|
|---|---|---|
 |
(edit button) Will open the physical inventory scan panel for the selected record allowing you to view information about the inventory scan |
|
|
Franchise Address |
Displays Franchise Address (Location) that the inventory scan is for |
|
|
Inventory Date |
Displays the date that was associated with the inventory scan
|
|
|
Scanned |
Displays the number of different inventory items that have been scanned to the inventory scan record
|
|
|
Expected |
Displays the number of different inventory items that SmartWare shows exist on the selected location
|
|
|
Reconciled |
Indicates if the Physical Inventory Scan record has been reconciled with SmartWare
|
|
Create Inventory Scan Record
In order to scan inventory into SmartWare, you must first create an inventory scan record
- From Physical Inventory Scan panel, click the
 (+) button
 - The Physical Inventory Scan (new) panel will load on the right side of the screen

Physical Inventory Scan – New
- Under Location, select the inventory location you will be scanning inventory for
- Under Inventory Date, select the date you are performing the inventory scanning process on. By default, the Inventory Date will display the current date
- Click
 (Start) button in top right to save the new inventory scan record and start scanning
Scan Inventory Items to Inventory Scan Record:
After clicking (Start) button, the Shelf, Quantity, and MFG # fields will become available allowing you to begin scanning in inventory
- Below is a brief explanation of each Inventory Scan option:
- Shelf: When scanning a part, allows you to default the 'Shelf' value for the part based on the value that is entered in the 'Shelf' text box
- Shelf is a free form text box allowing you to customize the names of your shelves. Any part scanned in while information is entered in the 'Shelf' field will automatically have that 'Shelf' value defaulted on the scanned part
- Quantity: When scanning a part, allows you to specify the quantity of the part you are scanning
- Quantity will reset back to 1 after each part is scanned
- MFG #: Allows you to scan or type in the MFG # for the part you would like to include in the Physical Inventory Scan
- Make sure your cursor is clicked inside the MFG # field when scanning
- With your scanner hooked up to the computer, you may begin scanning in inventory items from your inventory location
- Make sure your cursor is clicked inside the MFG # field when scanning
- Shelf: When scanning a part, allows you to default the 'Shelf' value for the part based on the value that is entered in the 'Shelf' text box
- You can either scan each individual inventory item in separately or use the 'Quantity' field to enter the number of parts to include in the scan
- Each scanned inventory item will appear as it's own row on the Physical Inventory Scan
 Physical Inventory Scan – part grid
- Each scanned inventory item will appear as it's own row on the Physical Inventory Scan
- Below is a brief explanation of the Inventory Scan - Part grid
Item
Functionality
MFG Displays the manufacture name associated with the MFG # that was scanned
MFG #
Displays the MFG # that was entered or scanned during the Inventory Scan process
Name
Displays the part name (from Material | Parts) that is associated with the scanned MFG #
Shelf
Display the shelf name that was entered at the time the part was scanned.
- If the same part was scanned to more than one shelf location/name, then each shelf name will appear in the 'Shelf' column separated by a | character
- User may change or remove the 'Shelf' value from a scanned part
 (edit shelf name): Will enable the 'Shelf' field allowing you to edit the shelf name for the specific scanned part
- Clicking the
 (edit shelf name) button will also toggle the buttons next to Shelf to
  (save) button and
  (revert) button
 (Save): Will save any changes made to the 'Shelf' name
 (Revert): Will undo any changes made to the Shelf field and will revert the shelf name back to it's previous value
- Clicking the
 (Delete): Will clear the shelf name for a specific scanned part
Count
Displays the part quantity that was scanned for a specific part
Delete
Allows you to delete or reduce the quantity associated with a scanned part
-
'Delete' column will toggle between
 (X) button &
  (-1) button
 -
 (X): Will only appear if the part count is 1. Clicking the
  (X) button will delete the scanned part from the Physical Inventory Scan.
 -
 (-1): Will appear for parts scanned in with more than 1 quantity. Clicking the
  (-1) button will reduce the scanned part by 1 quantity at a time.
-
- A beep will sound from your computer indicating if scanned inventory item is not found as a part in SmartWare
- If an inventory item does not exist in SmartWare you will need to add it
- Please reference the Material Parts document on how to add new material to SmartWare
- If the scanning process must be done in stages, simple close the Physical Inventory Scanning panel and all inventory you have currently scanned will be saved to the scan record. At any time, you can edit the scanned record and continue the scanning process
Remove Inventory Item From Scan Record:
At any time prior to reconciling an inventory scan record, you can remove an item or adjust the scanned quantity for an item from the list of scanned material
Physical Inventory Scan – edit with scanned parts
- Under the 'Delete' column for the part you would like to remove or adjust scanned quantity for you will see either an
 (X) or
  (-1) button
 -
 (X): Will only appear if the part count is 1. Clicking the
  (X) button will delete the scanned part from the Physical Inventory Scan
 -
 (-1): Will appear for parts scanned in with more than 1 quantity. Clicking the
  (-1) button will reduce the scanned part by 1 quantity at a time
 -
You will need to click the
 (-1) button until you see the correct part count appear. Once the part count reaches 1, the
  (-1) button will change to an
  (X) at which point clicking the
  (X) will remove the part completely from the scan
-
Review & Reconcile Inventory Scan:
Once all items have been scanned into the SmartWare Physical Inventory Scan record you will need to review your pre-processing results to confirm accuracy before accepting and changing inventory quantities in SmartWare
From the Physical Inventory Scan (edit) panel, select  (Review) button
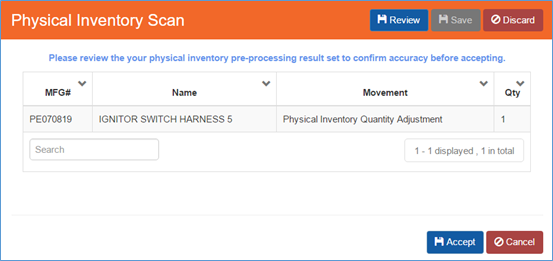
The Physical Inventory Scan (review) panel will load allowing you to review the changes that will be made to the inventory location
Physical Inventory Scan – edit
- SmartWare will compare the existing inventory on the location to the inventory items that were scanned into the Inventory Scan record
- Any inventory items or quantities that do not match between the SmartWare location and scanned inventory will appear on the screen for you to review
The Physical Inventory Scan review grid will appear displaying a list of all inventory items that will be adjusted based on the scanned inventory comparison
- Make sure that you review all items and are comfortable with the changes that will take place
- Once you have confirmed the accuracy of the scanned items, click
 (Accept) button
- Once you have accepted a scan, the inventory scan record will be marked as Reconciled and the following will happen in SmartWare:
- The scan record will be locked and no additional changes may be made
- Location selected on the inventory scan will be updated to reflect the scanned inventory, reducing or adding inventory quantities where needed
- Accepting a Physical Inventory Scan will update the Location Part 'Shelf' field to reflect the 'Shelf' information entered for the part during the scanning process
- Once you have accepted a scan, the inventory scan record will be marked as Reconciled and the following will happen in SmartWare:
Below is a brief explanation of the review grid:
|
Item |
Functionality |
|
|---|---|---|
|
MFG # |
Displays the manufacture number that is associated with the part |
|
|
Name |
Display the name that is associated with the part |
|
|
Movement |
Type of inventory movement record that will be created to adjust the inventory quantity on the location |
|
|
QTY |
Quantity the location inventory record will be adjusted by
|
|